Posted on 1 Comment

Spring Decor Wood Burning Project

TRUArt Spring decor

I’d have to say that Spring is one of my favorite seasons that just warrants a complementing Spring Decor. Baby birds are chirping, fragrant and colorful flowers are blooming, and butterflies are gracefully fluttering about. Everywhere you look, it is bursting with life. When thinking of Spring, naturally, thoughts of cute little rabbits come to mind. I wanted to create a cute design that displays a traditional representation of spring. In this piece, you will combine some simple shading techniques as well as applying multiple colors to your design.

Spring Decor Supplies:

Wire-nib pyrography pen or solid-point pyrography pen
• 10in x 0.13in (254 mm x 3.302 mm) diameter plywood circle
• Colored ballpoint pen for tracing
• Scissors
• Scotch tape
• Measuring tape or ruler
Graphite paper for tracing
• Sponge
• Melamine foam eraser (magic eraser)
• Colored pencils (dark brown, light brown, pink, black, white)
• Stain (optional)
• Spray sealant (ex. polyurethane)
• Old rag for staining

Pyrography Instructions

STEP 1:

Your pyrography pen needs to be set at a low to medium-low heat. The letters on this sign are rather thin so you will need to be aware of your pen settings and you need to be careful with the amount of pressure applied to your pyrography pen while burning. Be sure your letters are not burned at such a low temperature that the burn marks appear to be faint. When you reach the larger words, you can slowly increase your heat and/or pressure as needed.

TIP:

Remember, sometimes it is easier to burn the outline of your letters first and then go back to fill in the empty space. This helps you stay within the parameters of your image and minimizes any stray marks. When you are burning your letters, if you come across any gaps where you should have a solid burning, go back to fill those gaps in at a very low heat so that you don’t burn outside the lines.


STEP 2:

Let’s hop to it! It’s time to burn our image of the rabbit. Start off by tracing the outline. You want your outline to be burned in medium thickness. The purpose of the medium thickness is to have the outline dark enough for the image to stand out if you were to stain your sign.

STEP 3:

It’s now time to work on the rabbit’s ear. You will notice the inside of the ear has a “Y” shape pattern. Burn the stem of the “Y” and at the tip of the crevice – start a dark burn. As you work your way up the ear, slowly decrease your temperature to create a lighter, softer burn. As you burn softer, you should not apply much pressure to your pyrography pen. Repeat the same process on the opposite side.

STEP 4:

Start burning the marks and lines that indicate fur patterns within the rabbit design. Darken the area around the rabbit’s nose and darken the eyes.

STEP 5:

Now it’s time to stain your wood. Be sure to cover the surface completely. Since your image has some fine lines, be cautious not to add too much stain or your image will not be easily visible.

Tip:

If you do not wish to stain your wood you can go ahead and color your design. Once your design is colored, I recommend using a spray sealant to protect your image once completed. You can go ahead and color your design first and then stain your wood if you prefer, but it will leave your image looking dull and minimizes the details in the drawing.

STEP 6:

Take out your box of colored pencils. You will need a dark brown, light brown, black, white and pink. Start by taking your dark brown colored pencil and tracing the outline of the rabbit. Continue to add the dark brown colored pencil to the fur lines and marks within the image of the rabbit.

STEP 7:

Color the rabbit softly with the light brown. Do not color the inside of the ears brown. Leave that area untouched for now. Once the light brown has been applied to the rabbit’s fur, take your white colored pencil and softly blend it into the light brown areas. This blends the colored area more evenly and softens any harsh lines. Never use a lot of pressure when coloring. You do not want hard scratch lines that are hard to smooth out.

STEP 8:

Add a light pink to the nose and ears. Again, burn lightly and add white to smooth and soften the colors.

STEP 9:

Take a black colored pencil and color in the eyes and outline the nose and mouth. If you need to enhance your image, you can go back over the design and retrace your image using the black or dark brown colored pencil.

STEP 10:

Once your rabbit is complete, spray sealant over everything and allow it to dry. This protects everything.

Every bunny will love the finished product.

If you have any questions, suggestions or anything you would like to comment on, please do so in the comment section below and I’ll get right back to you as soon as possible.

See you next time,
Andrea Pate
Pate’s Pyrography

Posted on Leave a comment

Halloween Skull Wood Burning Design

Halloween skull

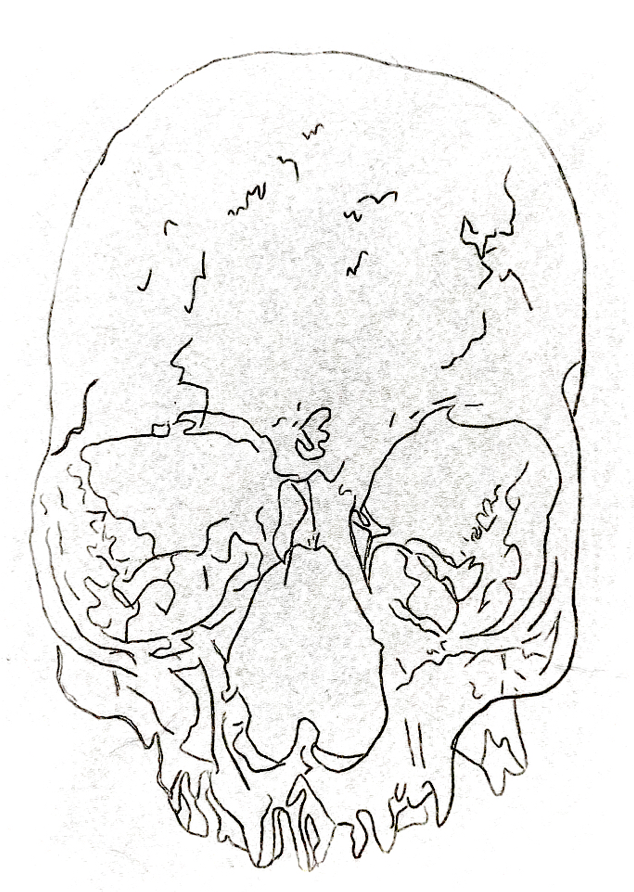
One of my favorite images to burn is the Halloween skull. I love the way the burned marks give the skull image an aged and tarnished look. I also love the look of the various tonal values that you apply to the skull to give depth and dimension to your burning. In this tutorial, I will also provide you with a template that you can use to create your very own skull.

Let’s get started!

You will need:

  • Halloween skull template (found at the end of this article)
  • TRUArt pen
  • Carbon paper
  • Ballpoint pen
  • Magic eraser
  • Tape
  • Fine-sanded wood


Step 1:

Take your wood, template, carbon paper, pen and tape. Tape your paper to your wood and begin the tracing process. For instructions on how to complete this process, please refer to my previous post here.

Step 2:

Once everything has been transferred, start your shading process. I started in the nasal cavity. Be aware of where light will hit and cast shadows. I started working on the darker end and slowly lightened my shading as I moved up. This is not an easy skill to master. For shading tips, please view my shading tutorial here.


Step 3:

Once I completed the shading in the nasal region, I began the same process in the eye sockets of me Halloween skull. The template should be used as a guide to indicate where areas should be darkened. Don’t worry about your tracing being visible through the shading, you can remove those lines once your image has been completely burned.


Step 4:

Start shading around the jawline. Remember to burn in a light tone here. We do not want our darker tones to blend with the lighter. We need to decipher what parts of the image are further away than the rest or what area has more depth. The shading around the skull is only meant to indicate where the shadows lie.


Step 5:

Begin working your way up the skull. Notice the crack lines on the template. At a lower heat, trace the lines to show cracks on the skull. Be sure your heat is not too high or you will create splotches instead of crack lines. You can always increase your temperature if needed. Add more lines if you wish.


Step 6:

When outlining the skull, the shading should be a darker value around the top portion of the head. You still don’t want this to be a dark shade, just a tonal shade darker than the bottom of the skull. Slowly fill in the center of the skull with a lighter value as you go inward.


Step 7:

Once you have completely burnt your skull image, start burning the background. This is an extremely time consuming process. You will also need to use high heat so this step must be done with caution. An alternate option would be to use paint to fill in the blank space or just leave it untouched. I personally love the look of the background burned. If you choose to do this, start on one spot and work your way down keeping your strokes as uniform as possible. This prevents an uneven burn and makes the completed piece look more polished.

Now that your burning is complete, take a dampened magic eraser and erase the lines that are visible from your tracing.

I hope you have fun burning a skull of your own. Remember, this takes time and practice. You stick with this and it will get easier every time you try. I hope everyone has a safe and Happy Halloween.


See you next time,
Andrea Pate
Pate’s Pyrography


Template


Posted on 1 Comment

Christmas Wood Burning Stencils

Christmas is literally just around the corner now and what better way to spruce up your decorations with little pyrographed projects with your TRUArt pens? With free stencils of course!

Inspired by Andrea’s latest article, “Holiday Gifts”, I’ve collected some images across the web to help you all out. These were picked especially for their simplicity. and elegance – where a single picture conveys an unmistakable message of Christmas.  It would be pretty tough to start burning big Christmas-themed projects at this point in time. Then I thought instead of going through the agony of waiting for that day to come, why not get the whole family involved in burning little decors to hang around the house and on the Christmas tree?

What’s more, these would be a perfect fit for those scrap pieces of wood lying about. You could create discs from small branches or others. Perhaps use that old scrap rectangular plywood in the basement as a warm greeting board or a little signage greeting everyone who sees it somewhere within the house.

Whatever the case, the important thing is that the whole family gets in on it – sharing the Christmas spirit as it were.


So hurry and click on the PDF files below and download your stencil. If you need help on transferring images to your work, check out Andrea’s guide.

  1. Angel
  2. Bare Christmas tree
  3. Bells
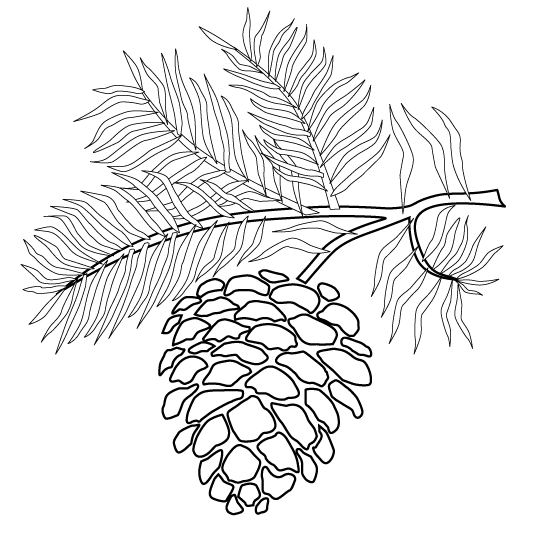
  4. Conifer cone
  5. Christmas quote
  6. Christmas quote 2
  7. Christmas quote 3
  8. Reindeer
  9. Reindeer 1
  10. Santa
  11. Santa 2
  12. Snowflake

Have a great Holiday Season everyone!


Posted on 1 Comment

Cactus Stencil Wood Burning with TRUArt Carbon Paper


What you will need:


Sometimes, in pyrography, trying to find the right image to burn can be extremely tricky.  When you are an artist, copyright laws can make it challenging to find a great image to burn.  Fortunately, now TRUArt has FREE printable stencils available.  Once I came across these stencils, I couldn’t wait to get started.

There are several unique designs available to download but, ultimately, I decided on this cactus stencil.  This stencil is available under the clock category.  I loved the pattern so much that I modified the stencil to make it my own and decided not to trace the numbers.

I found this stencil to be a quick and easy burn. This is a great project to do with your family.  My children had fun picking out the colors of the various pots and helped me find the right shade of green for each plant.  We spent the day going over different stencils and both my children found something that appealed to each of them.

Once the image was burned and colored, I decided to give the background a nice, thick solid burn.  This technique gave my burning some depth and made my image pop.


I was extremely happy with the ending result.  This was a fantastic family project that is exciting for children to do. These prints are also a useful tool to help you practice your pyrography skills. My children loved working with these stencils and they are both excited about working on our next burning together.


See you next time,
Andrea Pate
Pate’s Pyrography

Posted on 5 Comments

“Welcome Home” Woodburning Tutorial

If you are looking for a way to create a very beautiful and professional looking wood burning, I have some tips to assist you along the way.

What you will need:

  1. TRUArt pyrography pen
  2. Wood of your choice
  3. Colored ballpoint pen
  4. Carbon tracing paper
  5. Tape
  6. Image/design to burn
  7. Magic eraser
  8. Sand paper
  9. Stain
  10. Varnish


Take the time to find the right image to burn.  Make sure the size of the image works well with the piece of wood you choose.  Be mindful of the type of wood you choose.  Try sticking to a softwood such as birch wood, basswood or even simple plywood.  Sand your wood surface down prior to use to ensure that the image you use will burn evenly.  Do not burn on treated or painted wood as fumes inhaled from these can be harmful to your health.


Get some tape, carbon paper, and a colored pen.  Find the center of your wood and place your image on the desired location.  Tape the top of your image onto the wood to prevent it from shifting.  Slide the carbon paper underneath your image (glossy side down). Take out your pen and trace the image.  I like using a pen because I feel like I don’t have to add as much pressure while I’m tracing the image.  It is useful to use a colored pen so that you can see the area that was already traced.


Once the image has been completely transferred, gently lift the bottom portion of the design to ensure that you have traced the whole image onto the wood. If so, remove the paper.  When burning the image, start at a lower heat and slowly increase the temperature as needed.  If you start too hot, you will get an uneven burn and possible burn marks outside your design.

Do not press down hard while burning. If you feel the need to push down hard on the wood with the pen in order to get the desired darkness/shade, your temperature is too low and needs to be increased.

Once you have completed the burning, you may have some marks left on your wood from where you traced your design.  These markings can’t simply be erased with a regular eraser. Get a magic eraser.  Add only a little water to the eraser and gently rub in a circular motion evenly across the wood.  If it’s not done evenly, you will have splotchy marks on your wood when you stain.  When that happens, simply sand the wood down on those areas. Rubbing too hard may cause smearing of the image.  Gently rub the eraser on the smudges until they’re gone and let the wood dry completely.

To give the wood a finished look, add a little stain on it.  Be sure not to add too much stain or too dark of a stain or the image will fade into the wood. To protect the image from darkening over time, varnish the wood with polyurethane or resin.

Now, all you have to do is enjoy all your hard work.  Keep practicing and be patient with yourself.  Hang in there, you’ll get it.

I wish you the best of luck and I will see next time with some more tips to help you along the way.

If you have any questions regarding the whole process, please leave them in the comments below and I’ll get to them as soon as possible.


Andrea

Pate’s Pyrography


Posted on Leave a comment

Create Your Very Own Carbon Transfer Paper

One major problem all commercial carbon transfer paper have is that its not easy to get rid of the accidental lines and smears made during transfers. If all those lines are going to be covered by your pyrography pen, that’s all well and good. But what if they don’t get covered with your design?


The best way to get rid of them would be to sand off the affected area. Naturally, the darker the lines, the more sanding is needed. Furthermore, you can’t just sand that affected area if you want your whole work piece to be level. You would need to sand everything down.


We don’t understand why transfers made from commercial carbon transfer paper cannot be erased by a simple rubber eraser. However, we have found an alternative that works quite well and is completely erasable – not to mention reusable too. Think of the savings! You probably already have all the materials in your house right now too so this is going to be an easy few minutes of a little elbow grease.


Check out the short video clip below, see if it works for you or not and share your experience with all of us through the comments below.


All the best,
Pavel Karoukin
hello@truart.co