

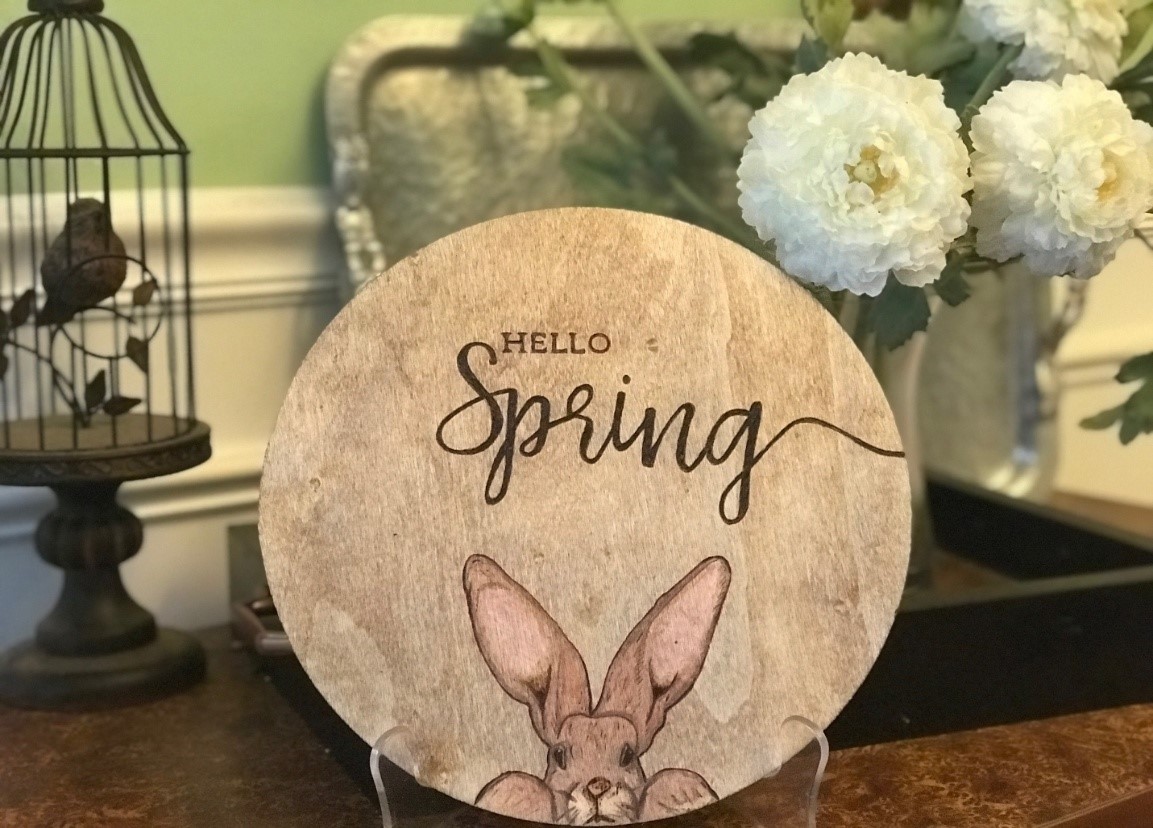
I’d have to say that Spring is one of my favorite seasons that just warrants a complementing Spring Decor. Baby birds are chirping, fragrant and colorful flowers are blooming, and butterflies are gracefully fluttering about. Everywhere you look, it is bursting with life. When thinking of Spring, naturally, thoughts of cute little rabbits come to mind. I wanted to create a cute design that displays a traditional representation of spring. In this piece, you will combine some simple shading techniques as well as applying multiple colors to your design.

• Wire-nib pyrography pen or solid-point pyrography pen
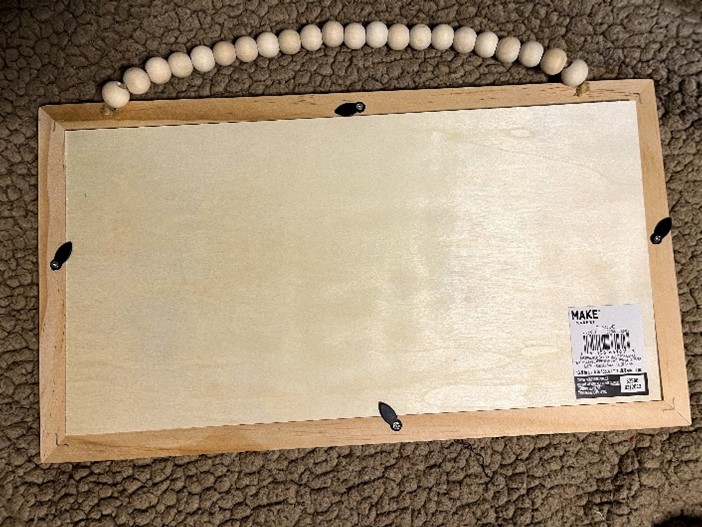
• 10in x 0.13in (254 mm x 3.302 mm) diameter plywood circle
• Colored ballpoint pen for tracing
• Scissors
• Scotch tape
• Measuring tape or ruler
• Graphite paper for tracing
• Sponge
• Melamine foam eraser (magic eraser)
• Colored pencils (dark brown, light brown, pink, black, white)
• Stain (optional)
• Spray sealant (ex. polyurethane)
• Old rag for staining
Your pyrography pen needs to be set at a low to medium-low heat. The letters on this sign are rather thin so you will need to be aware of your pen settings and you need to be careful with the amount of pressure applied to your pyrography pen while burning. Be sure your letters are not burned at such a low temperature that the burn marks appear to be faint. When you reach the larger words, you can slowly increase your heat and/or pressure as needed.
Remember, sometimes it is easier to burn the outline of your letters first and then go back to fill in the empty space. This helps you stay within the parameters of your image and minimizes any stray marks. When you are burning your letters, if you come across any gaps where you should have a solid burning, go back to fill those gaps in at a very low heat so that you don’t burn outside the lines.
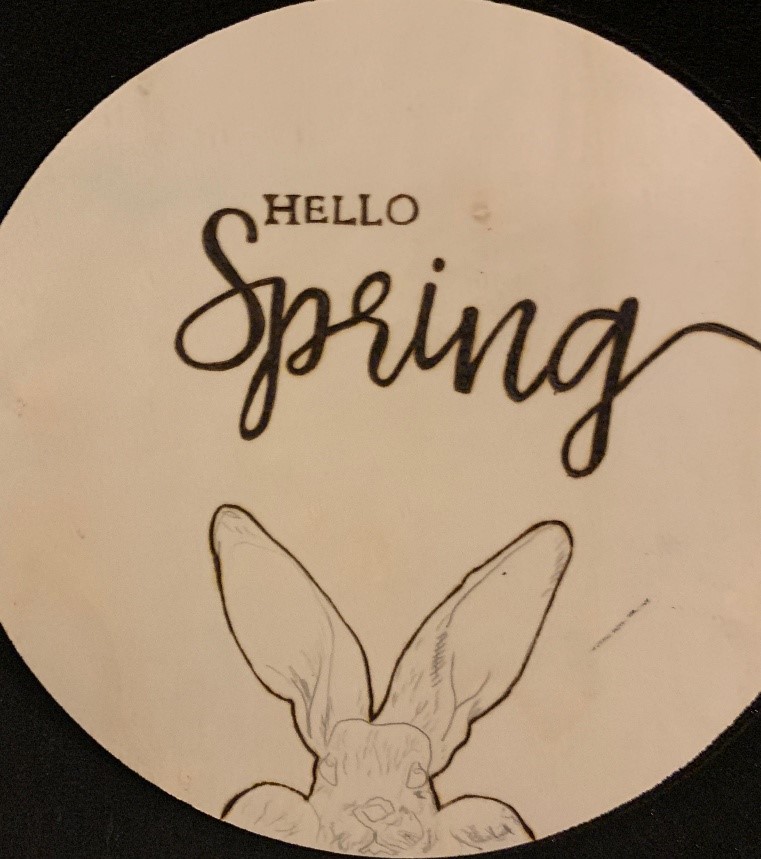
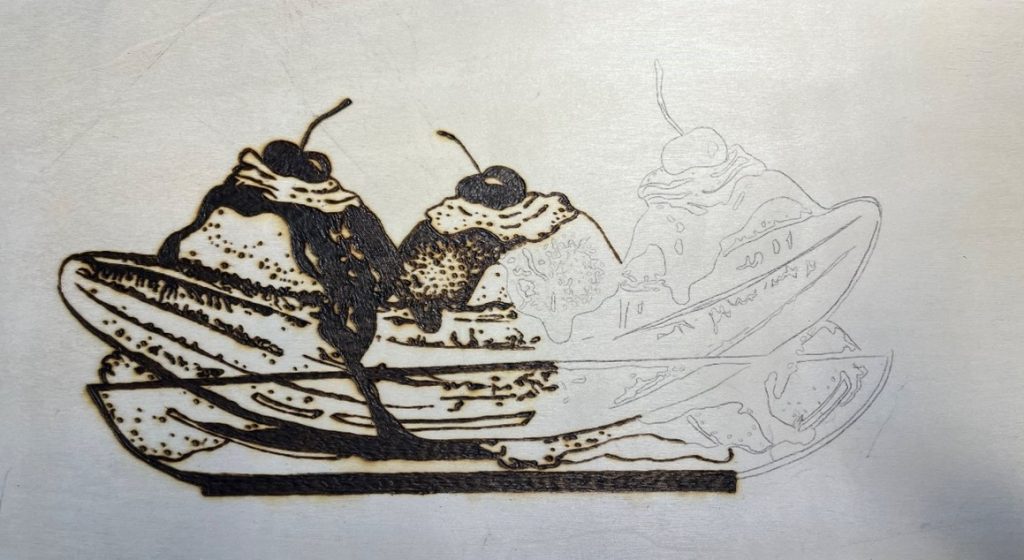
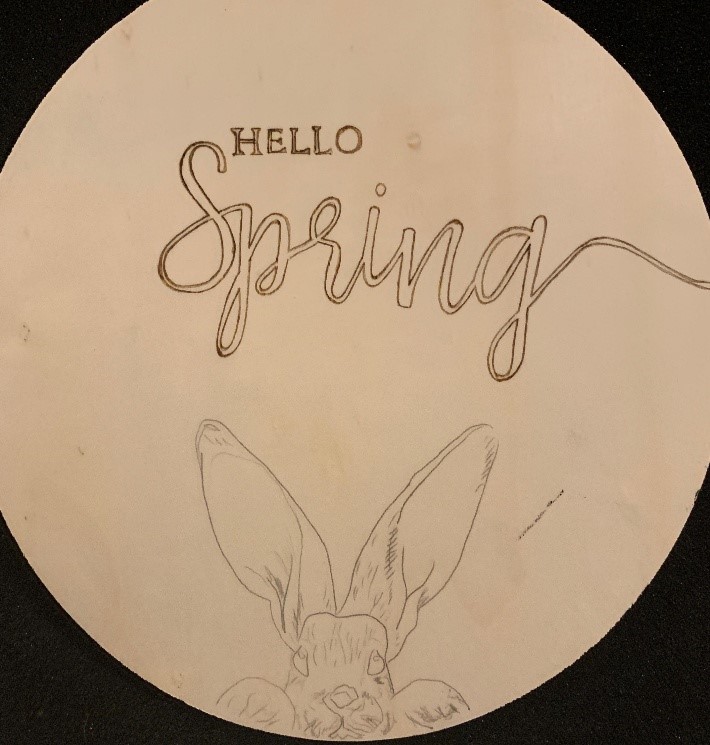
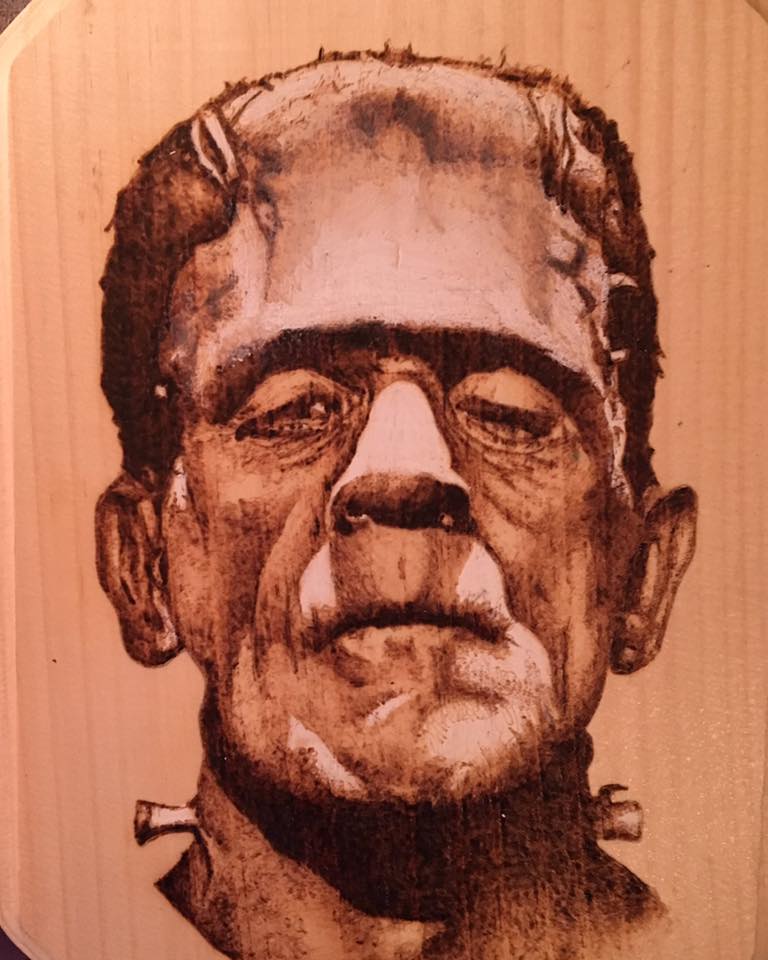
Let’s hop to it! It’s time to burn our image of the rabbit. Start off by tracing the outline. You want your outline to be burned in medium thickness. The purpose of the medium thickness is to have the outline dark enough for the image to stand out if you were to stain your sign.
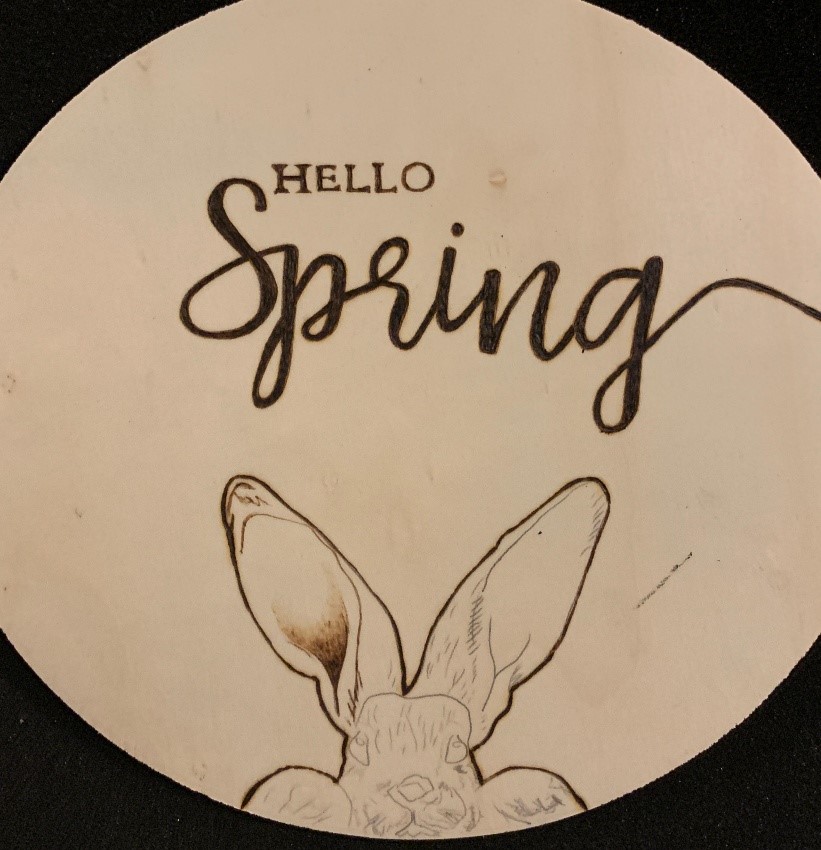
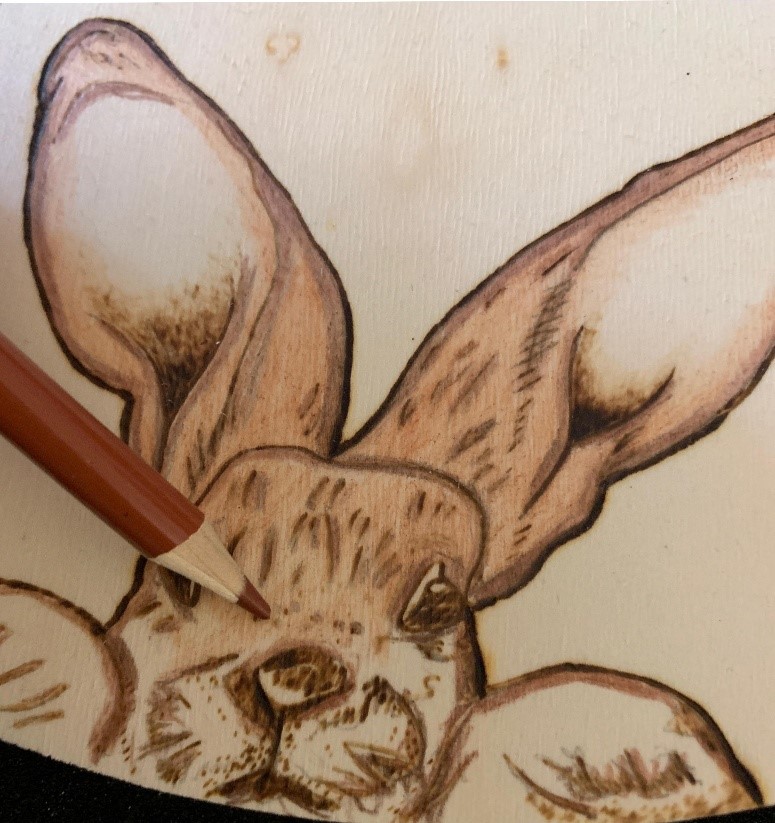
It’s now time to work on the rabbit’s ear. You will notice the inside of the ear has a “Y” shape pattern. Burn the stem of the “Y” and at the tip of the crevice – start a dark burn. As you work your way up the ear, slowly decrease your temperature to create a lighter, softer burn. As you burn softer, you should not apply much pressure to your pyrography pen. Repeat the same process on the opposite side.
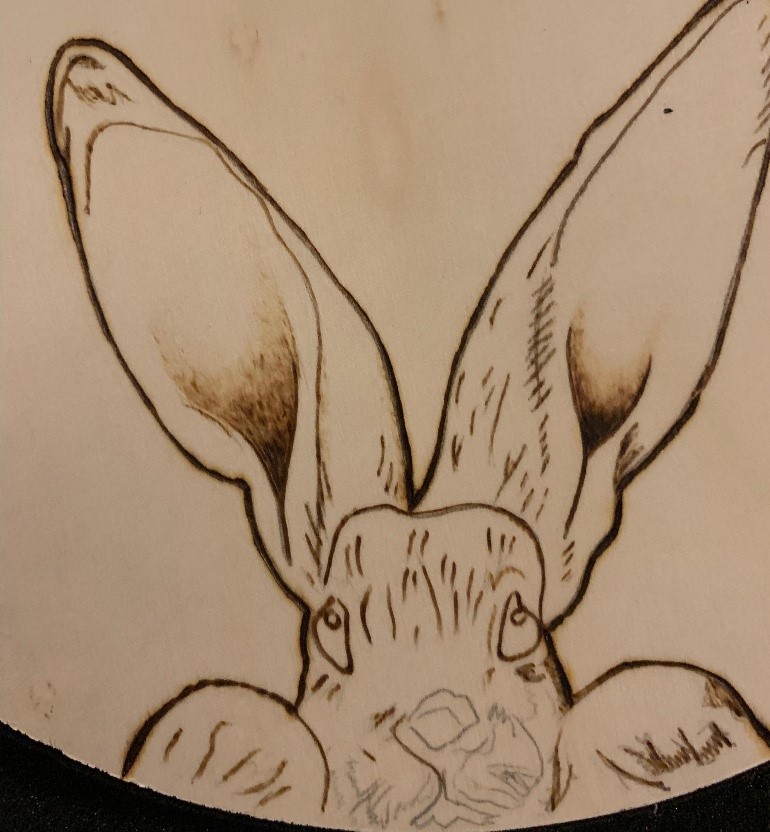
Start burning the marks and lines that indicate fur patterns within the rabbit design. Darken the area around the rabbit’s nose and darken the eyes.
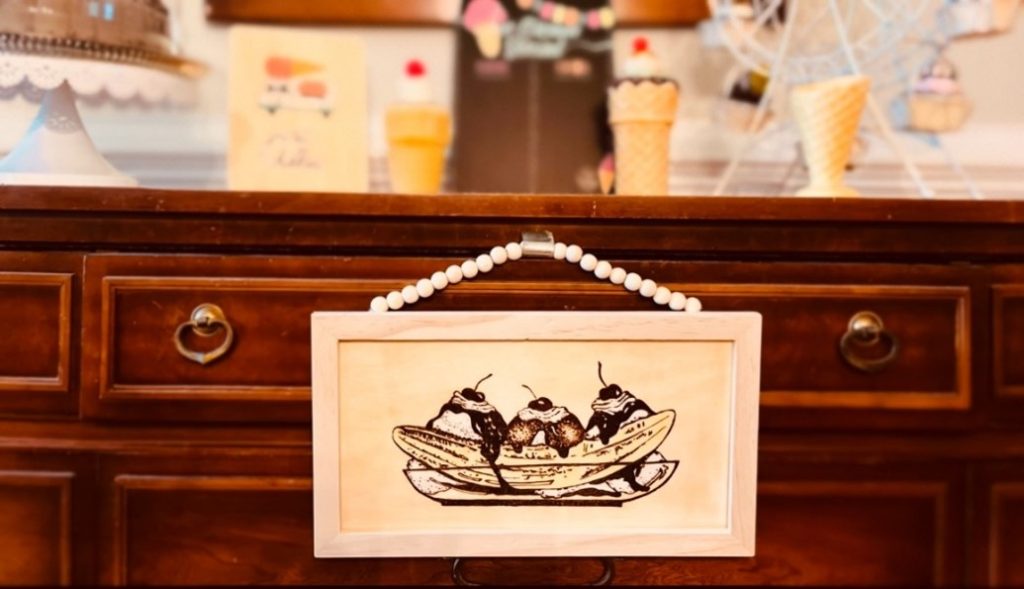
Now it’s time to stain your wood. Be sure to cover the surface completely. Since your image has some fine lines, be cautious not to add too much stain or your image will not be easily visible.
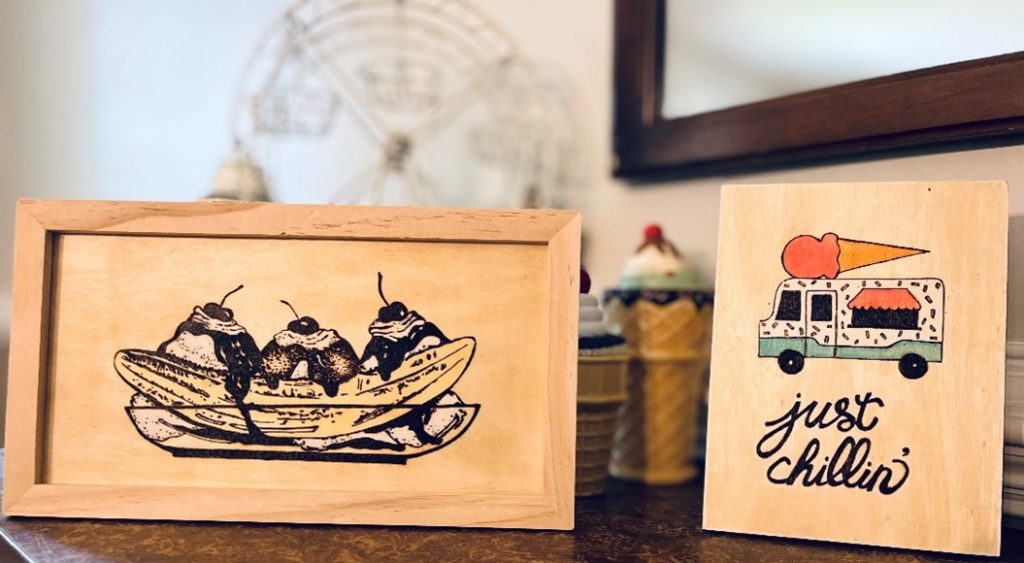
If you do not wish to stain your wood you can go ahead and color your design. Once your design is colored, I recommend using a spray sealant to protect your image once completed. You can go ahead and color your design first and then stain your wood if you prefer, but it will leave your image looking dull and minimizes the details in the drawing.
Take out your box of colored pencils. You will need a dark brown, light brown, black, white and pink. Start by taking your dark brown colored pencil and tracing the outline of the rabbit. Continue to add the dark brown colored pencil to the fur lines and marks within the image of the rabbit.
Color the rabbit softly with the light brown. Do not color the inside of the ears brown. Leave that area untouched for now. Once the light brown has been applied to the rabbit’s fur, take your white colored pencil and softly blend it into the light brown areas. This blends the colored area more evenly and softens any harsh lines. Never use a lot of pressure when coloring. You do not want hard scratch lines that are hard to smooth out.
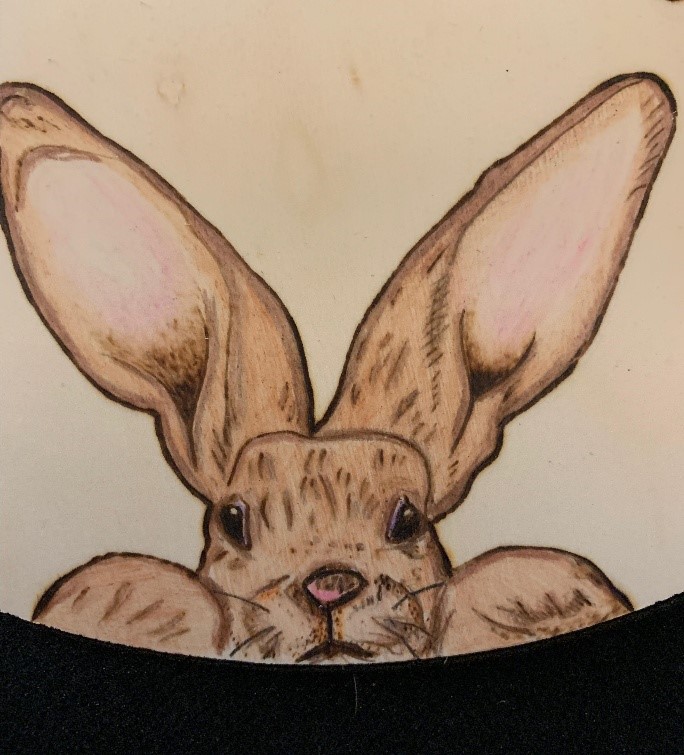
Add a light pink to the nose and ears. Again, burn lightly and add white to smooth and soften the colors.
Take a black colored pencil and color in the eyes and outline the nose and mouth. If you need to enhance your image, you can go back over the design and retrace your image using the black or dark brown colored pencil.
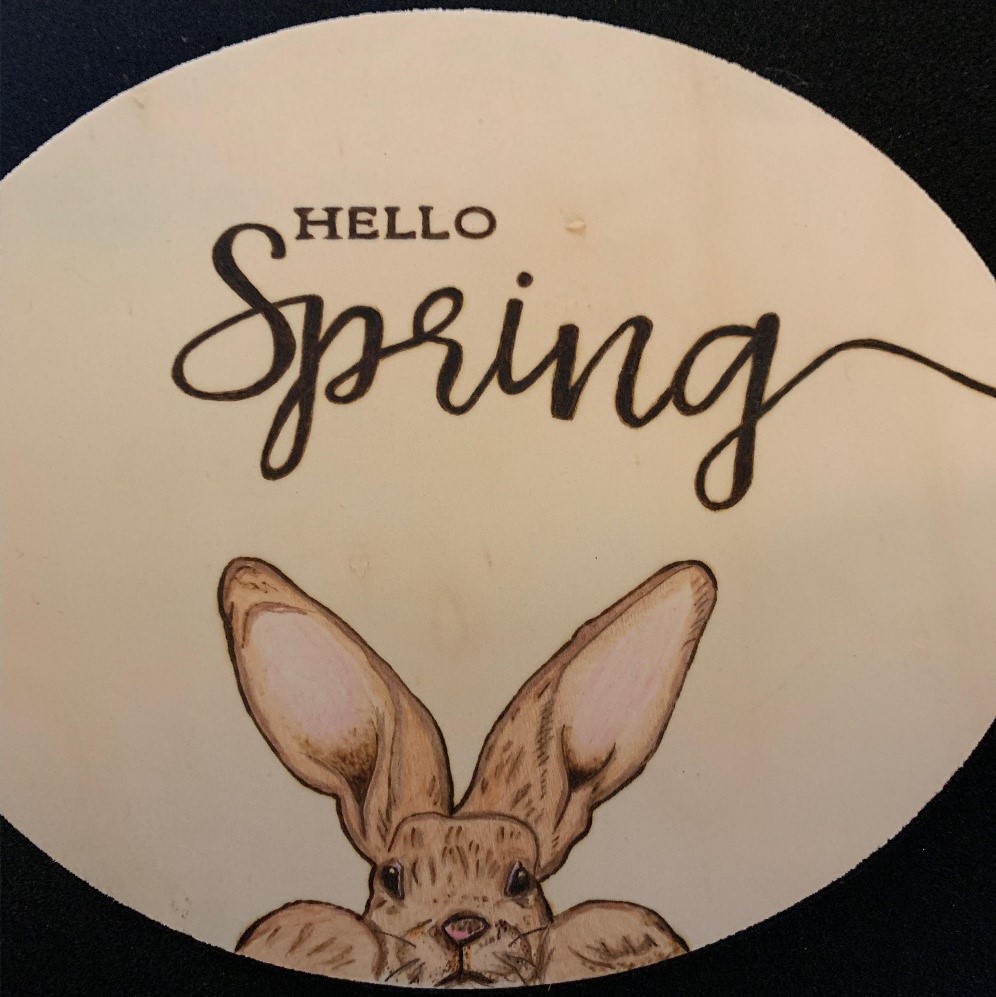
Once your rabbit is complete, spray sealant over everything and allow it to dry. This protects everything.
Every bunny will love the finished product.
If you have any questions, suggestions or anything you would like to comment on, please do so in the comment section below and I’ll get right back to you as soon as possible.
See you next time,
Andrea Pate
Pate’s Pyrography
I look forward to Fall every year. The cooler weather, the amazing aroma of spices, cinnamon and apple pie stir in the air and of course, all the decorations.
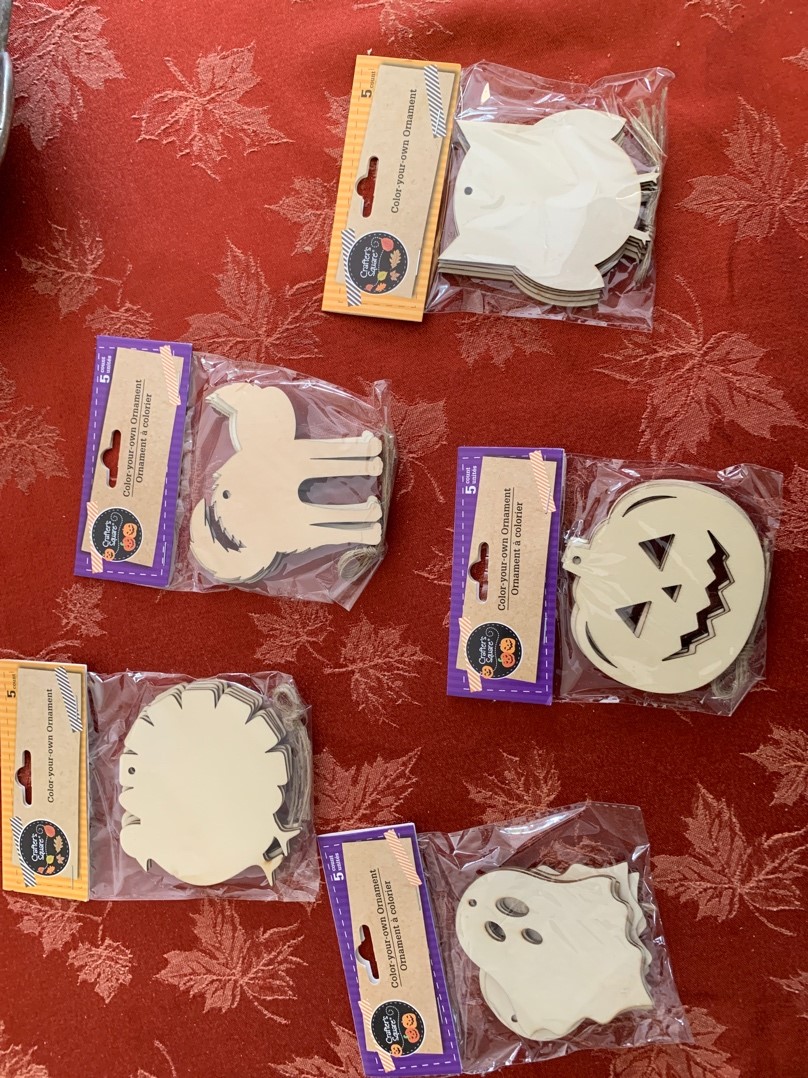
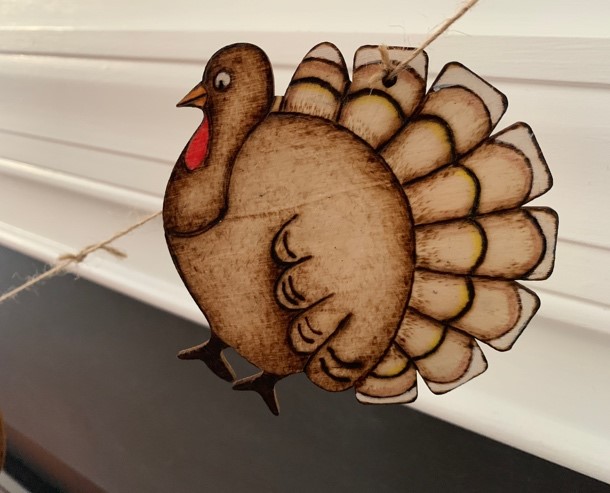
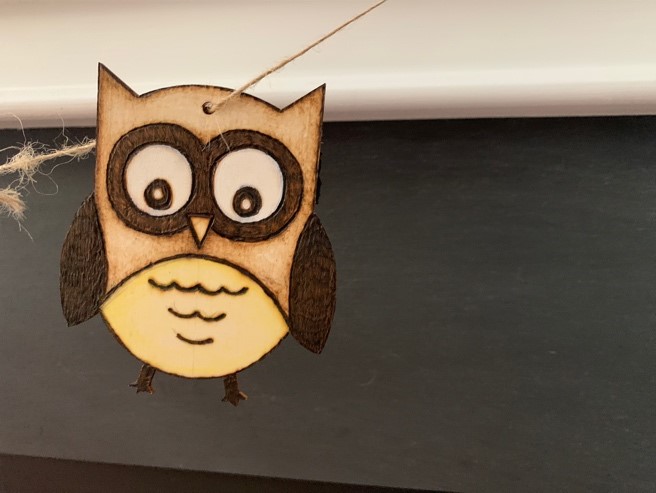
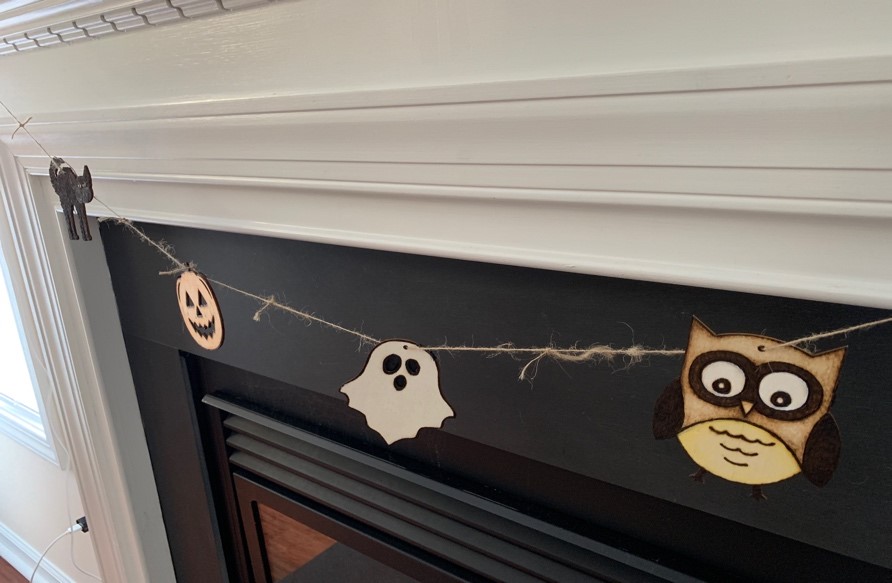
This Fall season, I wanted to find an affordable and easy project to create for my home. I went to my local dollar store and found these adorable plywood cutouts. Each package comes with five cutouts so you can easily create a garland for just a dollar if you wanted to. I wanted multiple designs so I bought five packages. Some universal designs can be found here.
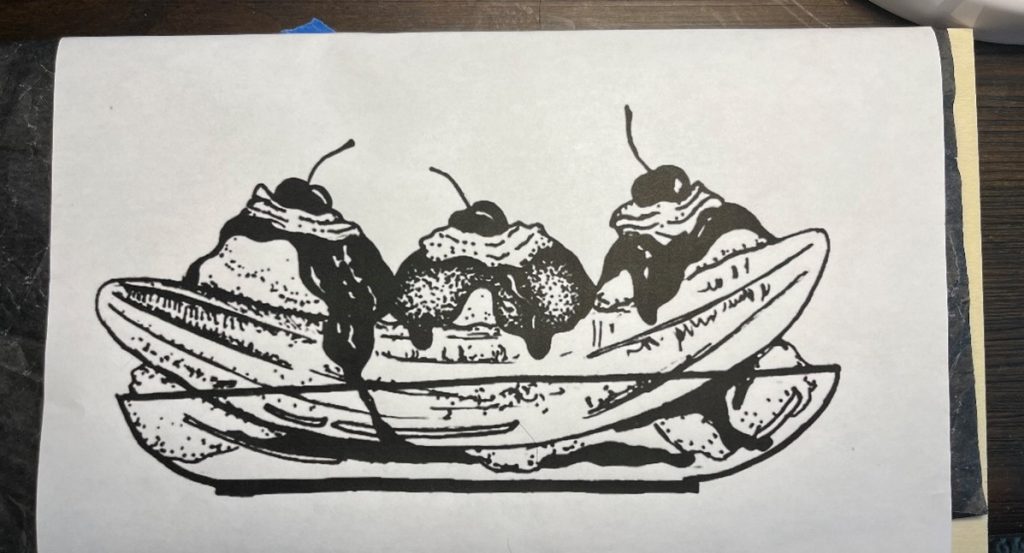
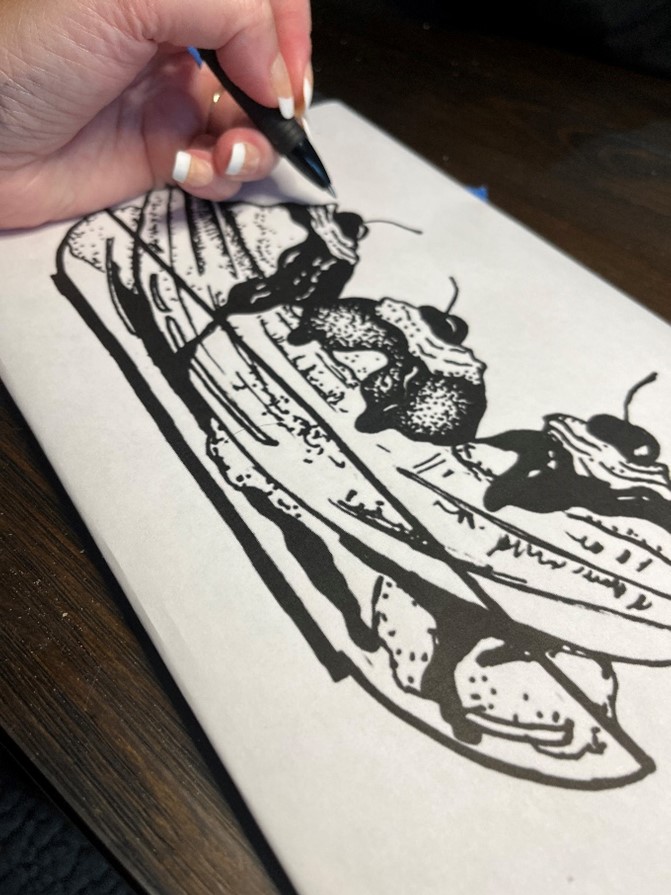
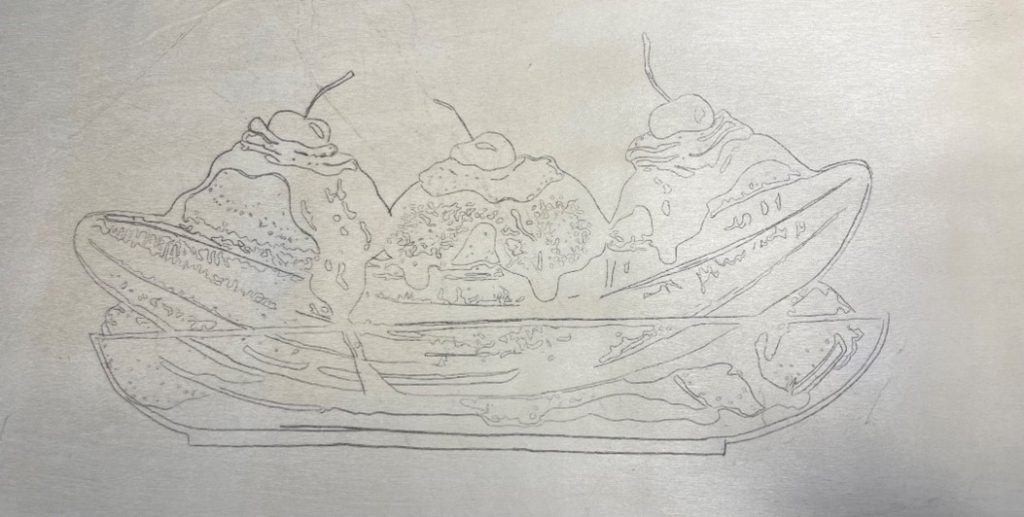
Once I opened my package, I looked up clip art patterns online to give me an idea of how I wanted to sketch out my design.
 |
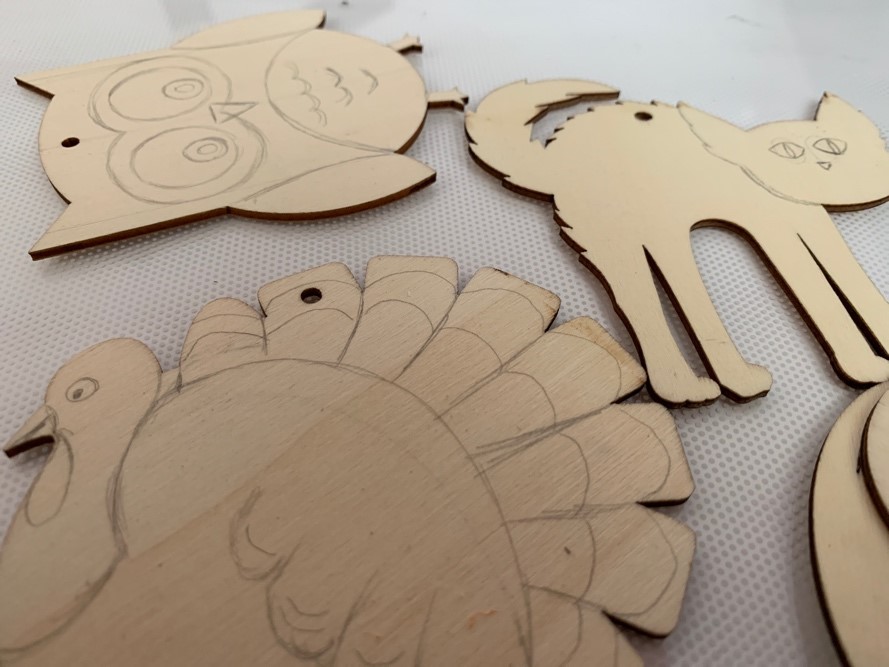 |
With my patterns picked and sketched on, I started the burning process. I started with a thick bold burn outlining the outermost part of the wood and continued with a solid burn while tracing my pattern.
 |
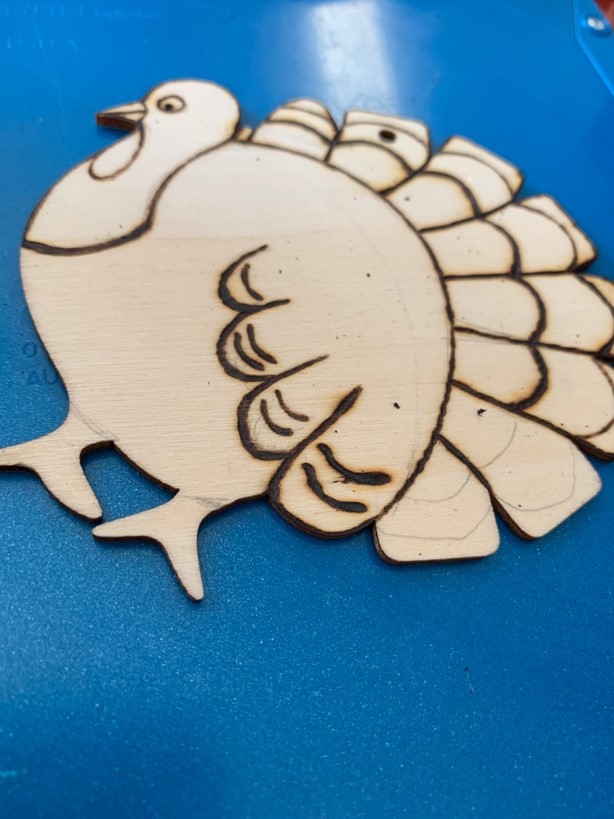 |
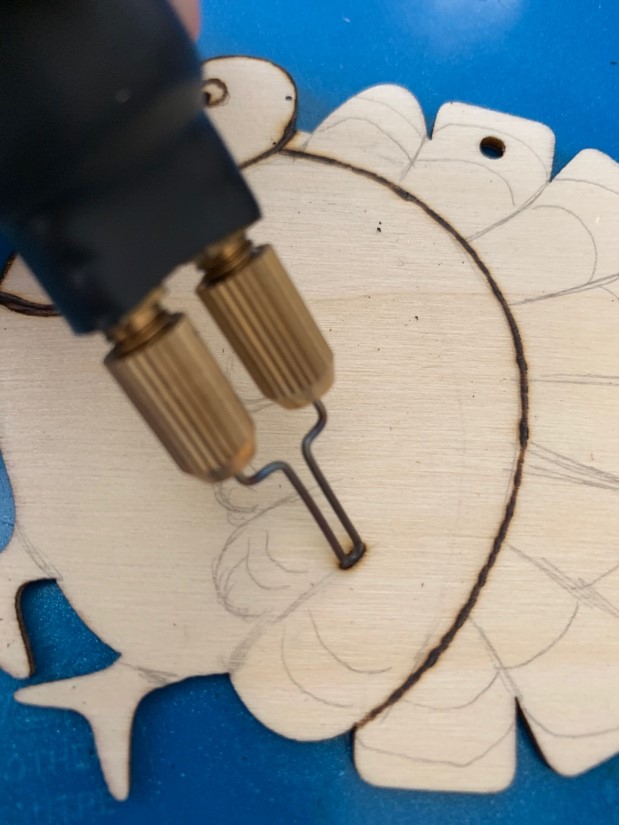
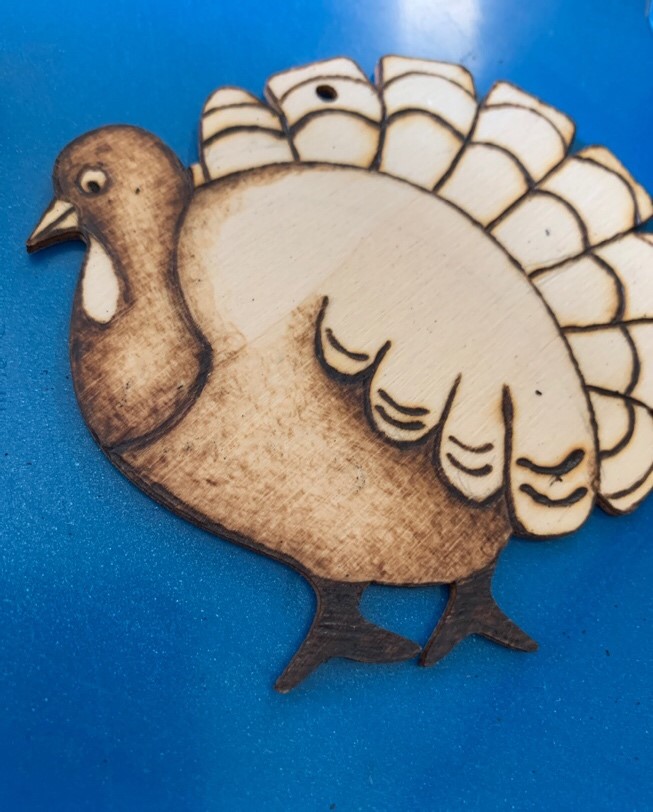
With the patterns completed, I began the shading process (please see previous post for shading instructions). If this technique is too difficult, you can always fill in the empty space with colored pencils.
 |
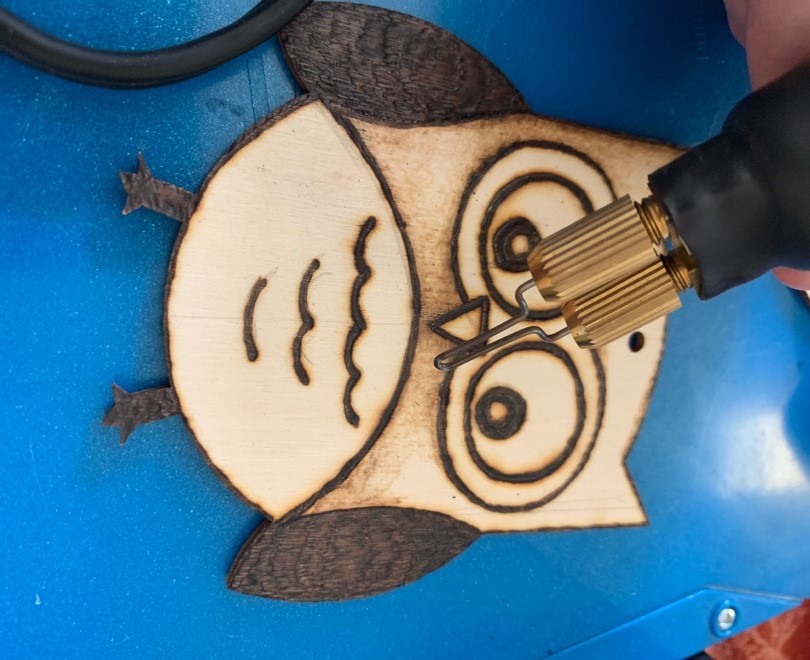 |
For the areas needing white, I used a white paint-based marker. The paint markers work great since they don’t tend to bleed when applied to the wood. I tried to keep my colors soft so I added touches of color with colored pencils to enhance each character.
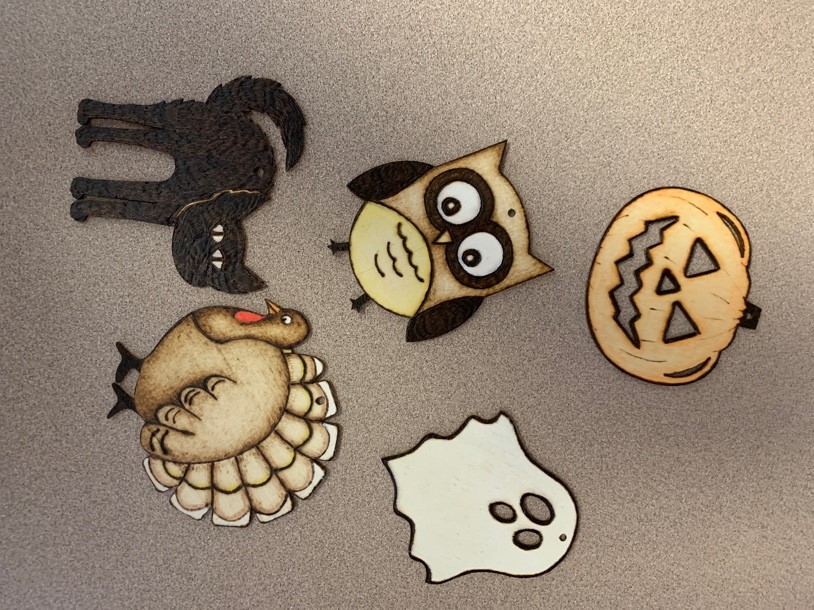
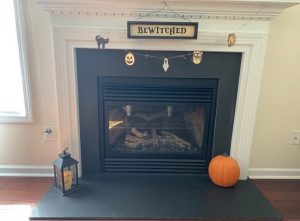
Once my cutouts were completed, I tied a string through small holes and displayed the garland over the fireplace. As an alternate choice, you can also tie a piece of string on the wood and use them for tags, gifts, or to wrap around a napkin for a cute Fall tablescape.
 |
 |
 |
 |

I hope this has given you some fun and very affordable wood burning ideas. This is going to be even greater when you get everyone involved in it. Ask your kids what they would like to work on and watch their imaginations fly! This is one the best times of the year to take your pyrography pen out. Start creating fun and amazing décor with everyone!
If you have any questions or would like to suggest other ideas, leave a comment below and I’ll get right back to you.
See you next time.
Andrea Pate
Pate’s Pyrography
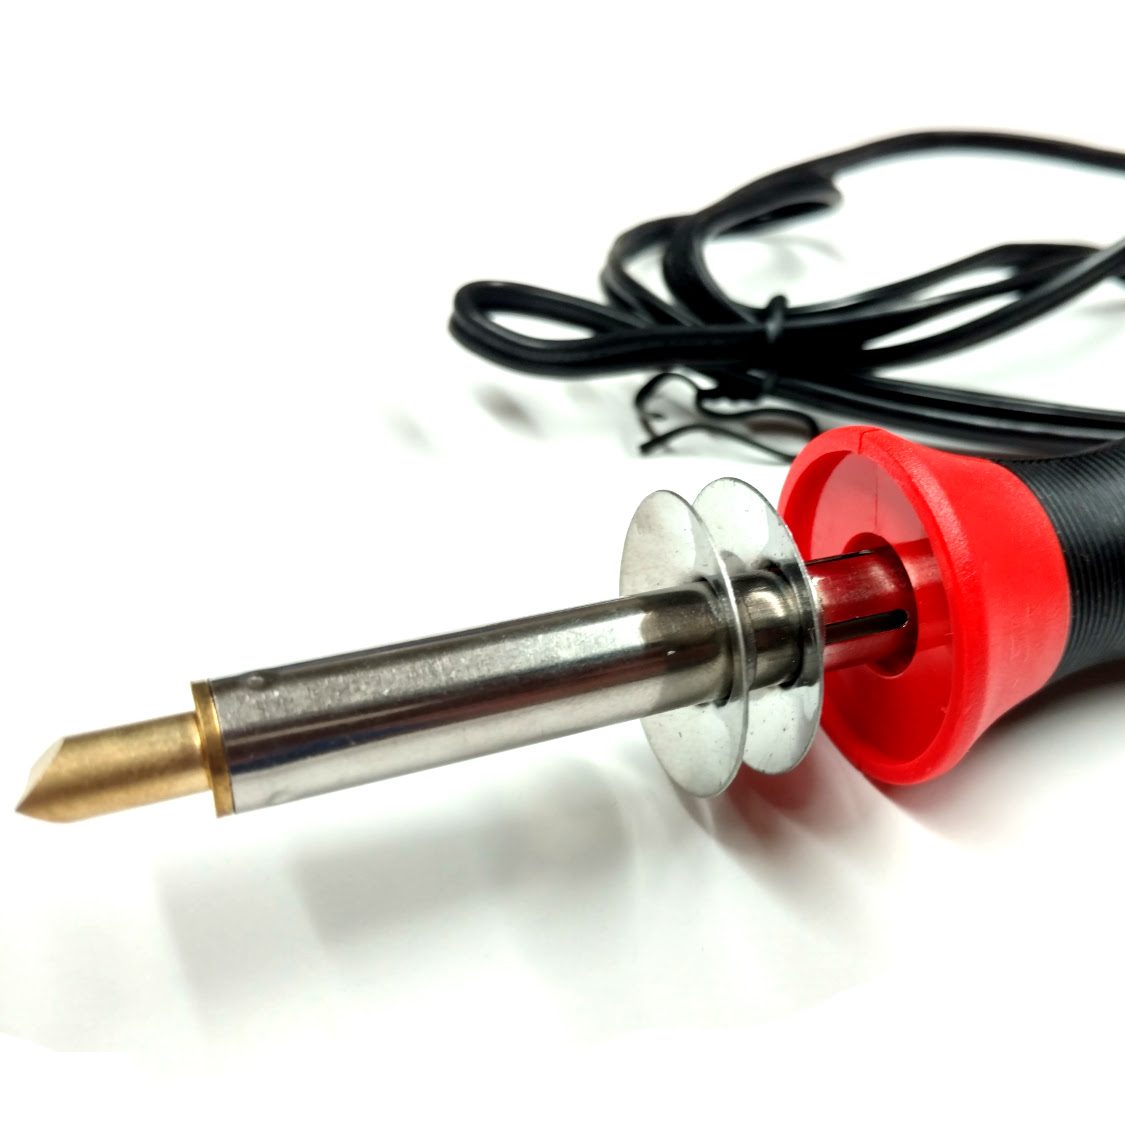
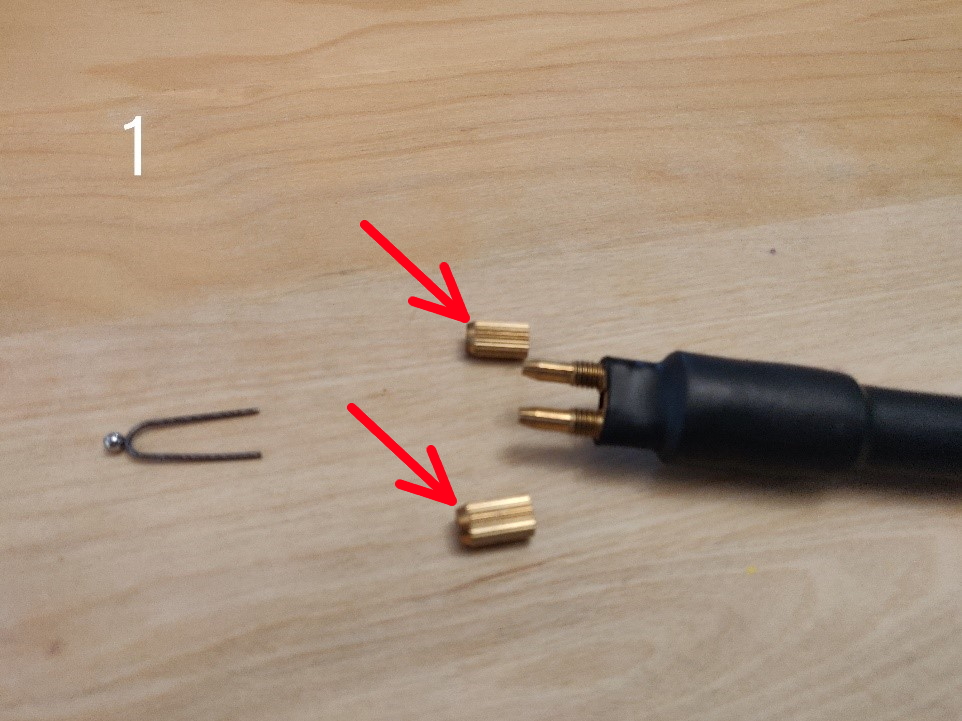
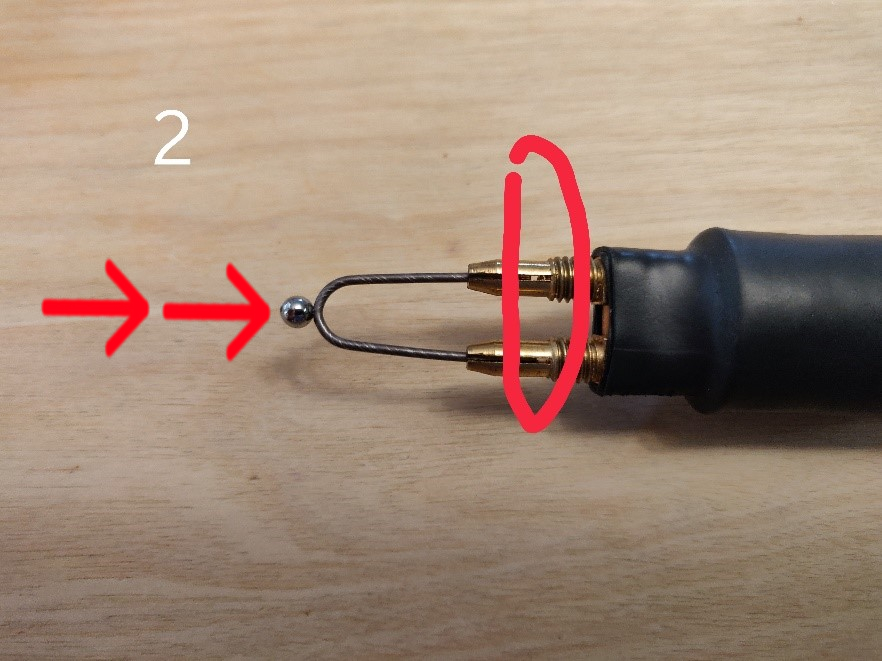
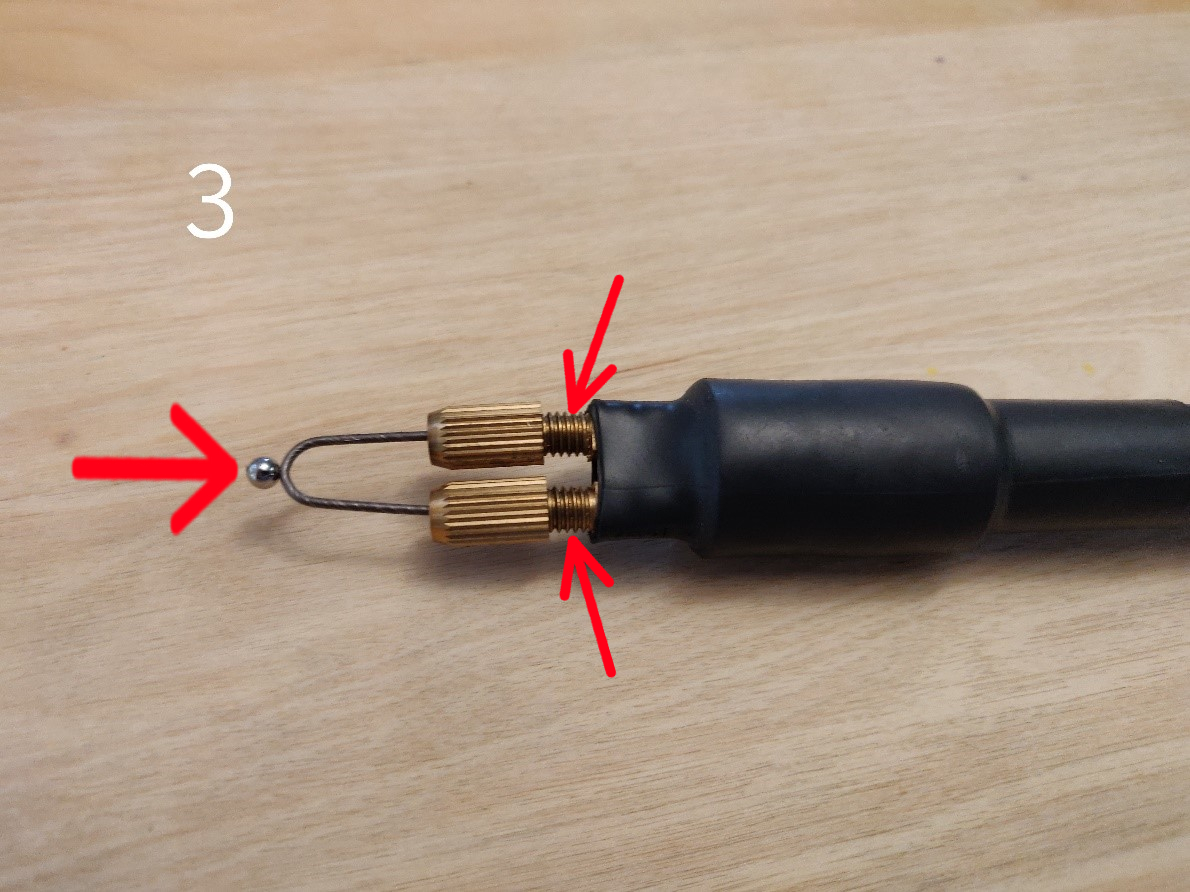
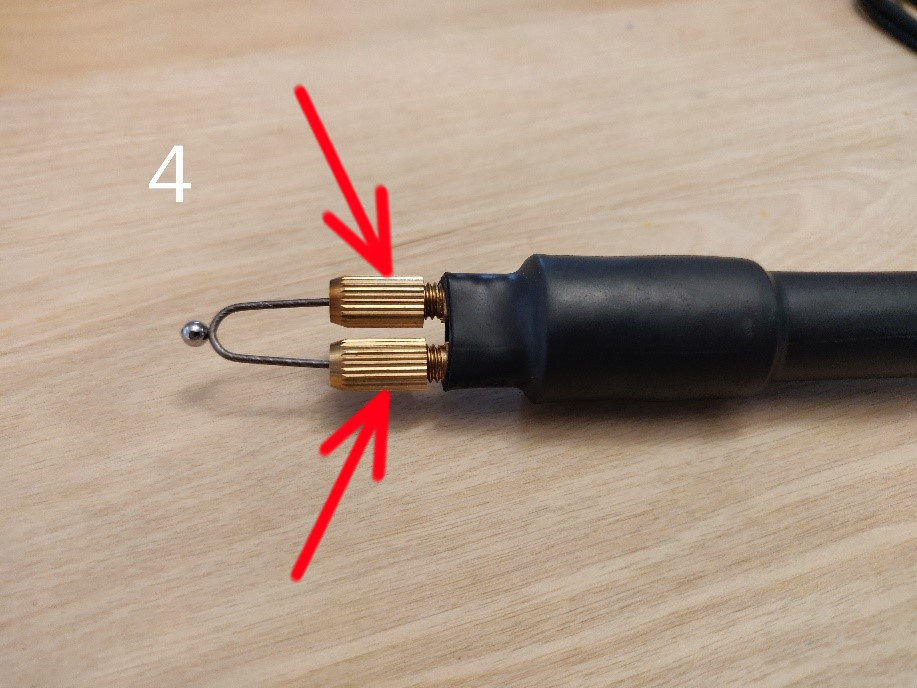
.With all the various pyrography wire tips out in the market today, two pyrography tip sizes are the most commercially popular. The 18 Gauge and the 20 Gauge (18 GA and 20 GA) tips. They correspond to 1.0 mm and 0.8mm respectively. The thicker 18GA wire lasts longer and is suitable for very long hours of work. The thinner 20 GA wire is perfect for slightly lower heat and intricate detail work.
As it often happens, customers buy a set of tips unaware various wire sizes. With our TRUArt Stage 2 Dual Pen Professional Woodburning Detailer and other wire-tipped variants, all our tips are interchangeable regardless of the size. The ball point pyrography tip and some of our shading tips are universally 18 GA. As such, you will need to initially adjust your pyrography pen’s collet (see image 1 below) to accommodate the slightly larger tip. You would only need to do this only once after which it becomes much easier to switch between regular sized wire tips to the thicker types and vice versa.
Below is a detailed guide on how to use our 18 GA tips on our pyrography pens:
If you have any questions about your pyrography tip, have any comments or suggestions, simply contact us at hello@truart.co or leave a comment below We’ll be right there to help you out.
Pyrography or woodburning, is an art medium rapidly gaining popularity especially in the United States and United Kingdom. This art medium involves the use of a heating device that resembles a large pen, which, when applied to wood surfaces, leaves distinctive burn marks. There are already many professional pyrography artists around and most of their work is truly astounding – many even life-like especially when a touch of color is added.
As more and more budding artists join the pyrography band wagon, many do not know what to start off with or know about the differences among the many pens sold out there. This then poses a problem for many who nevertheless went ahead, bought a pen (usually convinced by online reviews) and are either stuck on how to use them properly or end up destroying the tool altogether. To address that and a few other key issues, let’s compare the two types of pyrography pens, the solid-point burners and the wire-nib burners.
|
|
|
Solid-point burner – This type of pen usually requires a screw-in tip although some very few designs in the market feature non-screw tips held in place by a sleeve and a nut. Care should be taken when purchasing extra tips as they can vary in thread type. TRUArt pyrography pens use M4 X 0.7 tips. This means that the thread is 4 mm in diameter with a 0.7 mm thread pitch. These tips are screwed in tightly by hand and usually finished off with 1/8th to 1/4 of a turn using a pair of pliers.
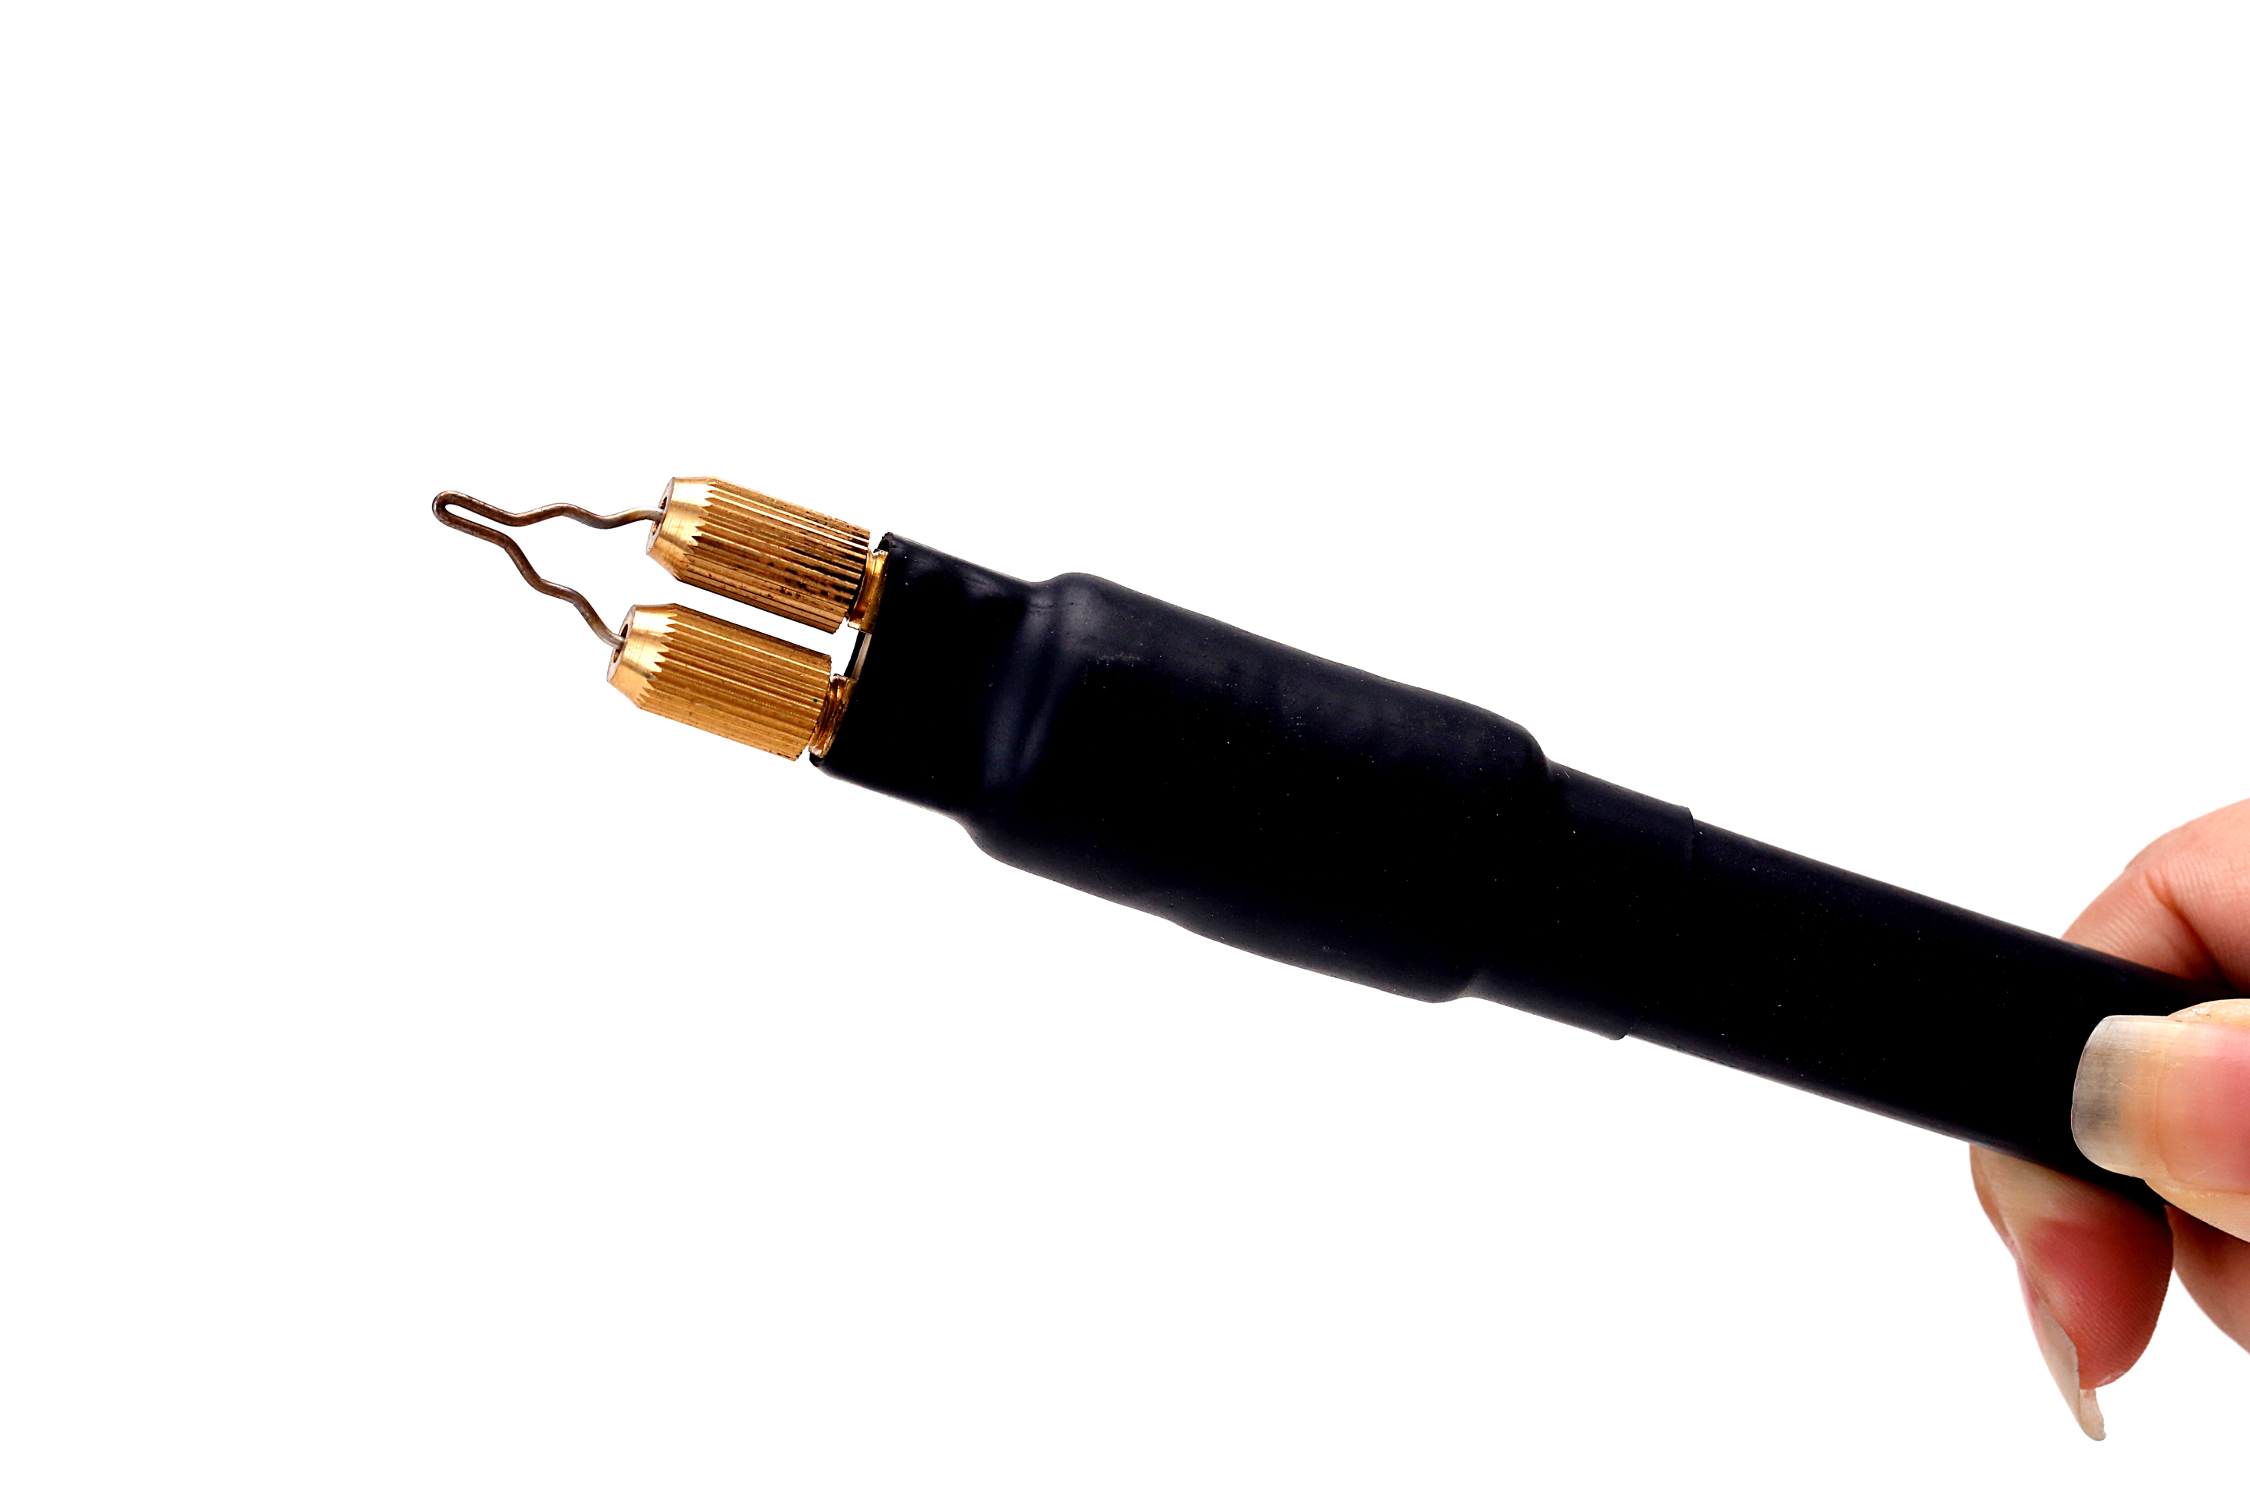
Wire-nib burner – This type of pen holds wire tips usually made from Ni-chrome wire of varying gauges. The wires are either inserted into collets or held in place by screws tightened unto them. TRUArt’s 60 W Professional Woodburning Detailer can accept 20 to 16 GA wire tips.
Solid-point burners create heat by means of a heating element within the pen that is then transferred to the tip and operate at a fixed temperature.
Wire-nib burners create heat on the nibs by electric current going through it. The collets or wire nib holders should never be shorted.
| Solid-point burner | Wire-nib burner |
| Pros | Cons | Pros | Cons |
| Cheaper than Wire-nib burners
Wide selection of patterned and stamp tips Brass tips conducts heat faster and retains it longer than other metals Easy screw-in and unscrewing of tips (only do this when unit is cold!) Variable heat output (TRUArt 15 W – 30 W pens) Ergonomic handle with anti-slip rubber Ventilation holes and double heat sinks to dissipate heat away from hands Price is great for beginners in pyrography No separate power supply No danger of shorting out the pen |
Brass becomes soft when heated. Oftentimes, beginners tend to put too much pressure on it instead of letting the heat do the work. This bends the softened brass tip, which leads to breakage – leaving the screw inside the pen and rendering it useless.
Long waiting period for hot tips to cool down enough for unscrewing/replacement Long waiting period (3-5 mins) for tips to heat up sufficiently Only two power settings – 15 Watts and 30 Watts Cannot create customized tips Hands are farther away from work surface than Wire-nib burners Tips may become lose within pen when heated. This will require further tightening with pliers (about 1/8 to 1/4 of a turn) |
Nibs heat up much faster (less than 1 minute) than Solid-point tips
Fast cool-down Easy inserting and removal of nibs Nibs stay tight inside collets even at the pen’s highest voltage setting Wide selection of nib shapes and sizes Easily create customized nibs from a roll of Ni-chrome wire Very close distance between hand and work surface Digital power supply allows very fine tuning of heat output on the tips, which allows for superior control over burn Pen is smaller and lighter than Solid-point burners Non-slip ribber handles Can accept 20 GA to 16 GA (0.8 mm to 1.25 mm diameter) nibs Ni-chrome wire nibs do not break easily when pressure is applied Preferred by professionals |
More expensive than Solid-point burners
Nib selection does not have big patterns or stamps like the Solid-point burner tips Bulky power supply Burner can get almost uncomfortably hot if voltage is too high and heat on the nib is not used fast enough Danger of shortening the burner if the collets are directly connected to each other by any metal object Skill in using voltage setting to get the required heat has to be developed |
Ultimately, when selecting a woodburning or pyrography pen, you will first have to consider what you intend to do. Figure out if you could see yourself doing this occasionally or often. If you’re just starting out in the art of pyrography and do not know what kind of pyrography pen will suit you, you’re safe if you start with the Solid-point burner. Later on, once you’re more confident in the art and start investing long hours into it, you may want to consider upgrading to the more robust and industrial strength of the Wire-nib burner.
If you still want to know more, simply share your thoughts or questions through the comments below and we’ll answer them within the day.
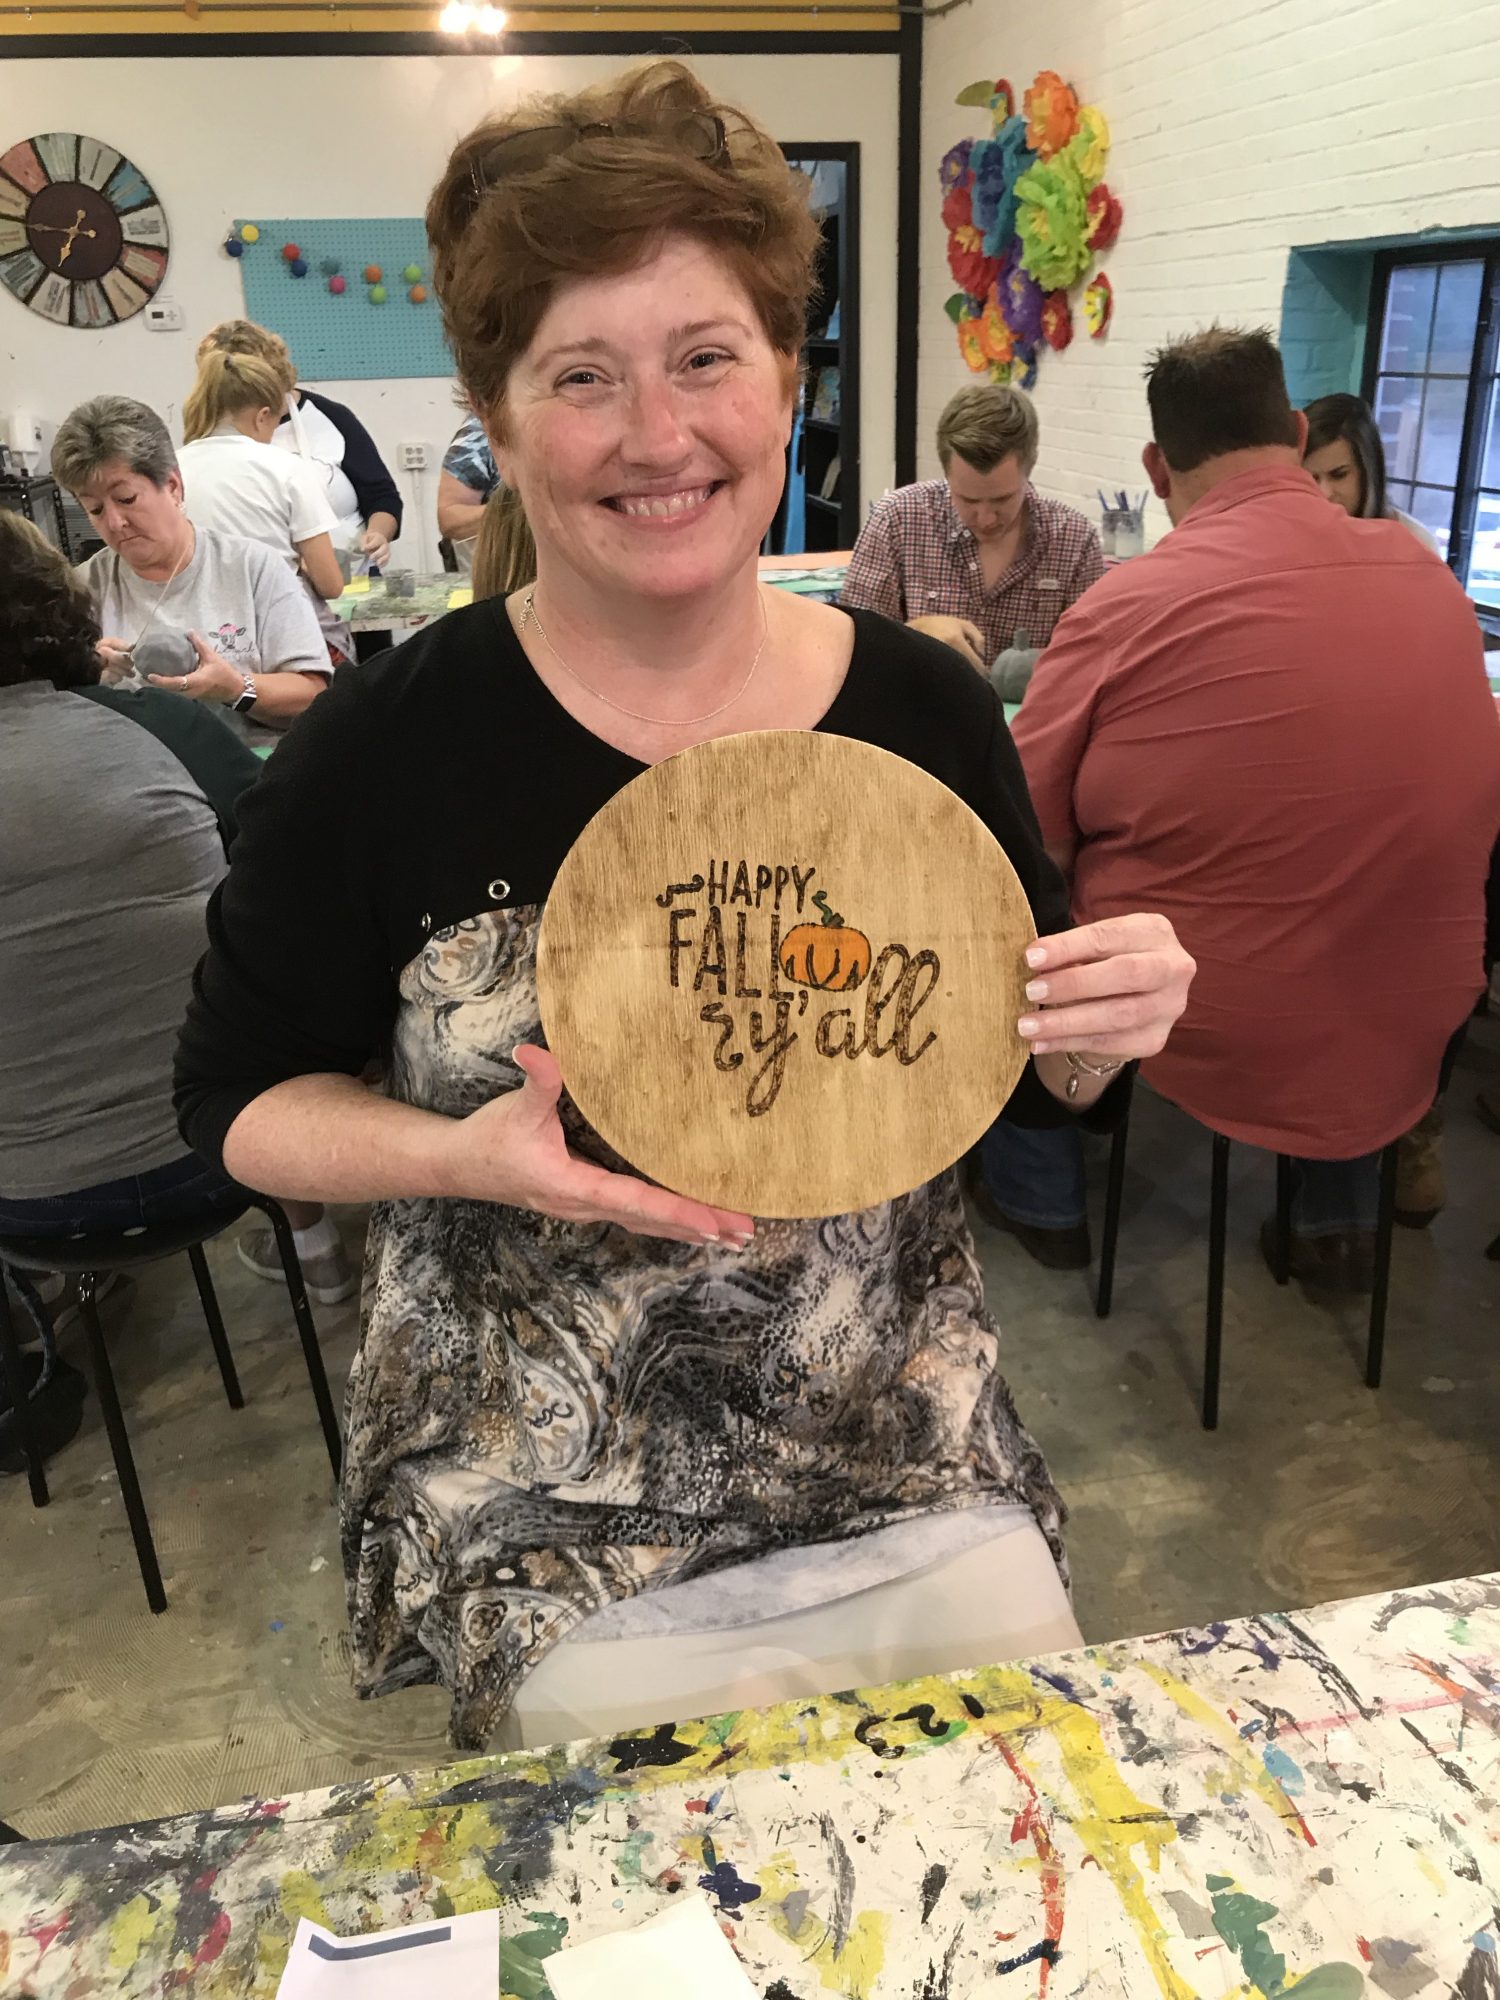
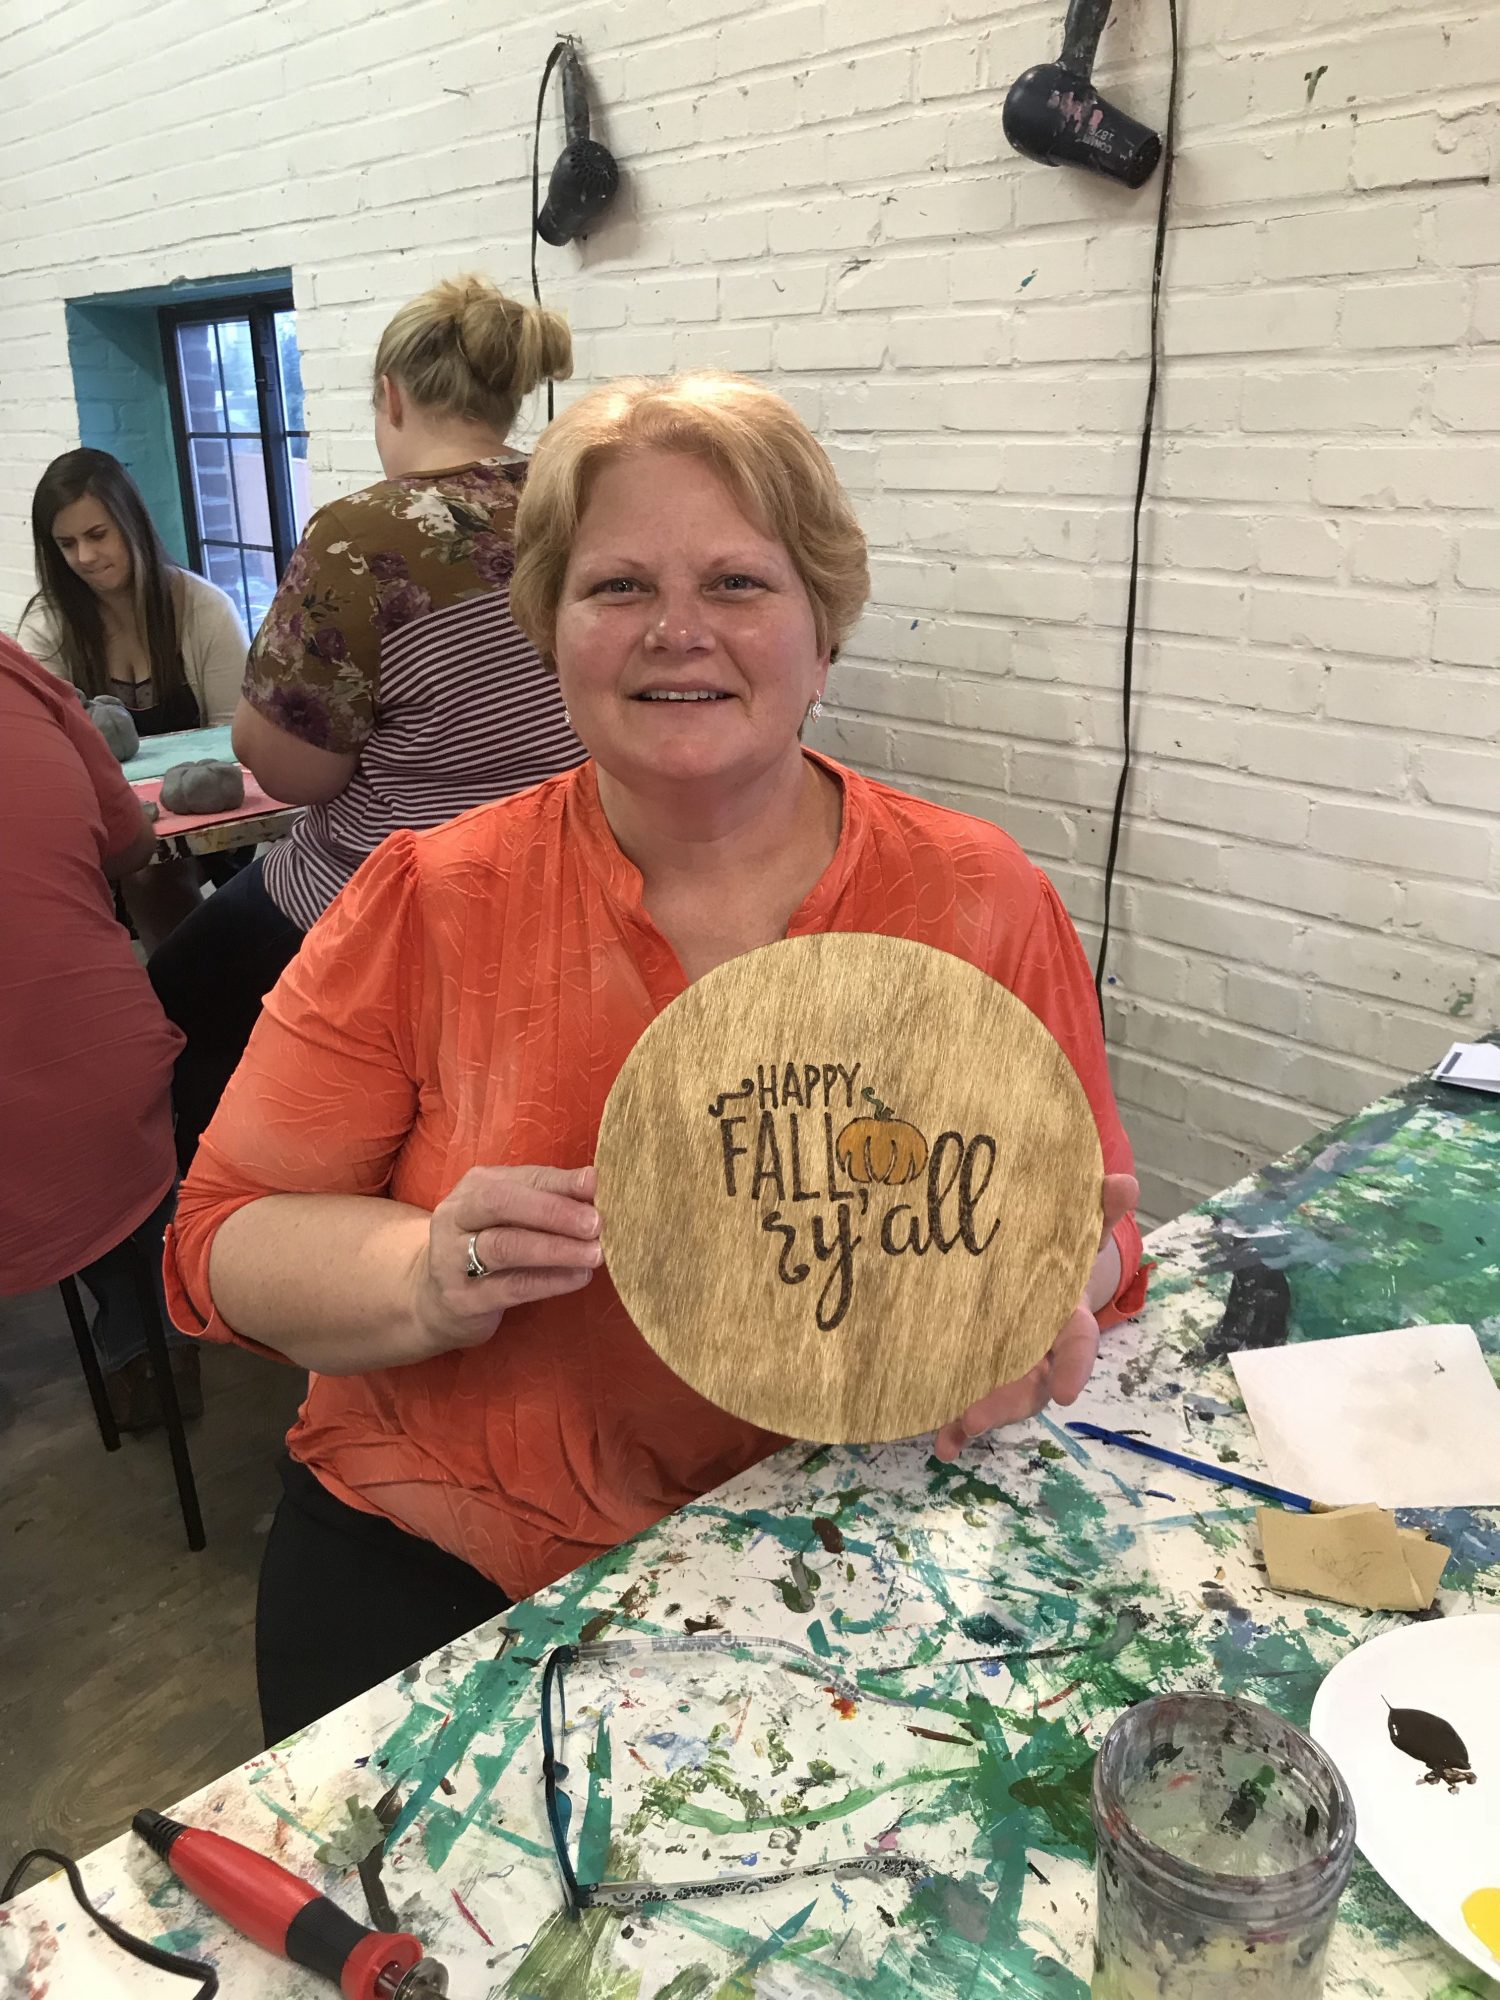
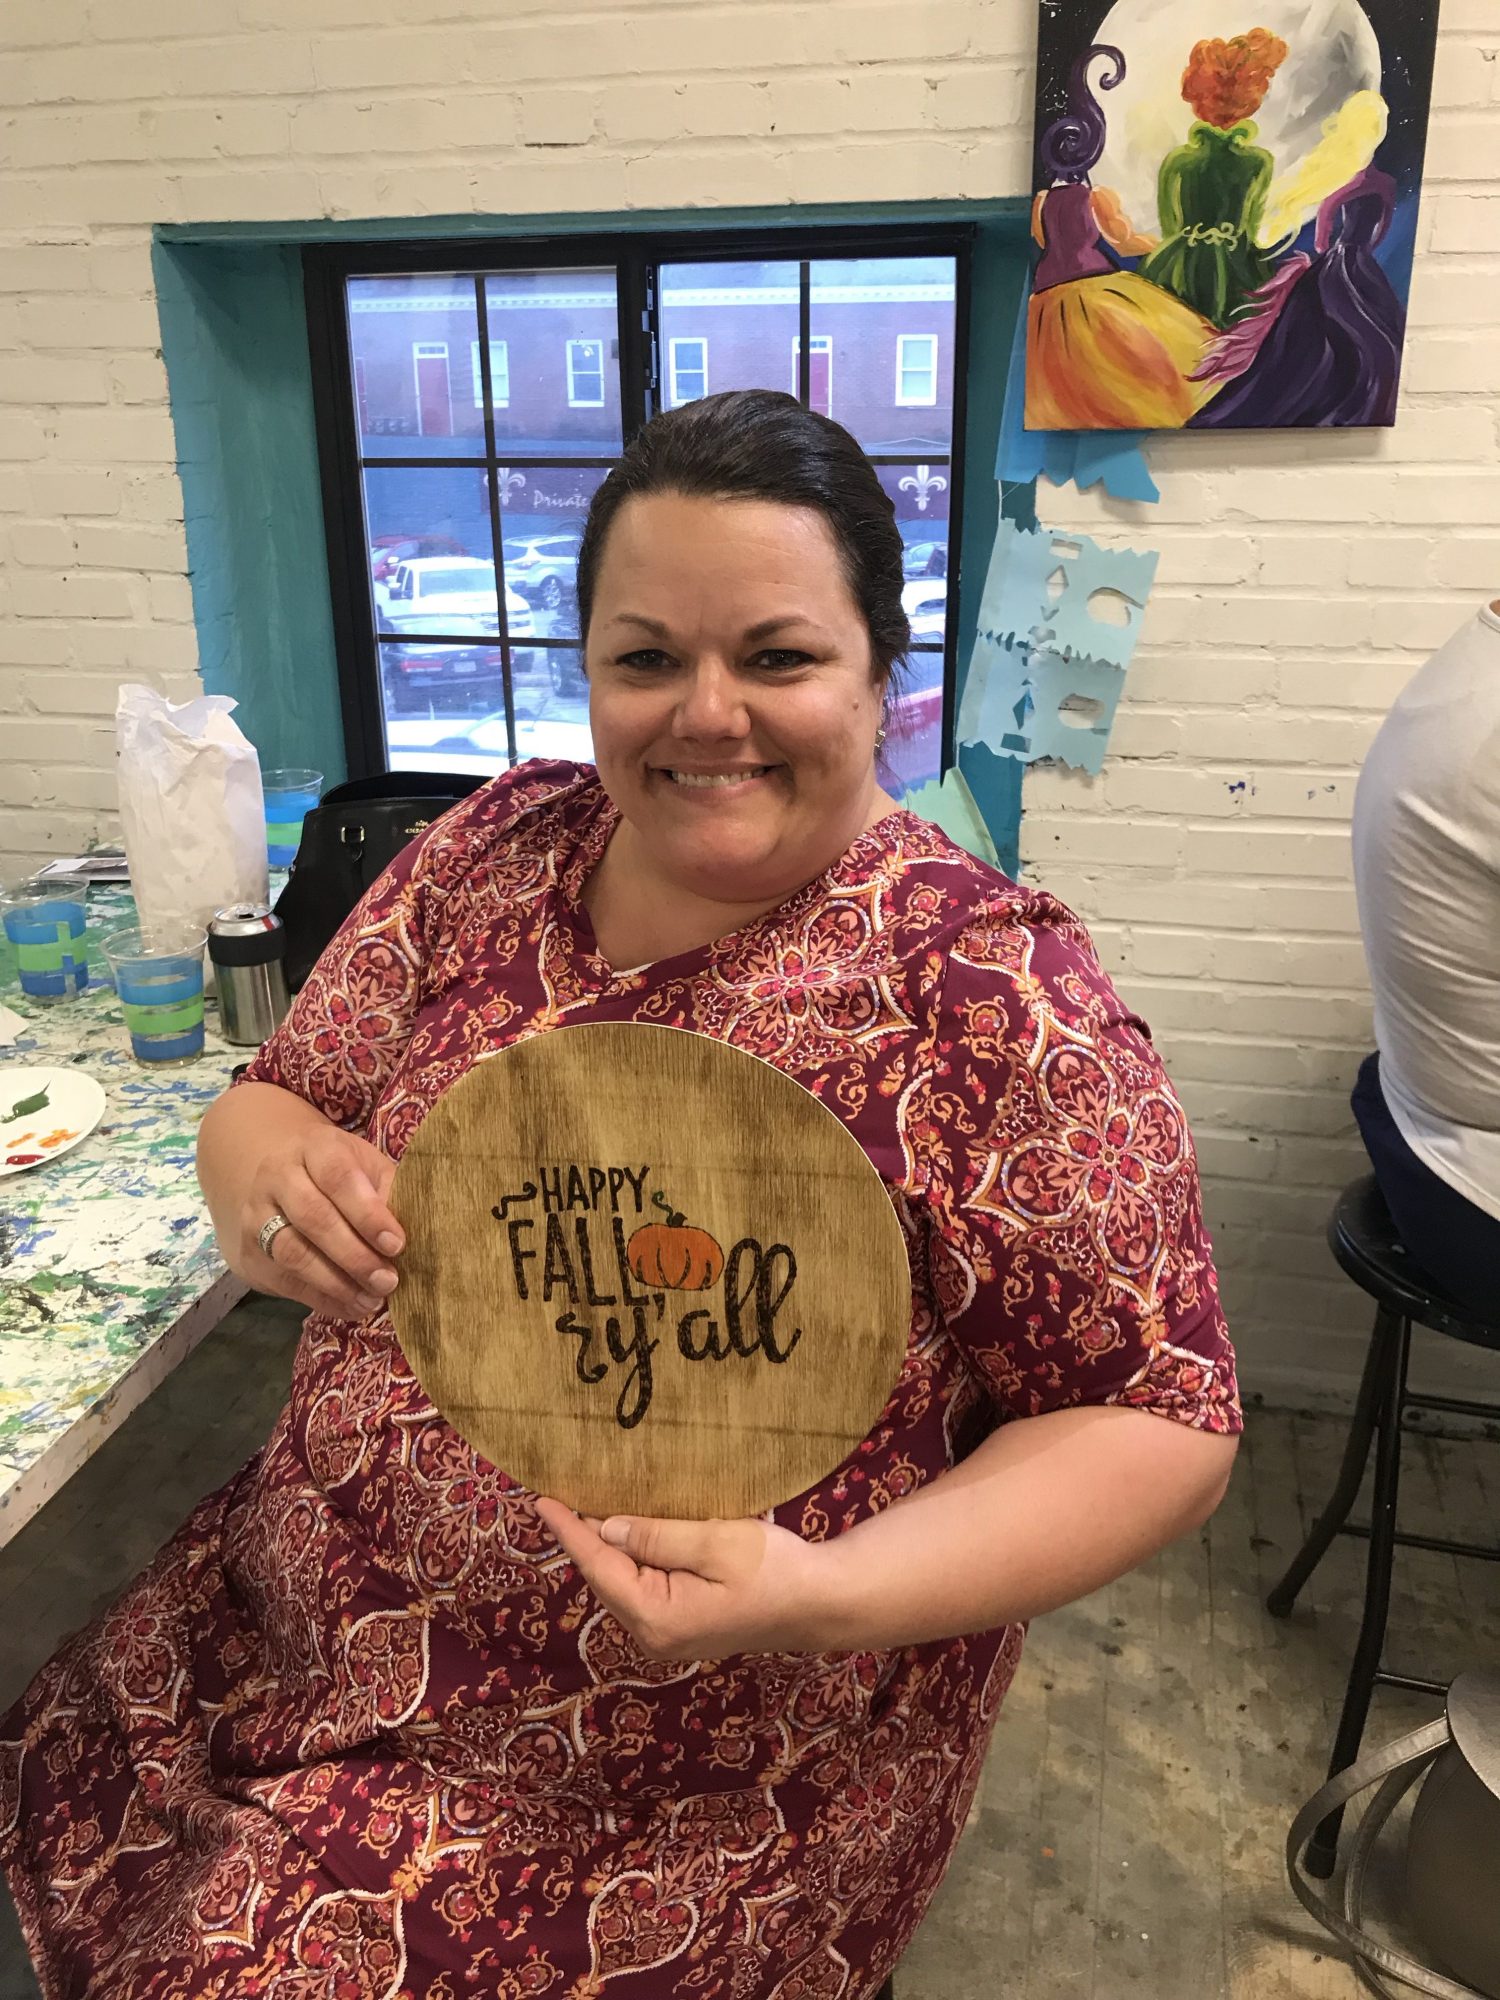
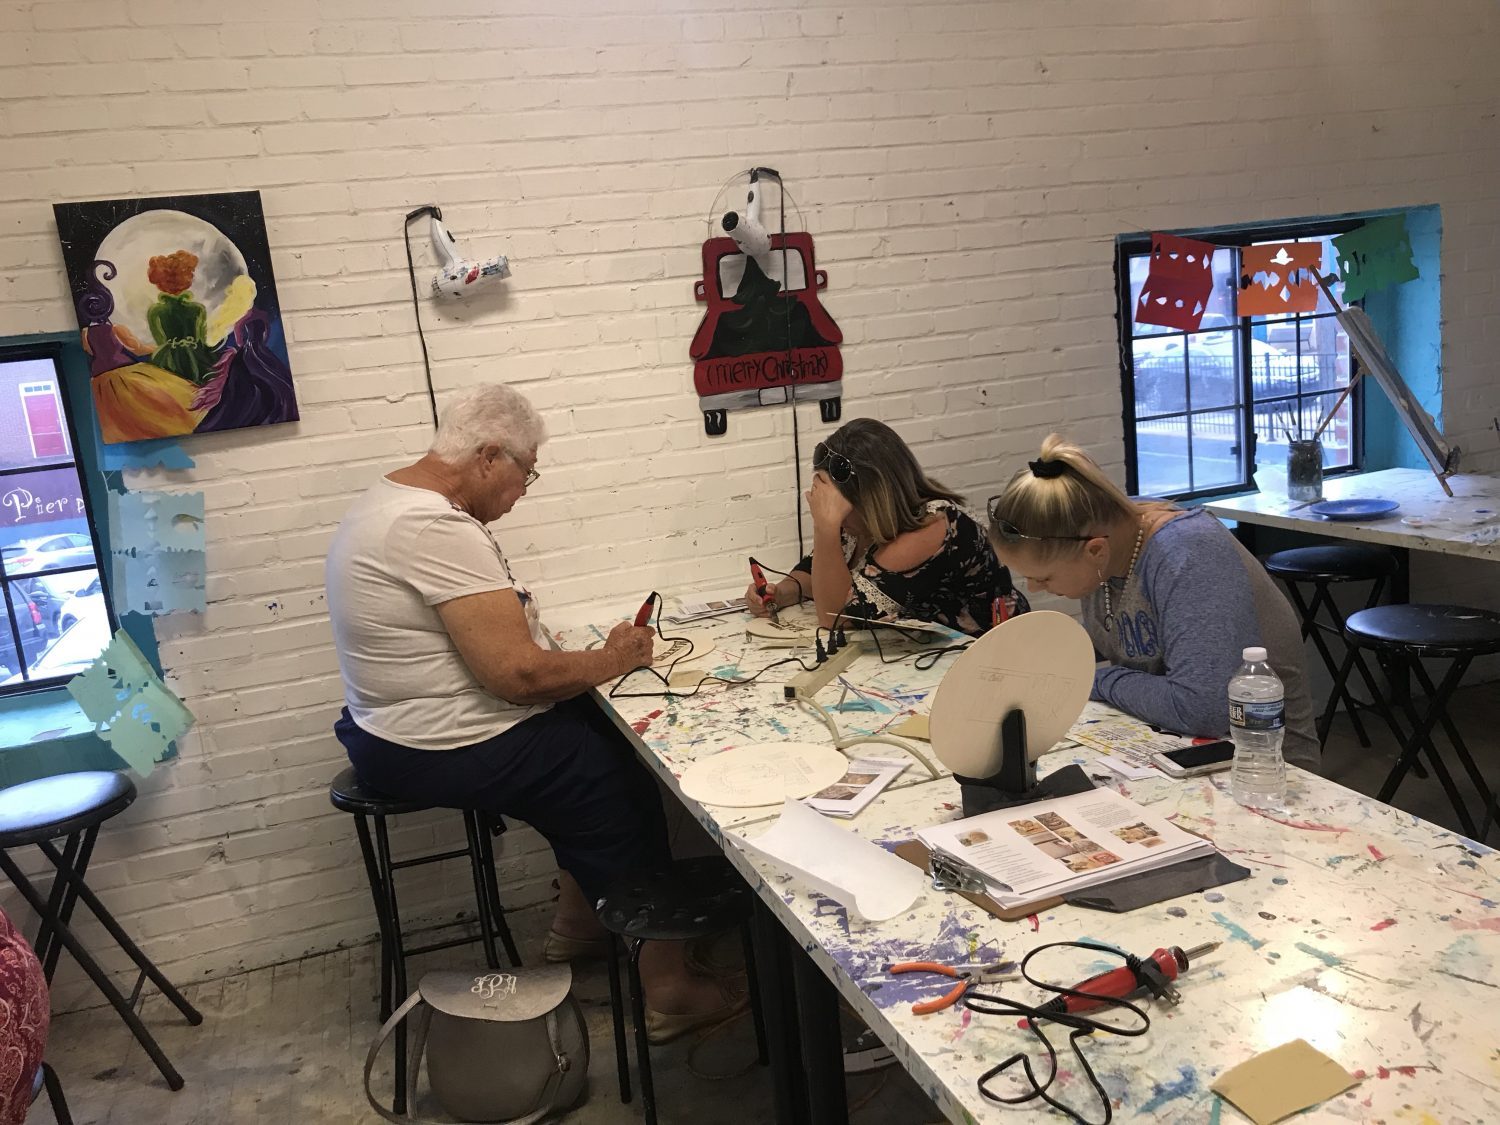
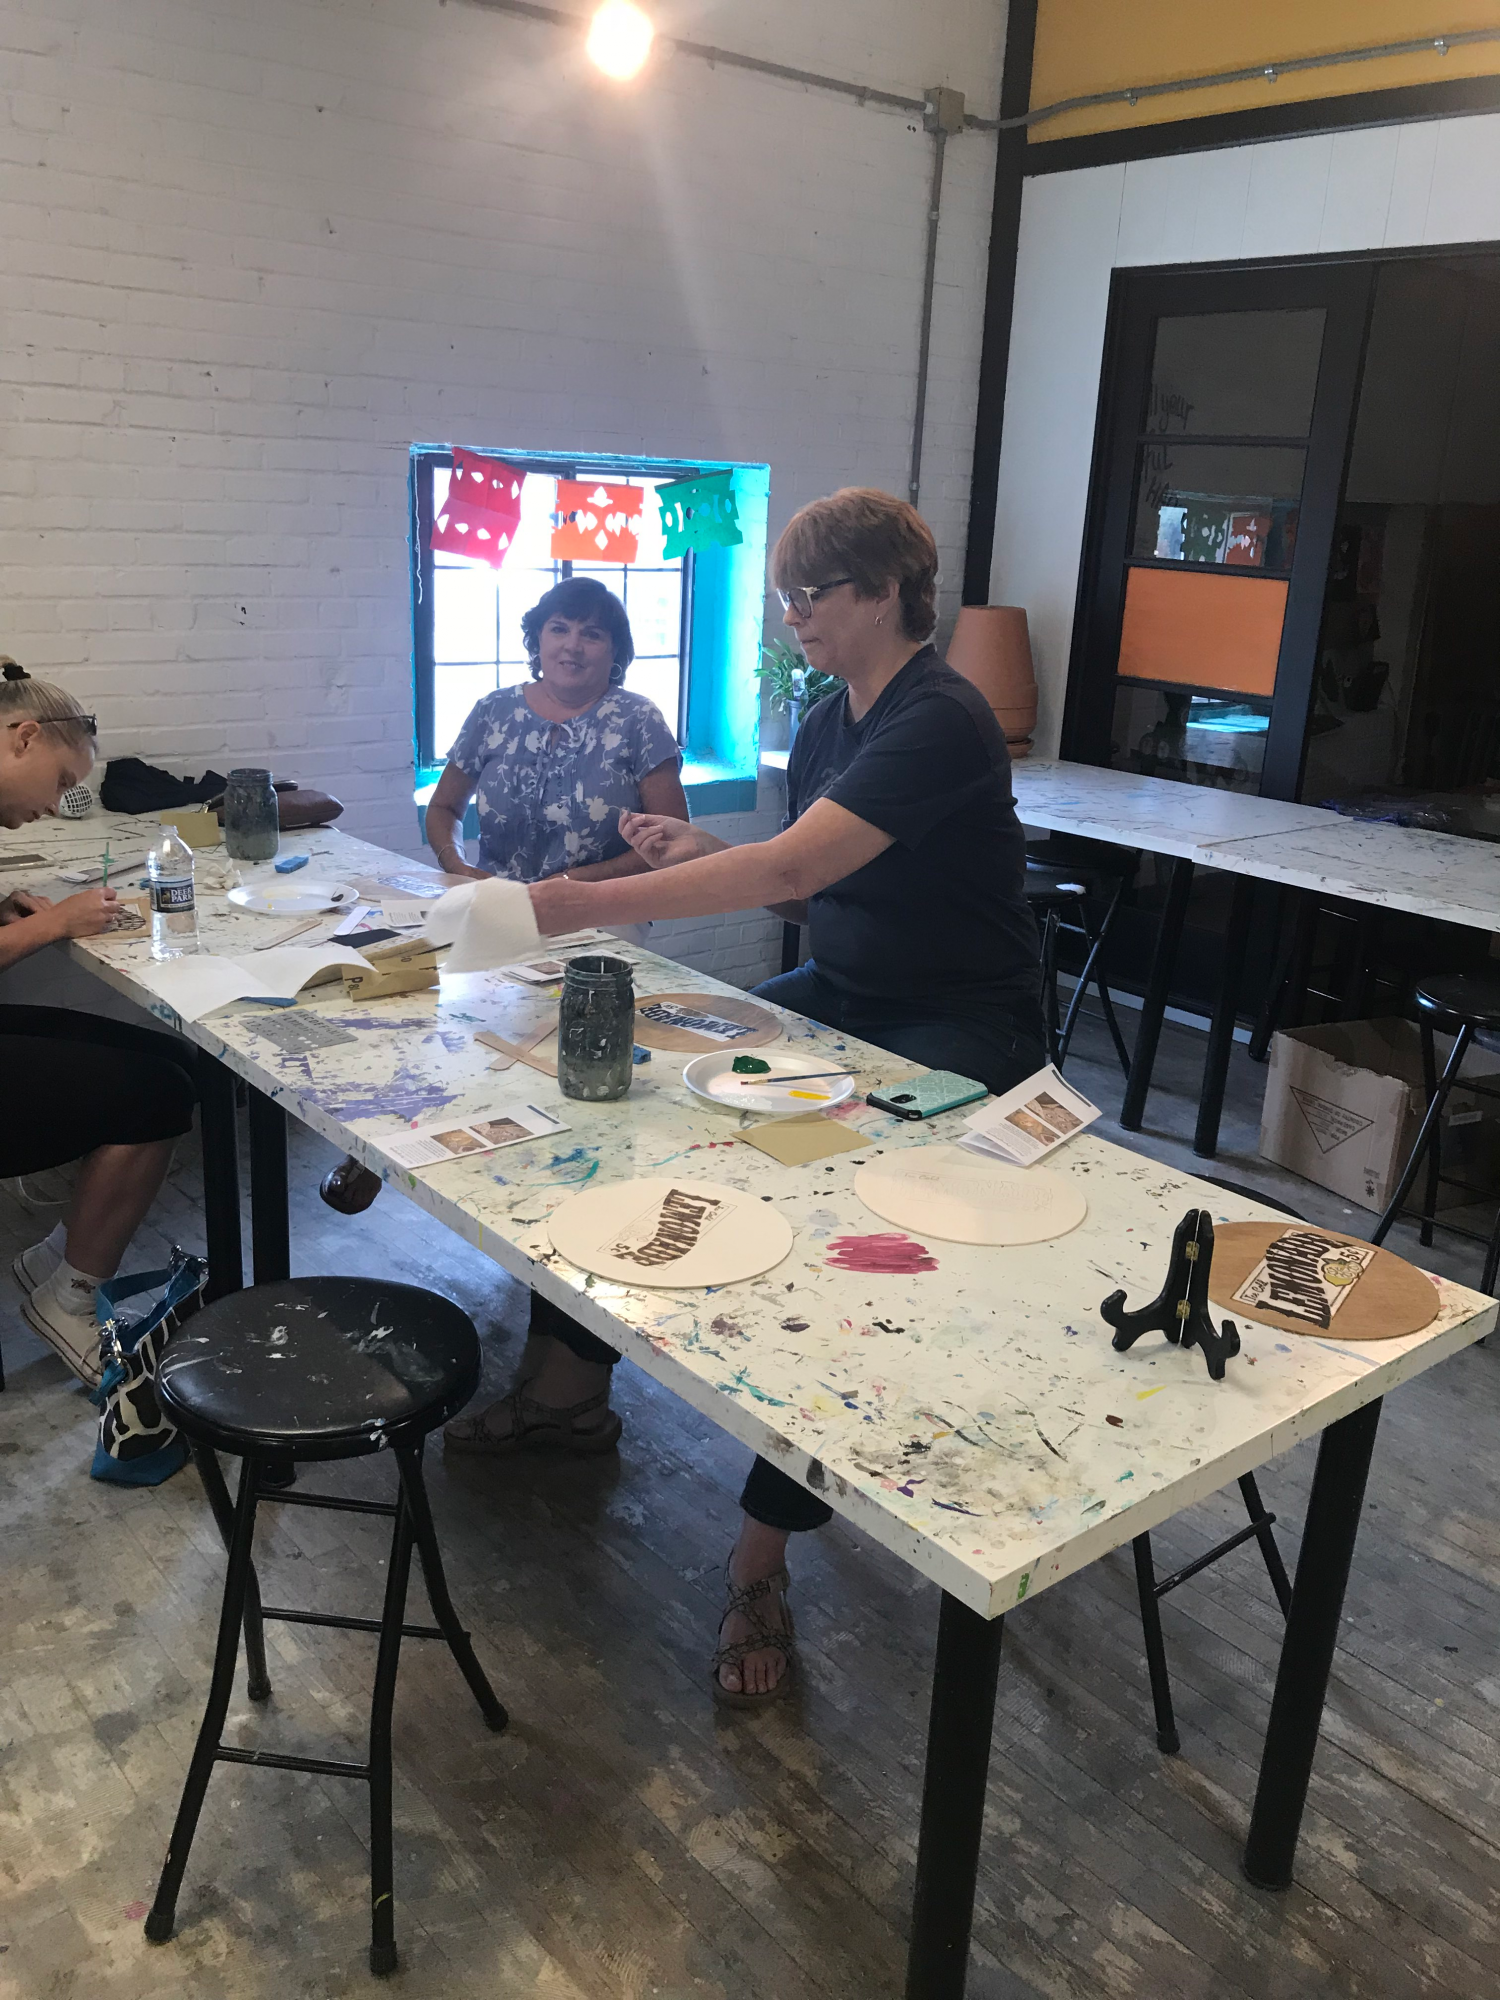
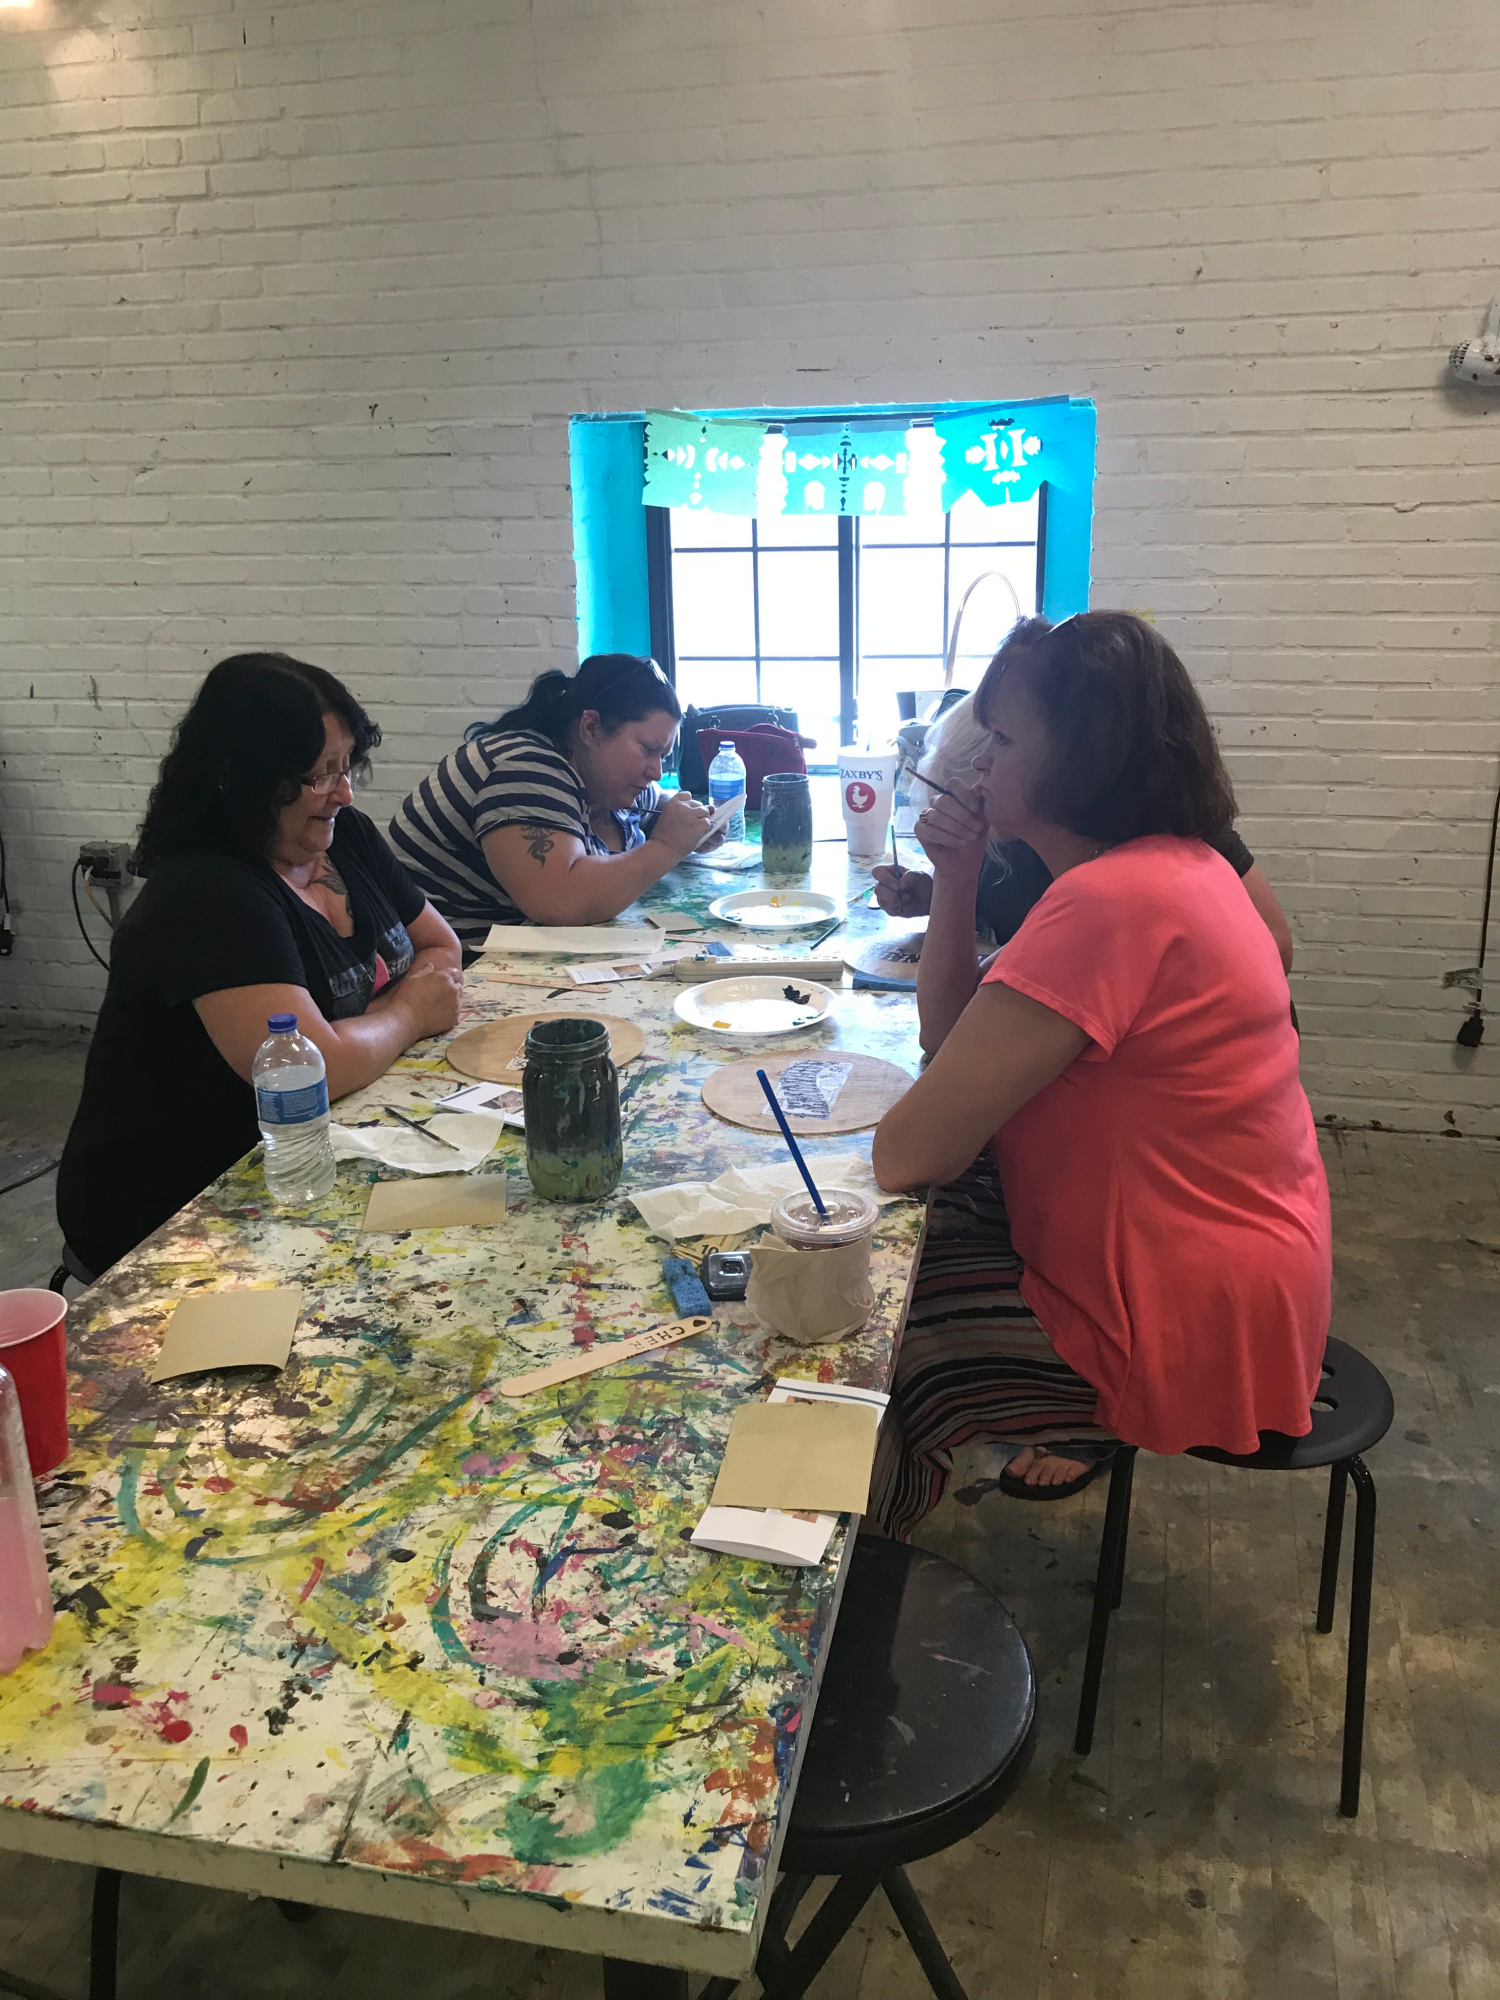
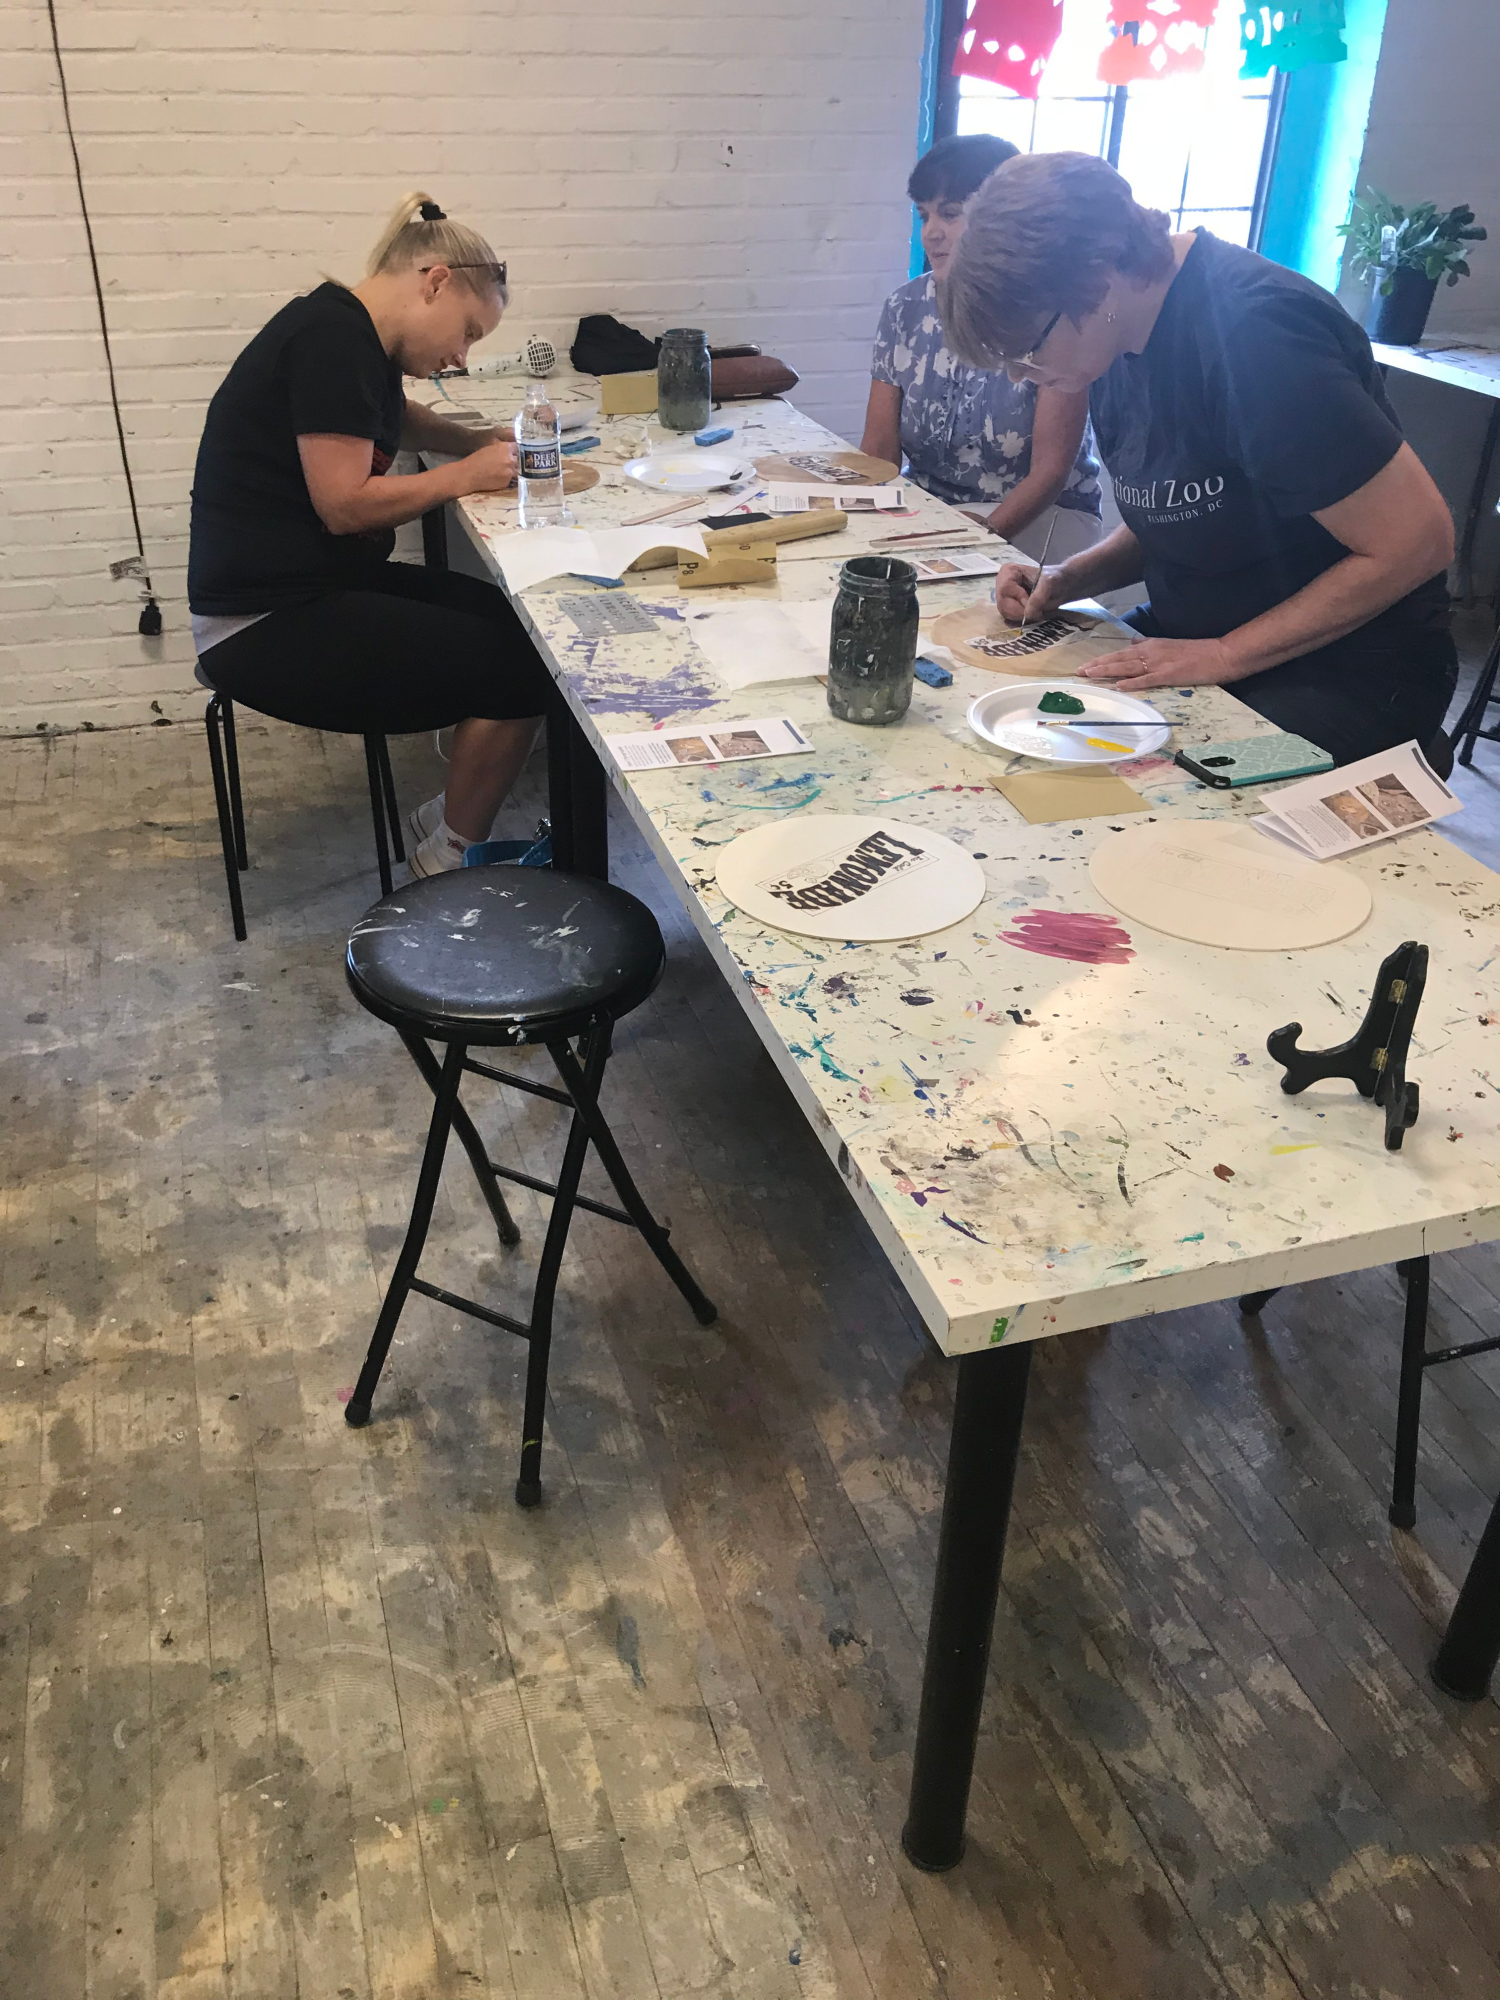
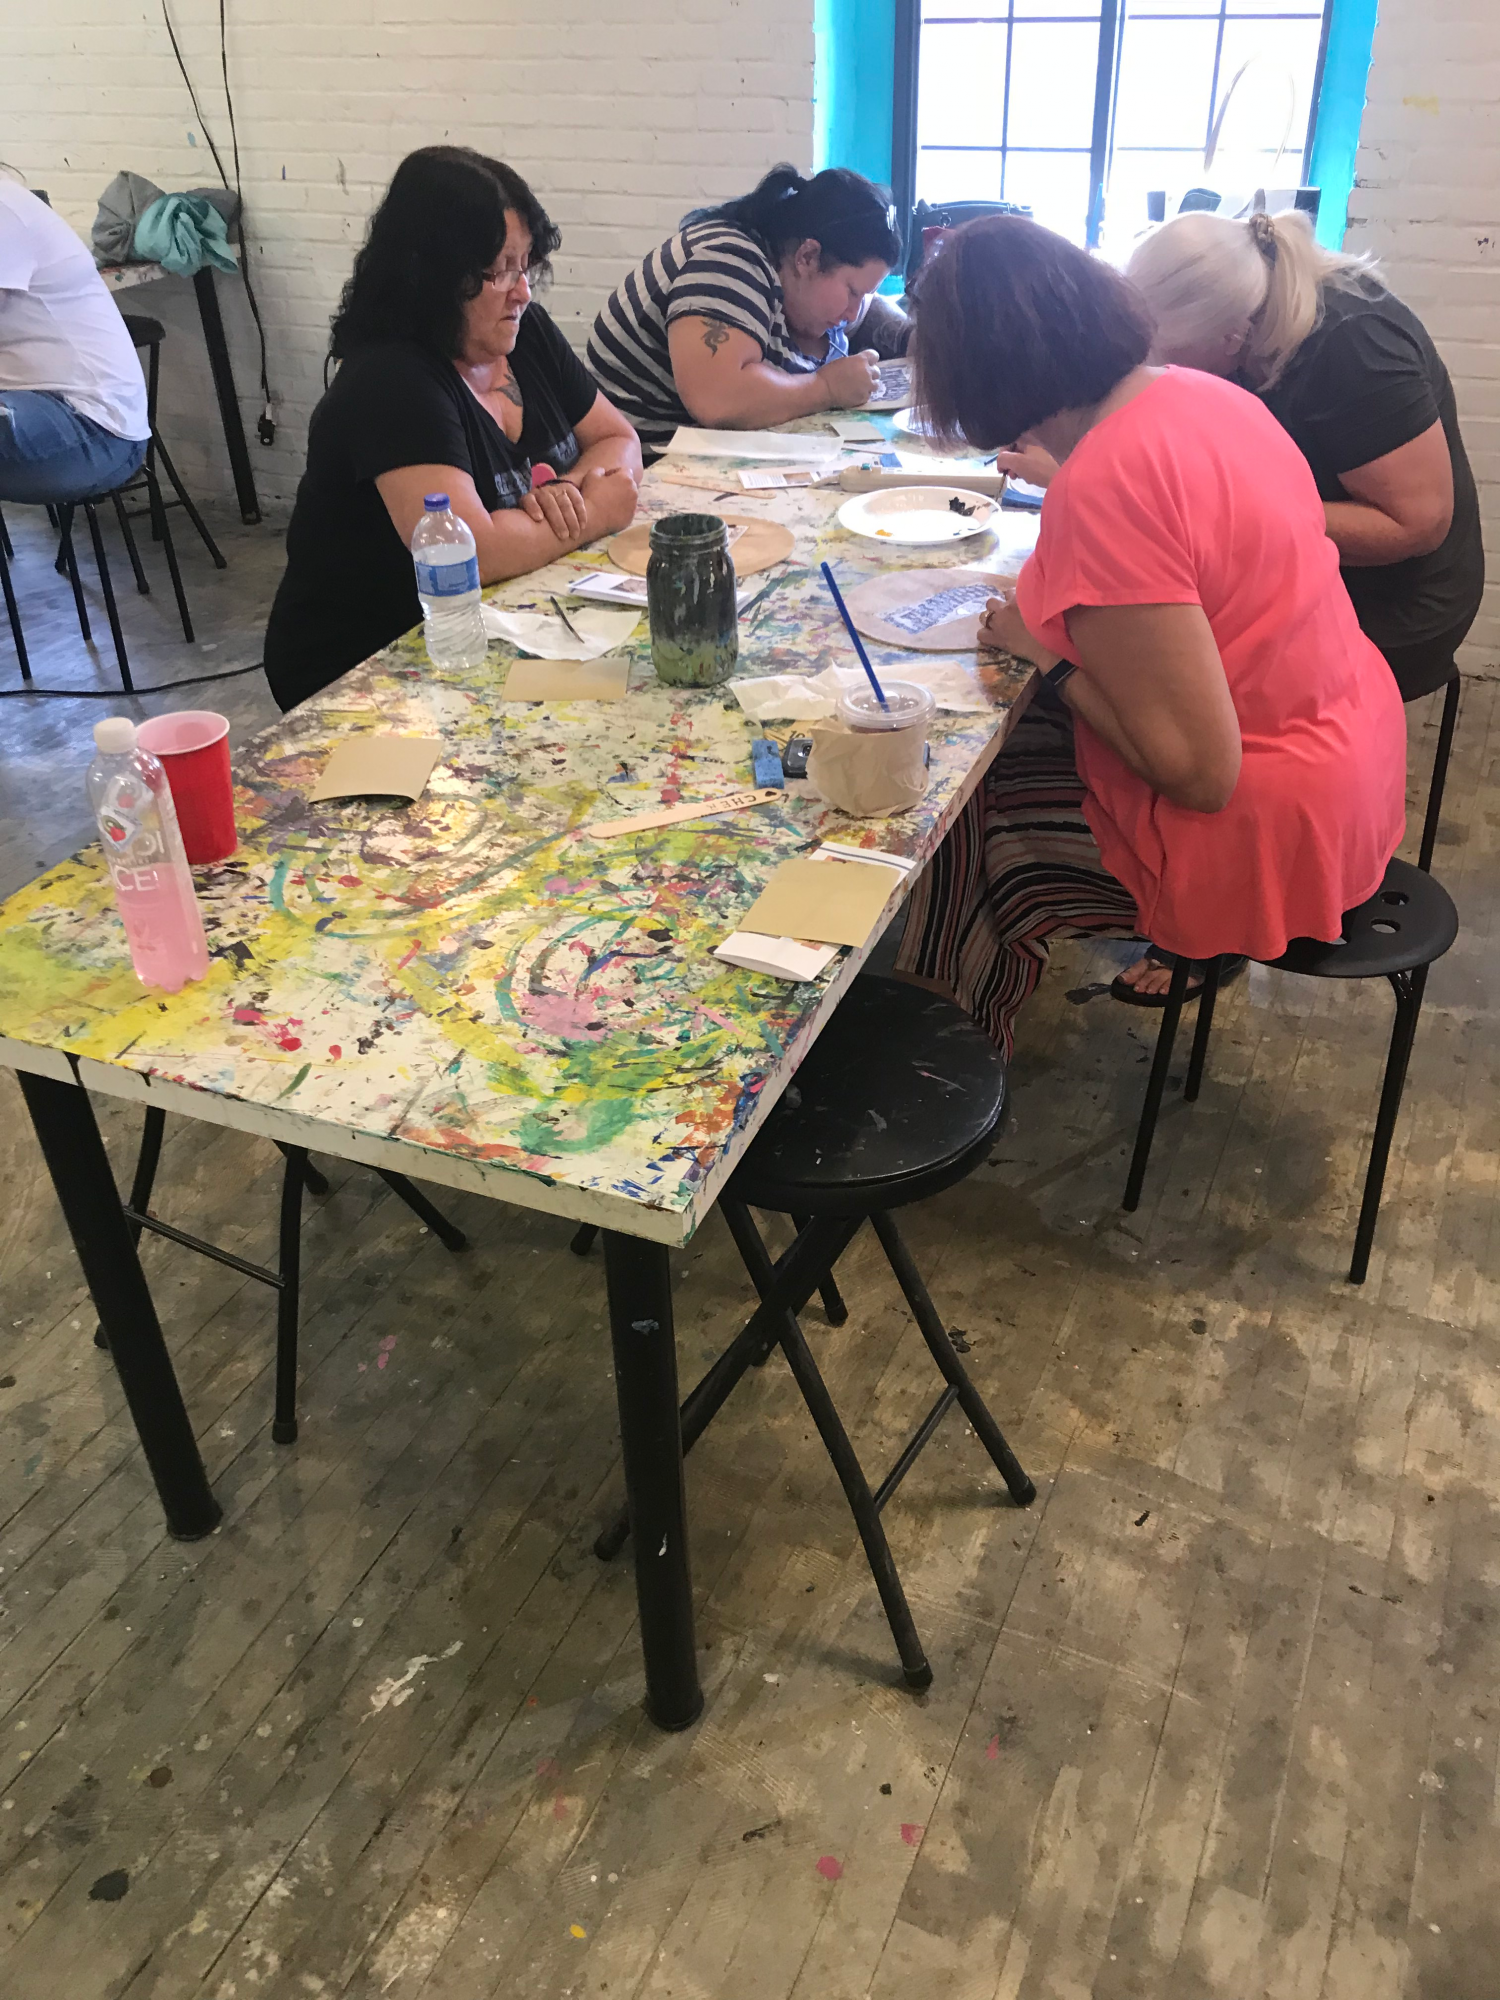
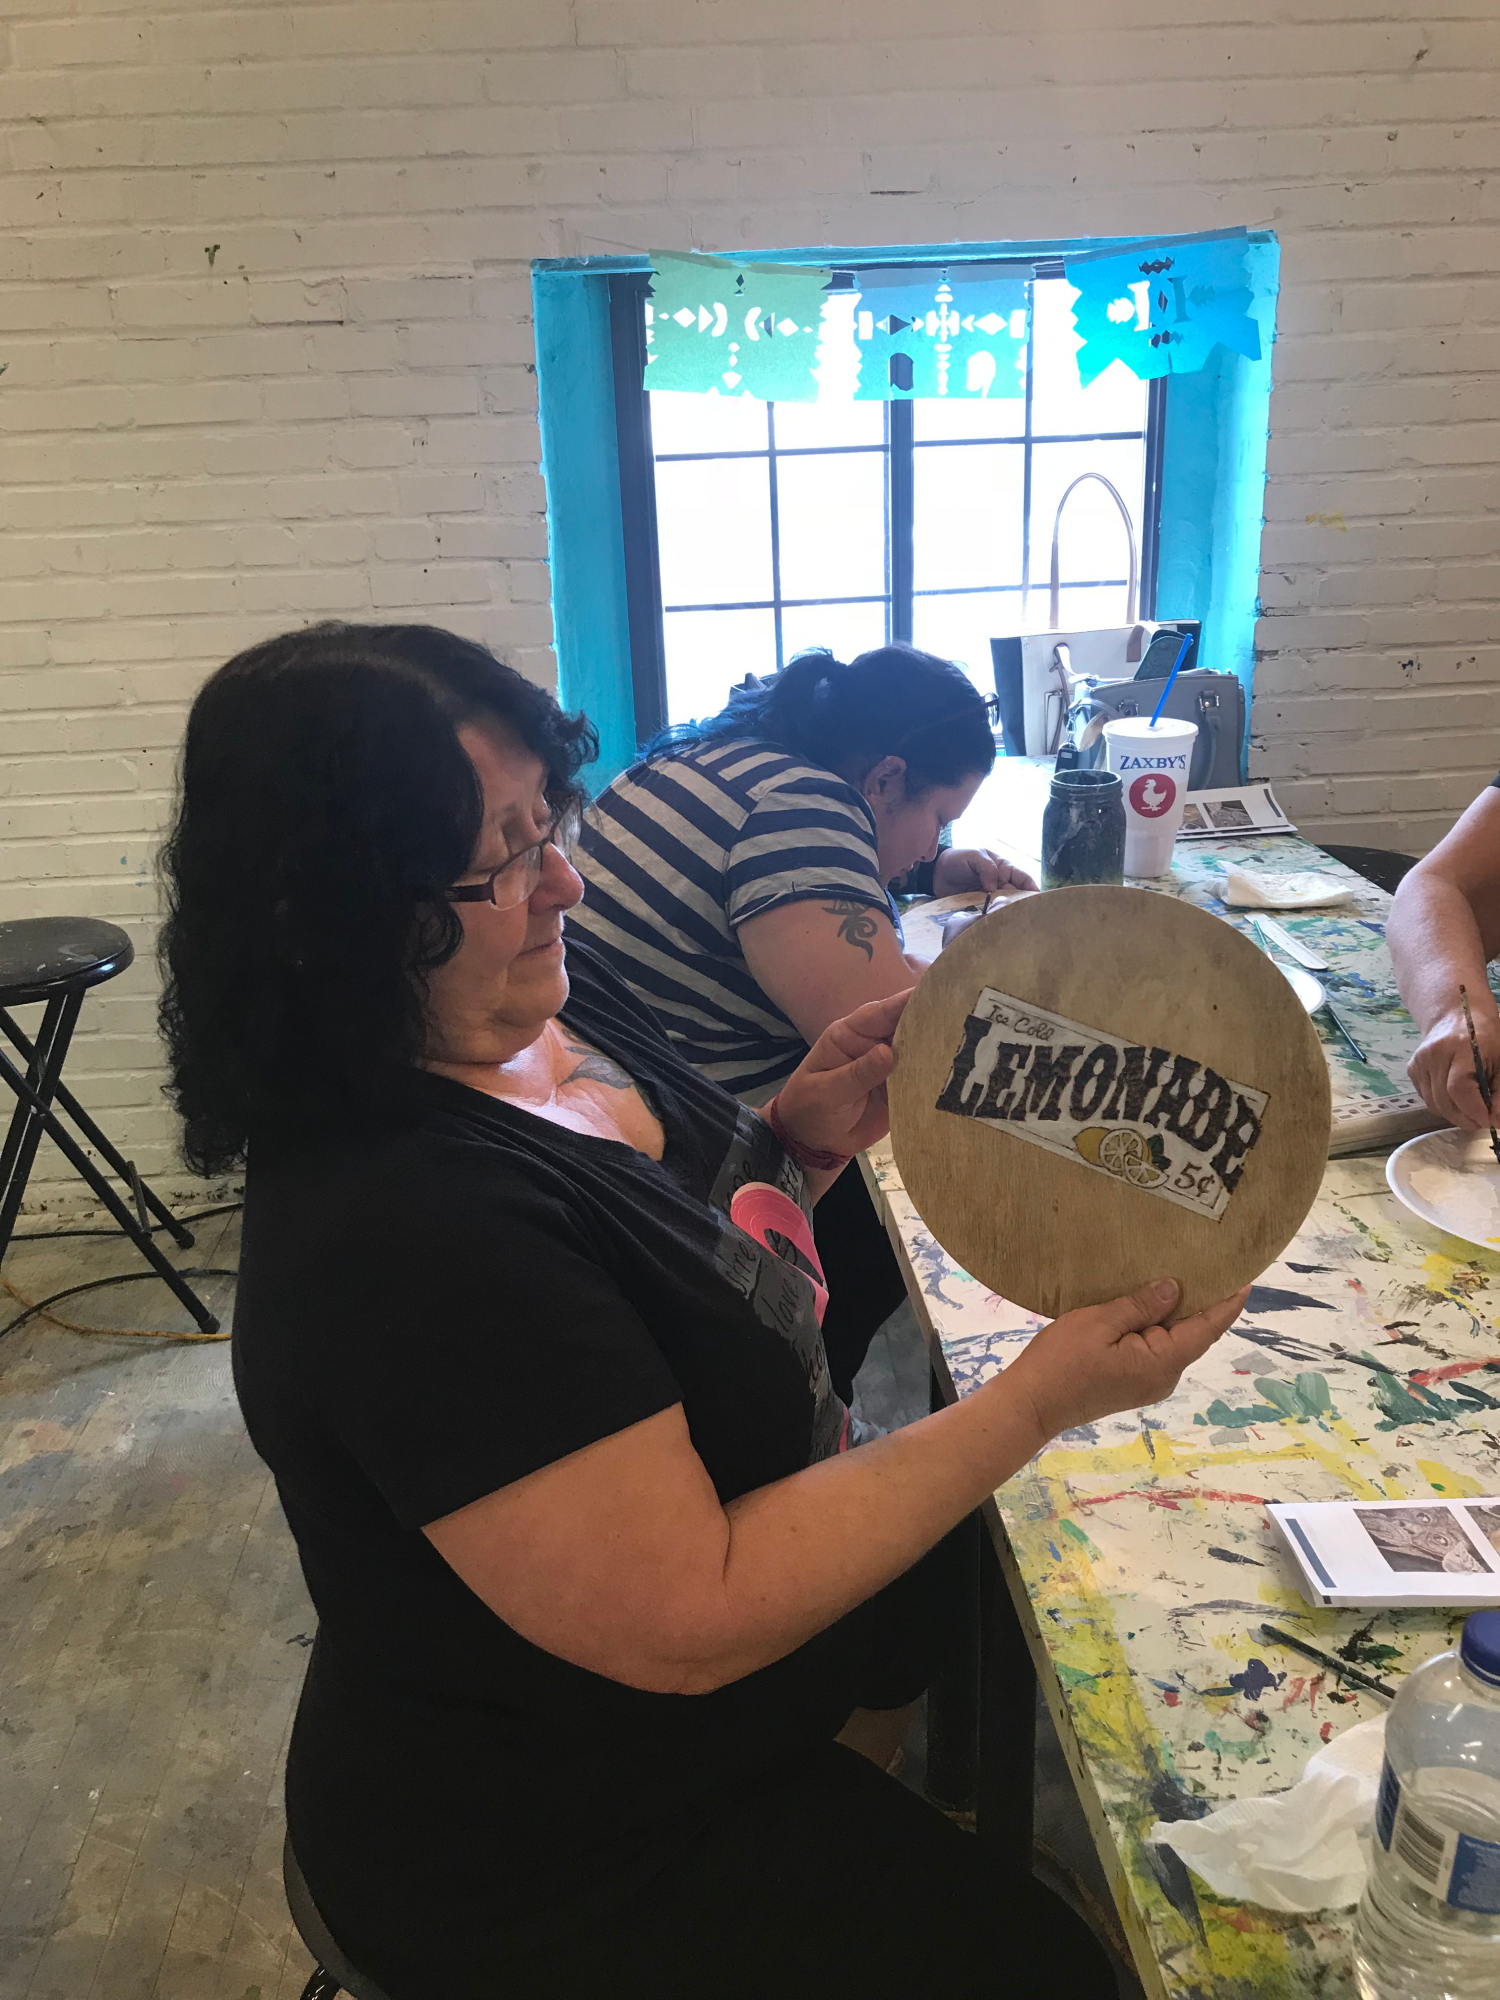
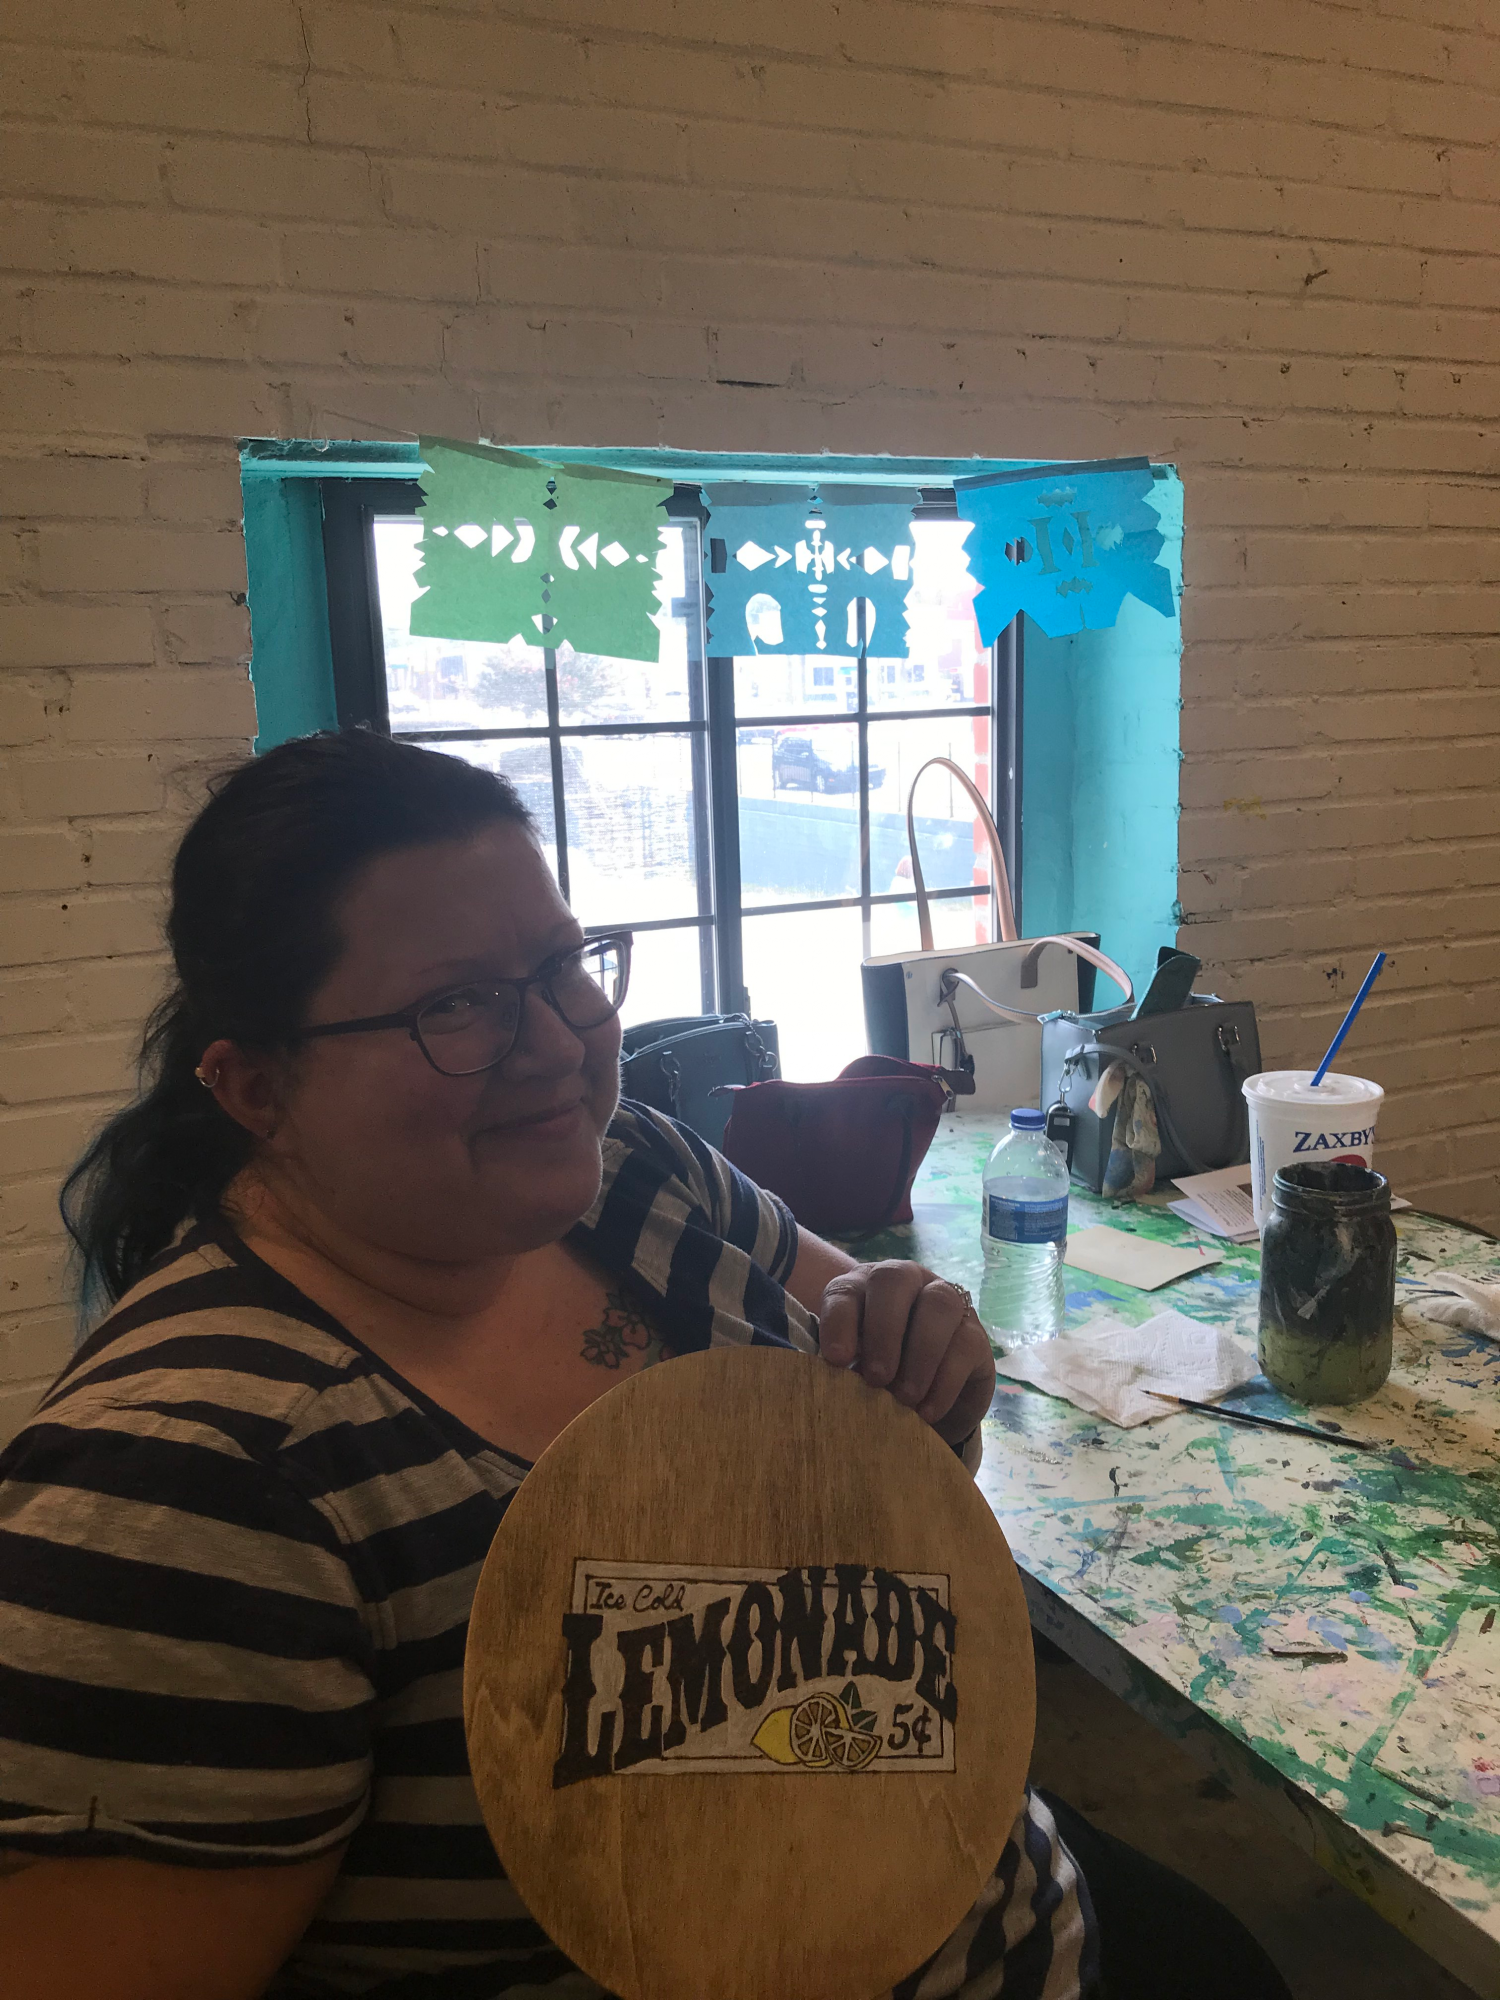
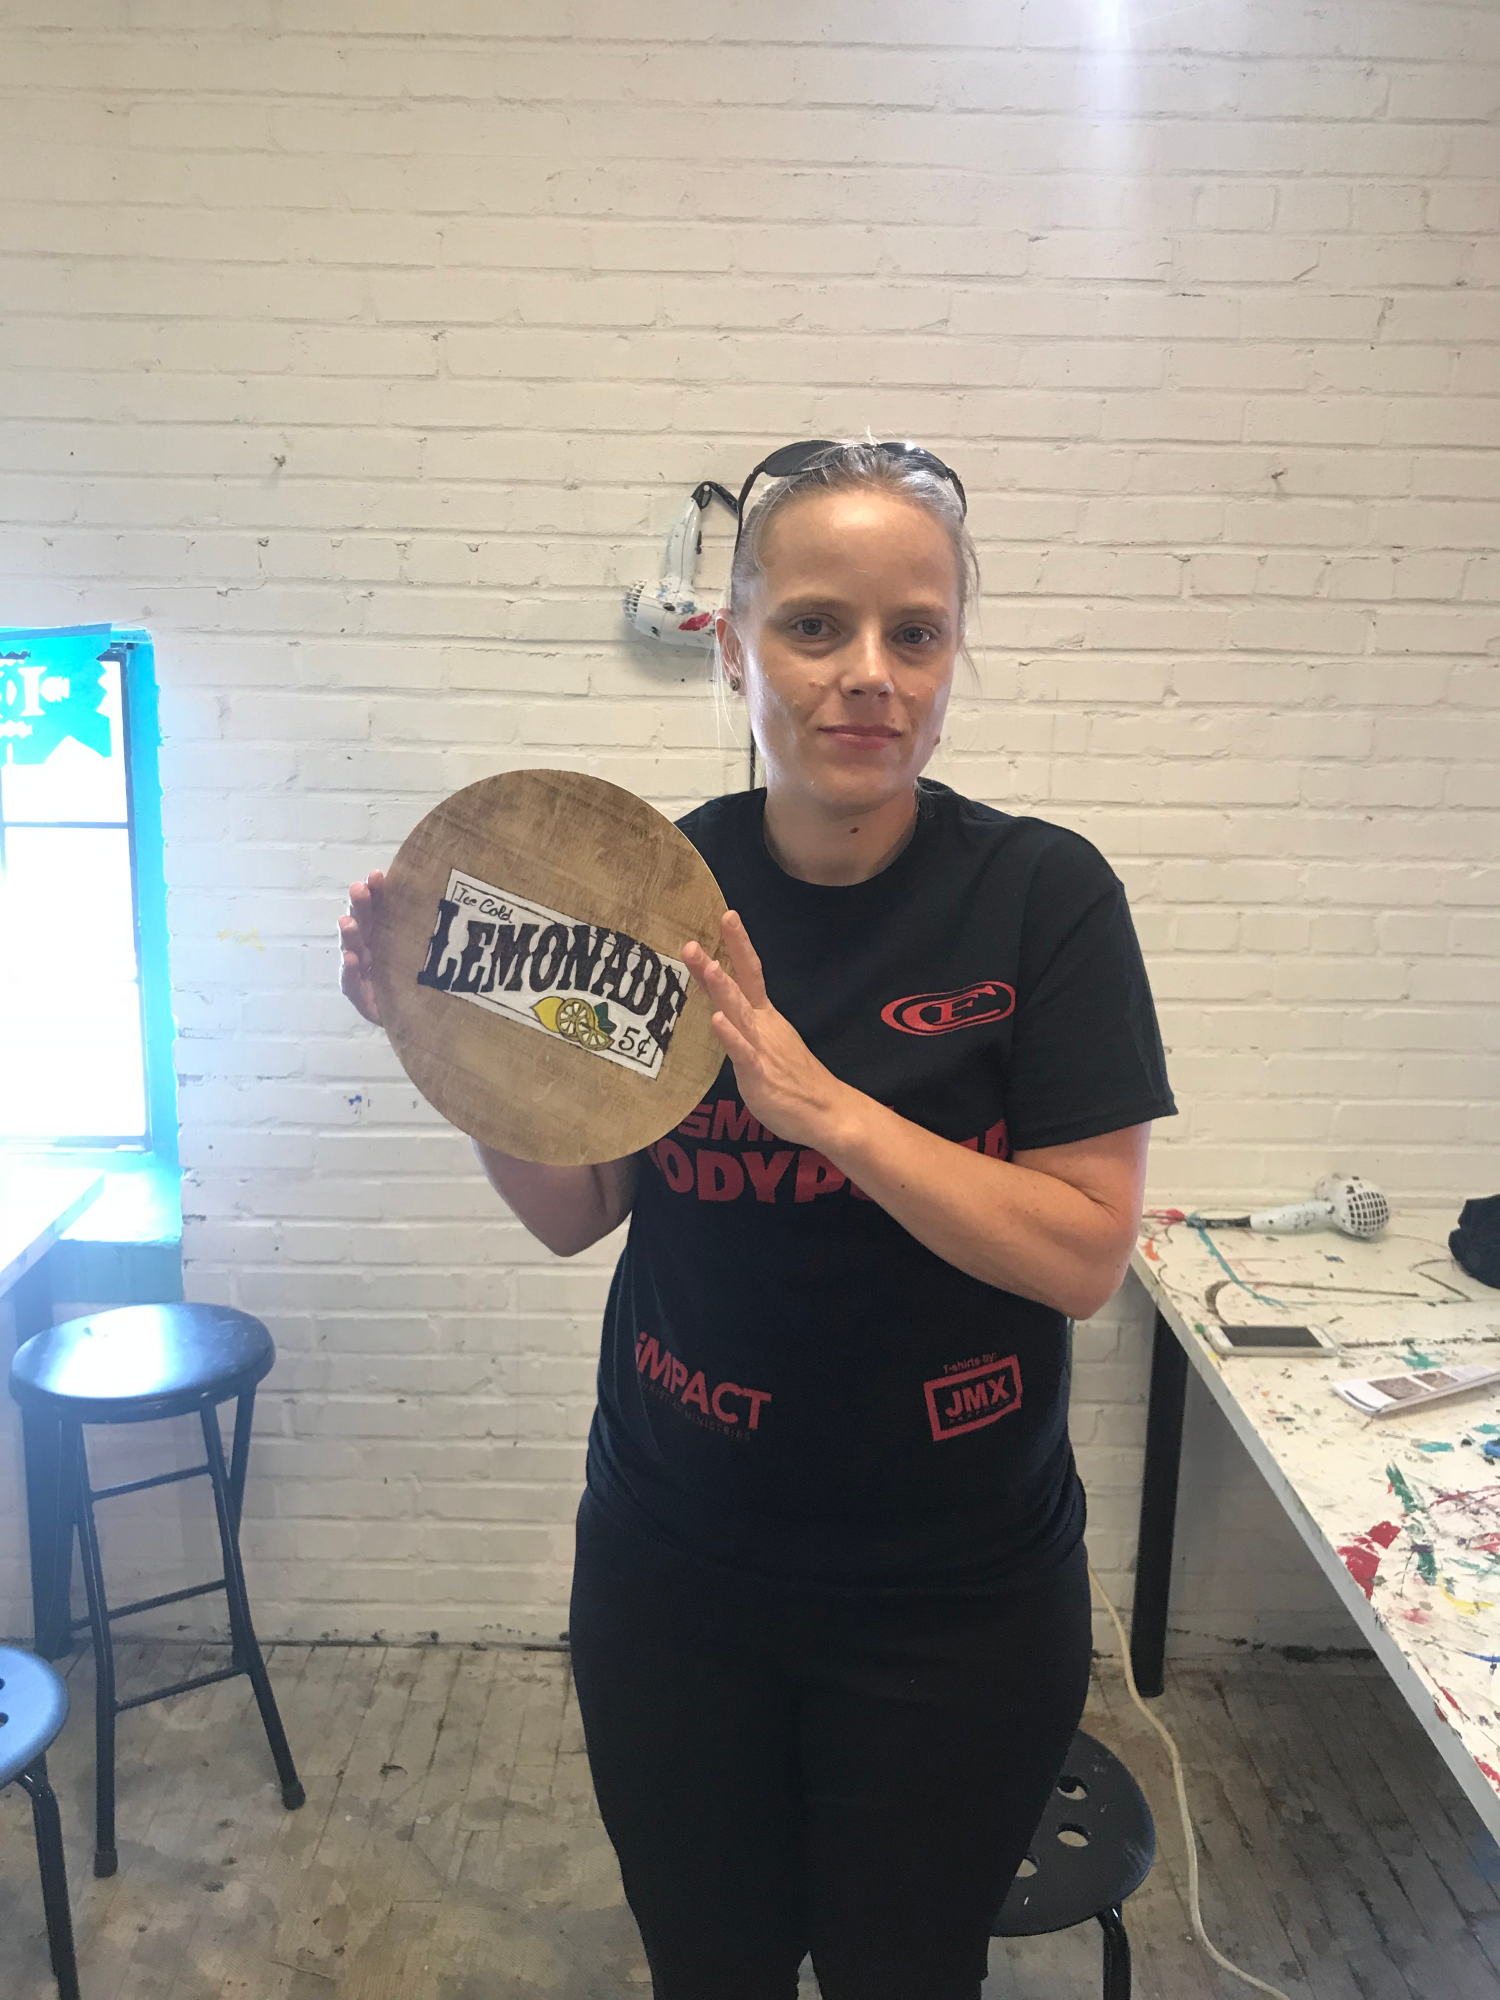
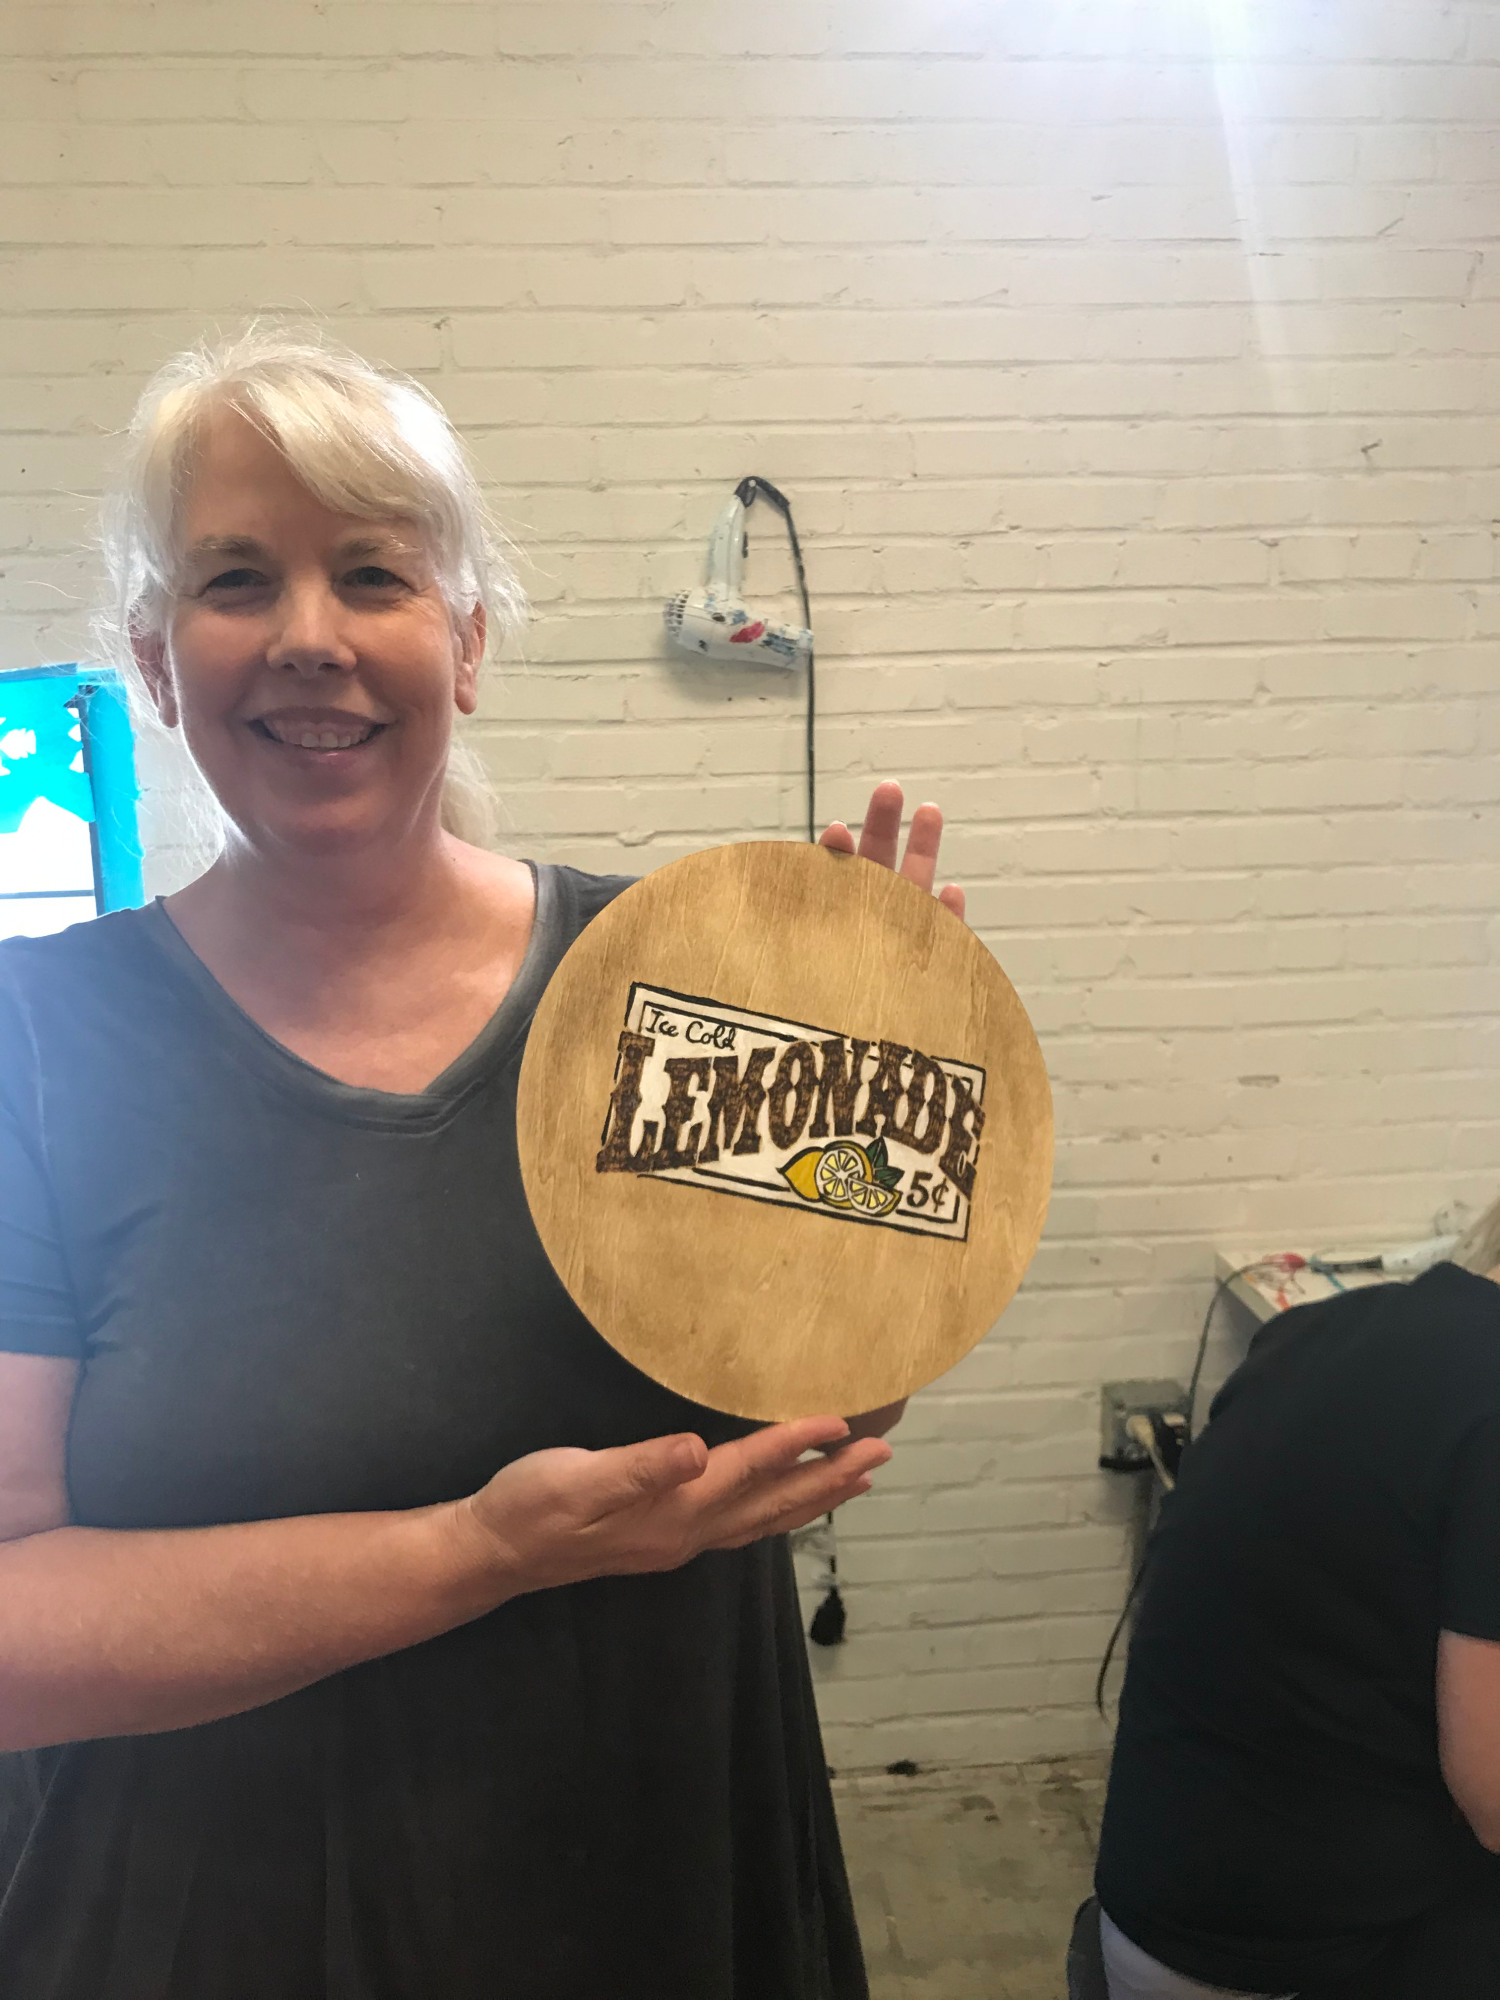
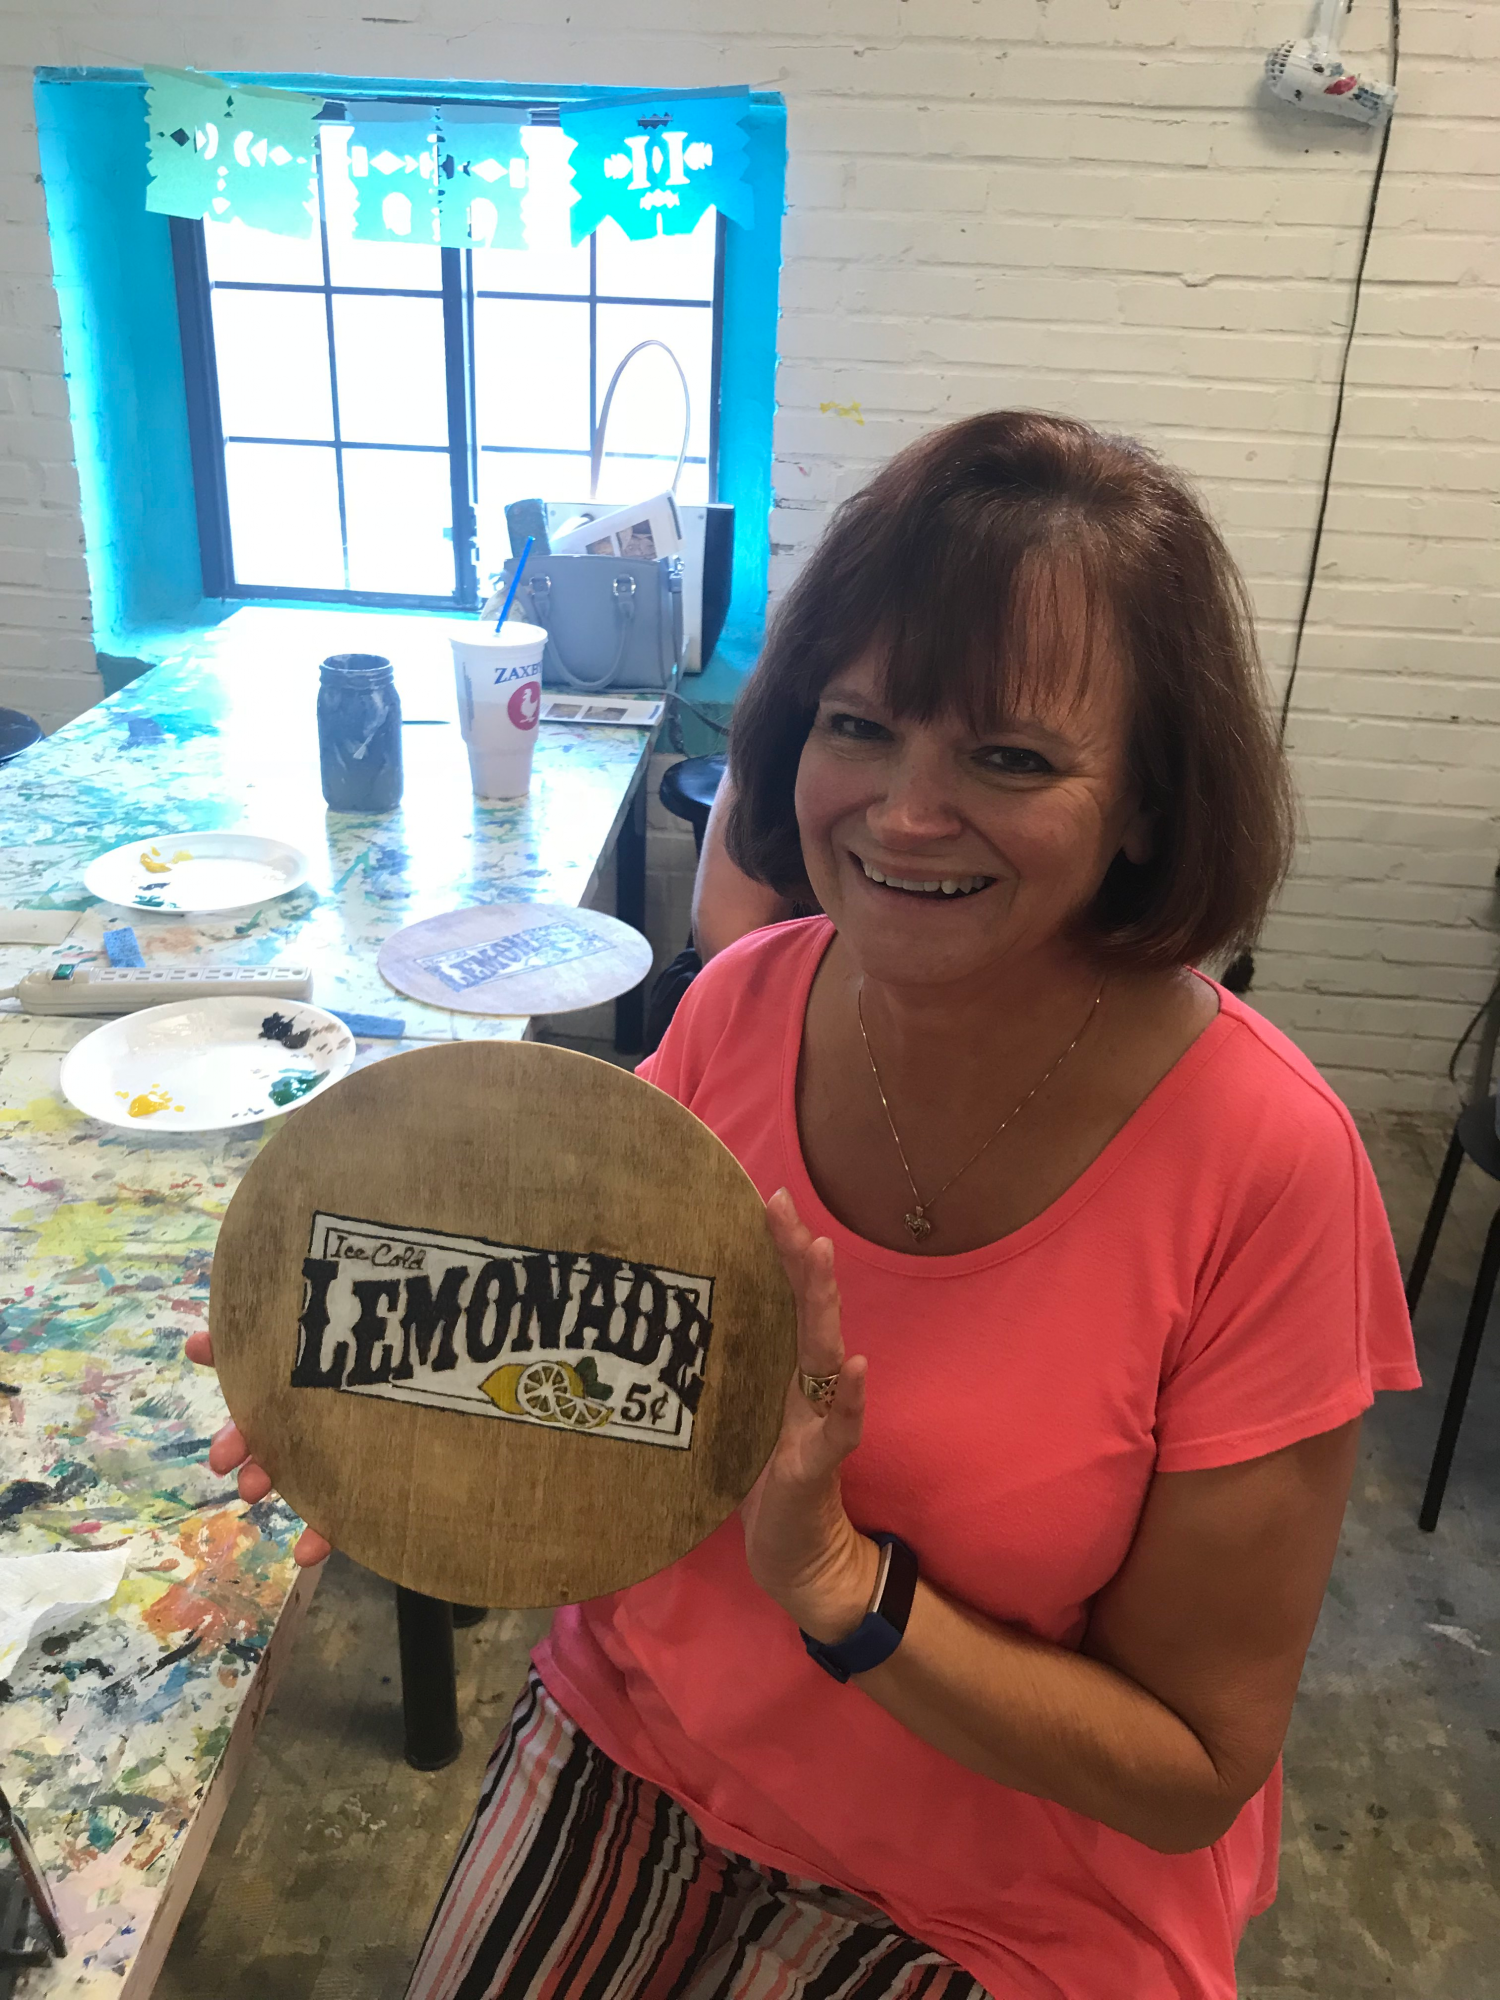
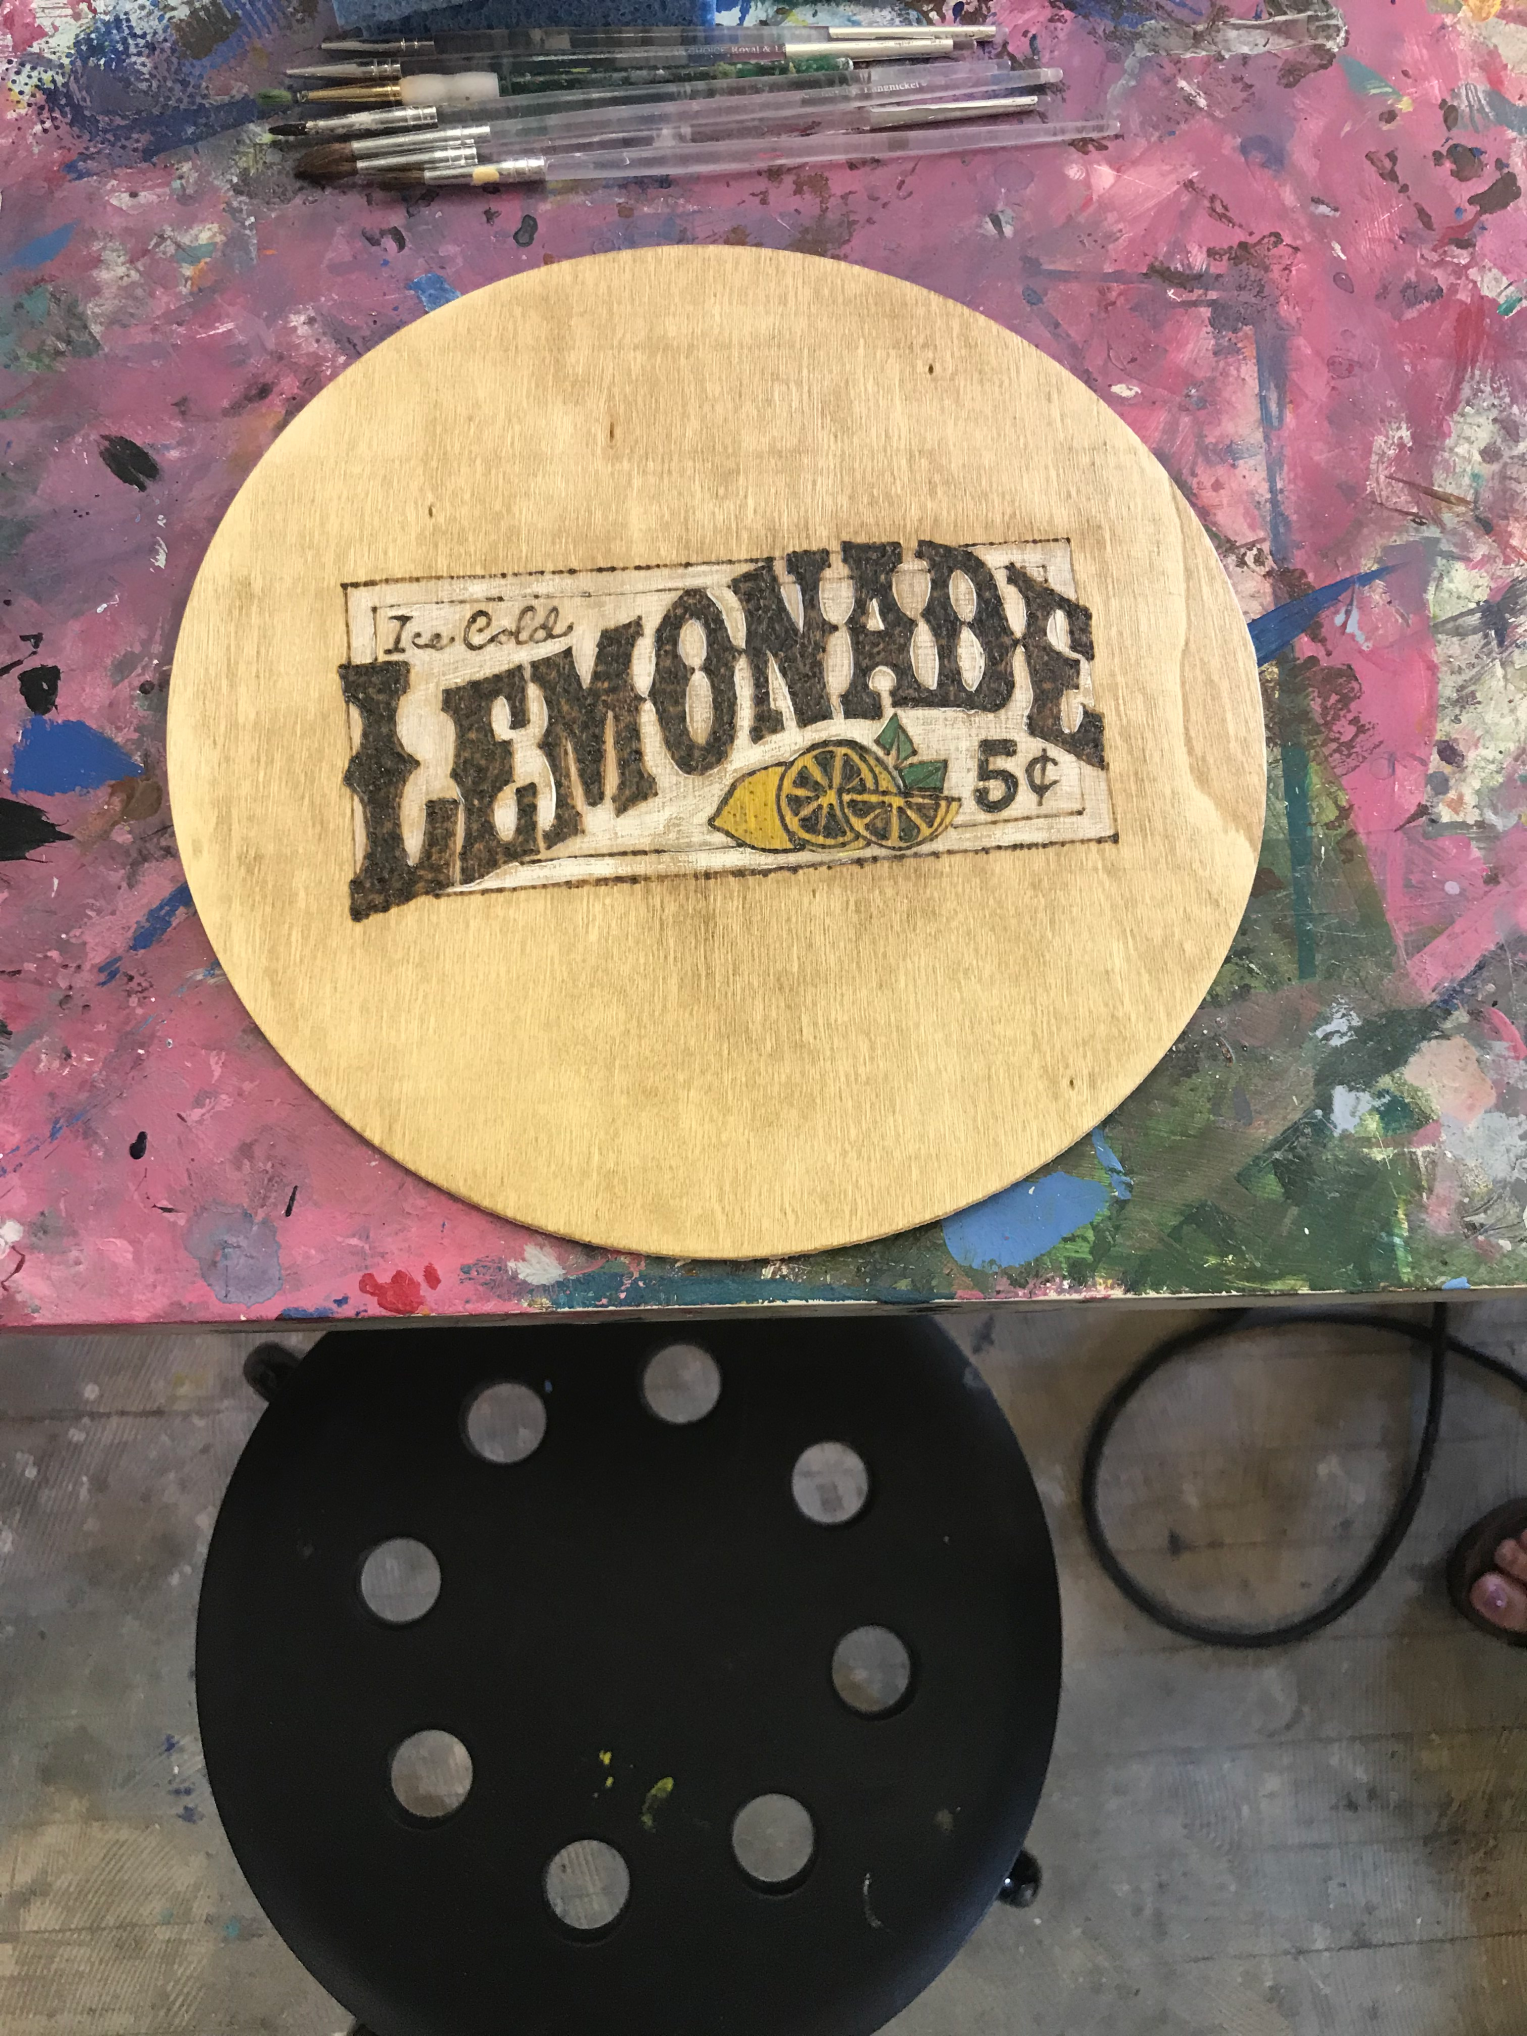
Another big “CONGRATULATIONS” to Andrea Pate on her second successful Pyrography Workshop at Stache Studios on September 29, 2018!
Once again, Andrea Pate, a very accomplished artist in art mediums such as portrait artistry and polymer clay modelling, has managed to spread the word about pyrography in downtown Griffin. As her plan to continue on the workshop on Seasonal Designs, all her attendees with big satisfied grins and new home decors.
 |
 |
 |
 |
 |
 |
“Leave a permanent impression with pyrography”
Andrea Pate
 |
 |
We at TRUArt are proud to be a part of Andrea’s endeavors to teach others of the easy and fun-loaded art of pyrography or wood burning. The pyrography pens used in this workshop and the one before that were predominantly our (Stage 1) Wood and Leather Pyrography Pen. The artist herself has our robust 60 W Professional Woodburning Detailer.
We can’t wait to check out what next season’s theme is going to be permanently burned into wood again!
The TRUArt family extends its biggest “CONGRATULATIONS” to Andrea Pate for successfully hosting her first Pyrography Workshop at Stache Studios last August 18, 2018 and has effectively opened the doors to many budding artists looking for a unique and fun way to express their creativity!
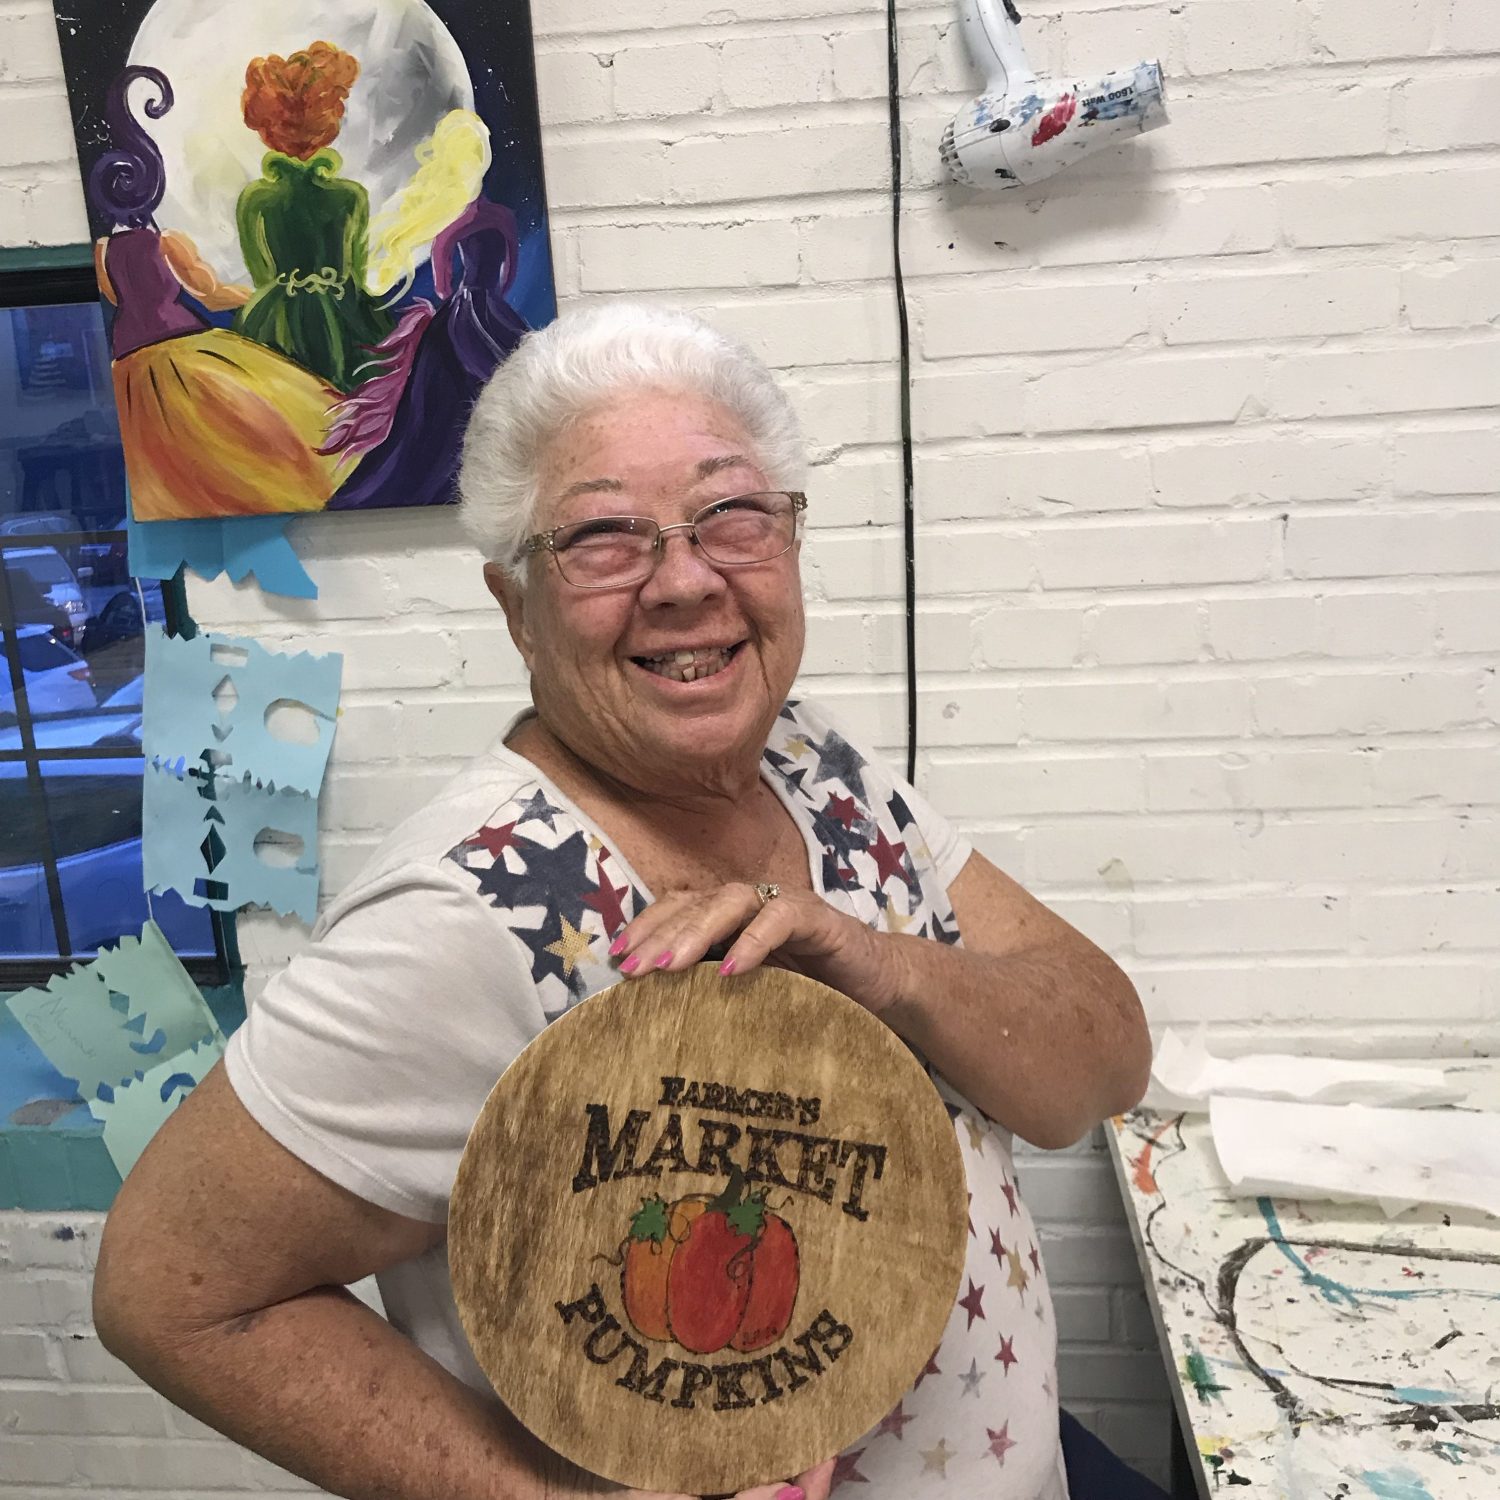
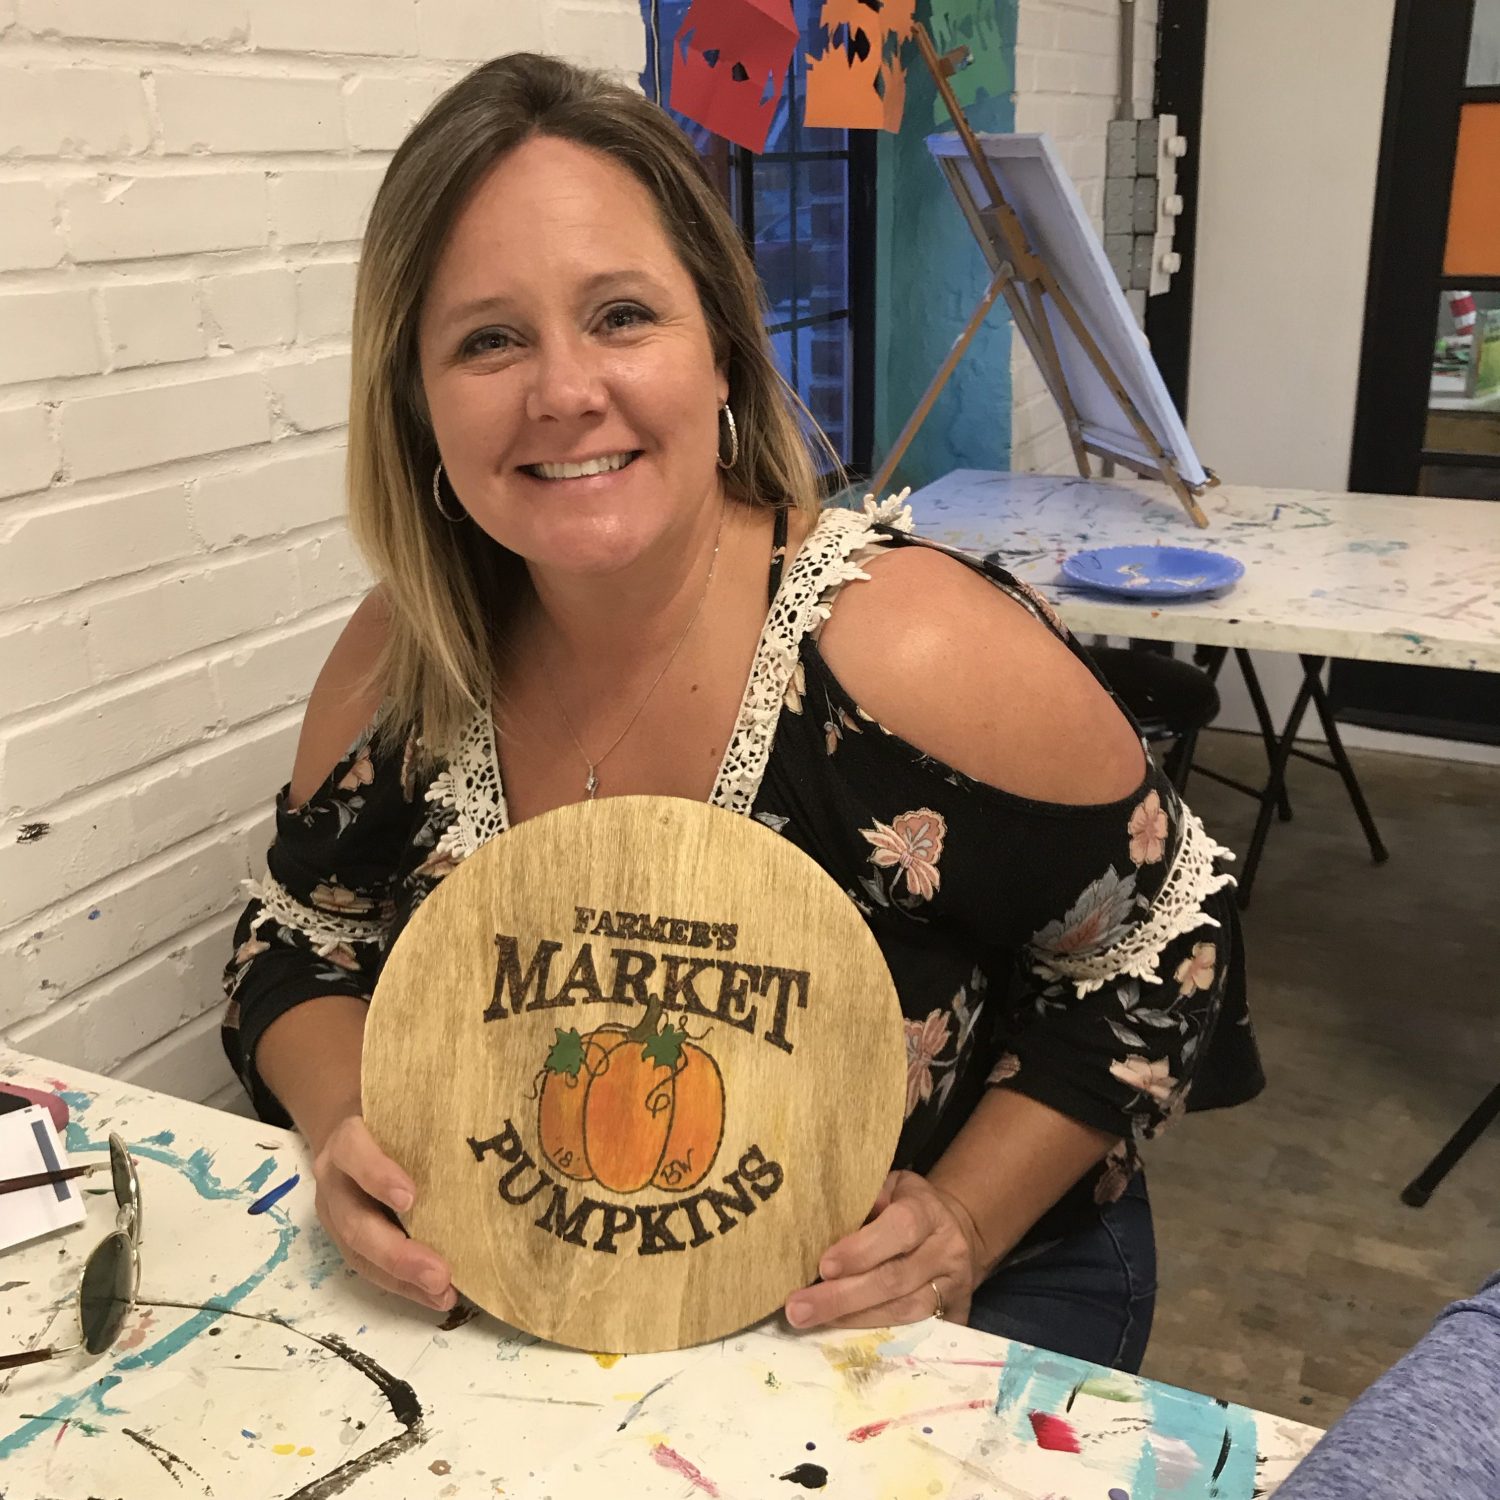
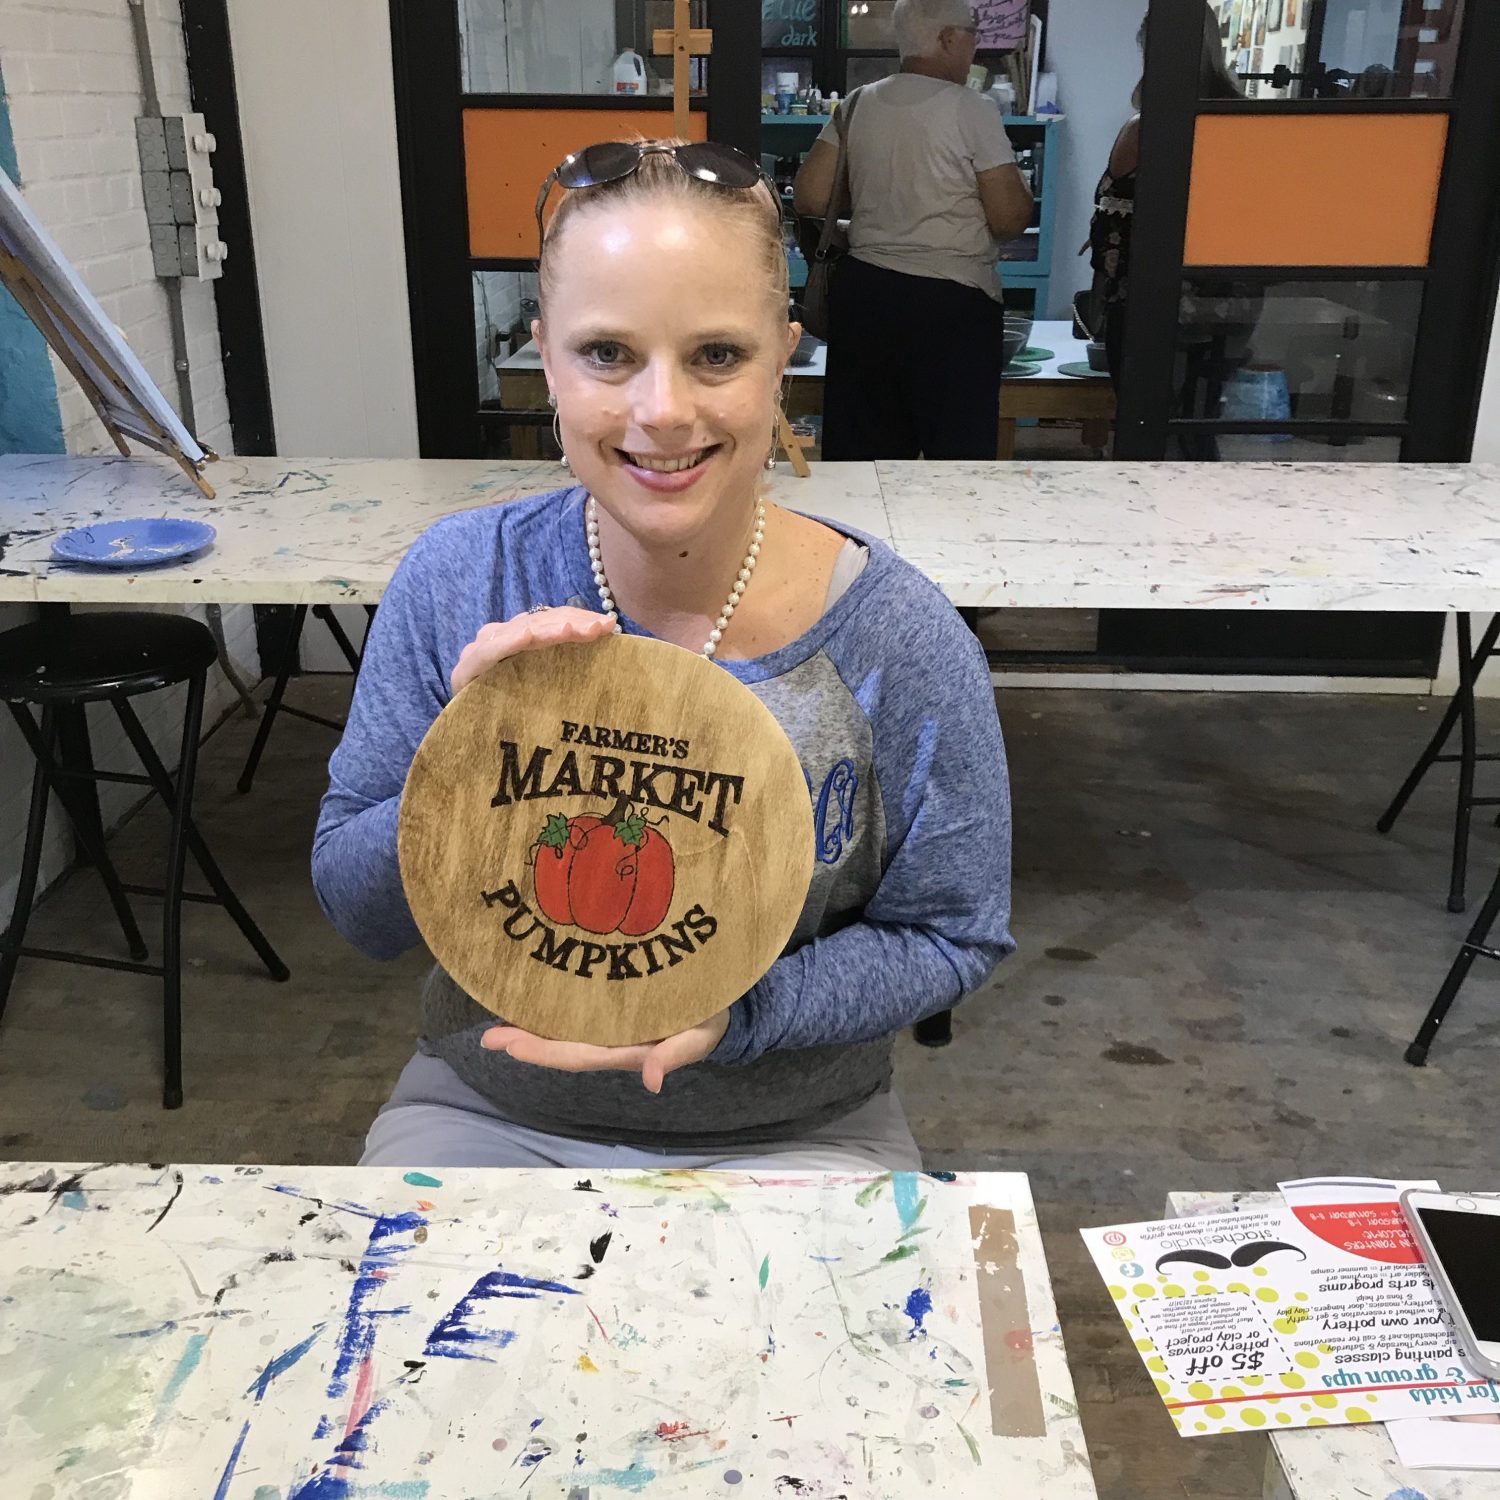
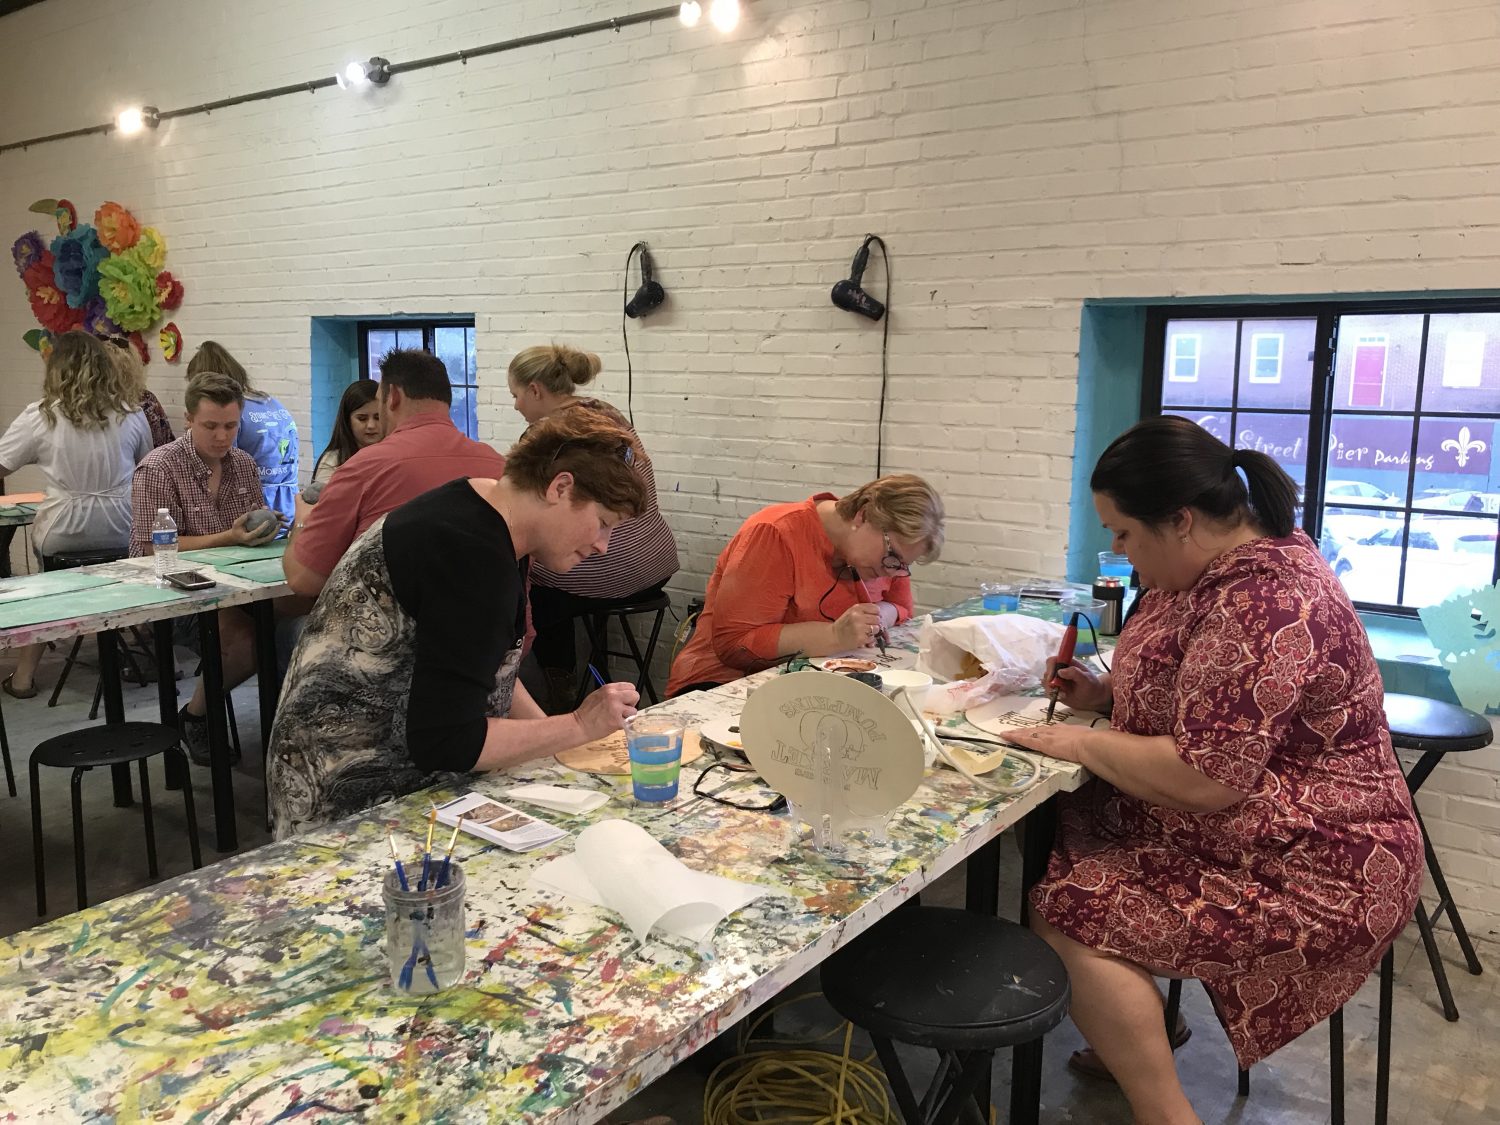
Stache Studios, the go-to place in Downtown Griffin for learning various forms of art medium such as painting, ceramics, mosaics and clay works, graciously welcomed Andrea’s suggestion to include a new form of artwork – pyrography. With Andrea’s long history and connection to art since childhood, coupled with more than two years of pyrography experience, she deftly introduced and guided everyone into the practically new art world of wood burning. Needless to say, all workshop attendees left with proud smiles and their finished projects. Just check out the pictures below!
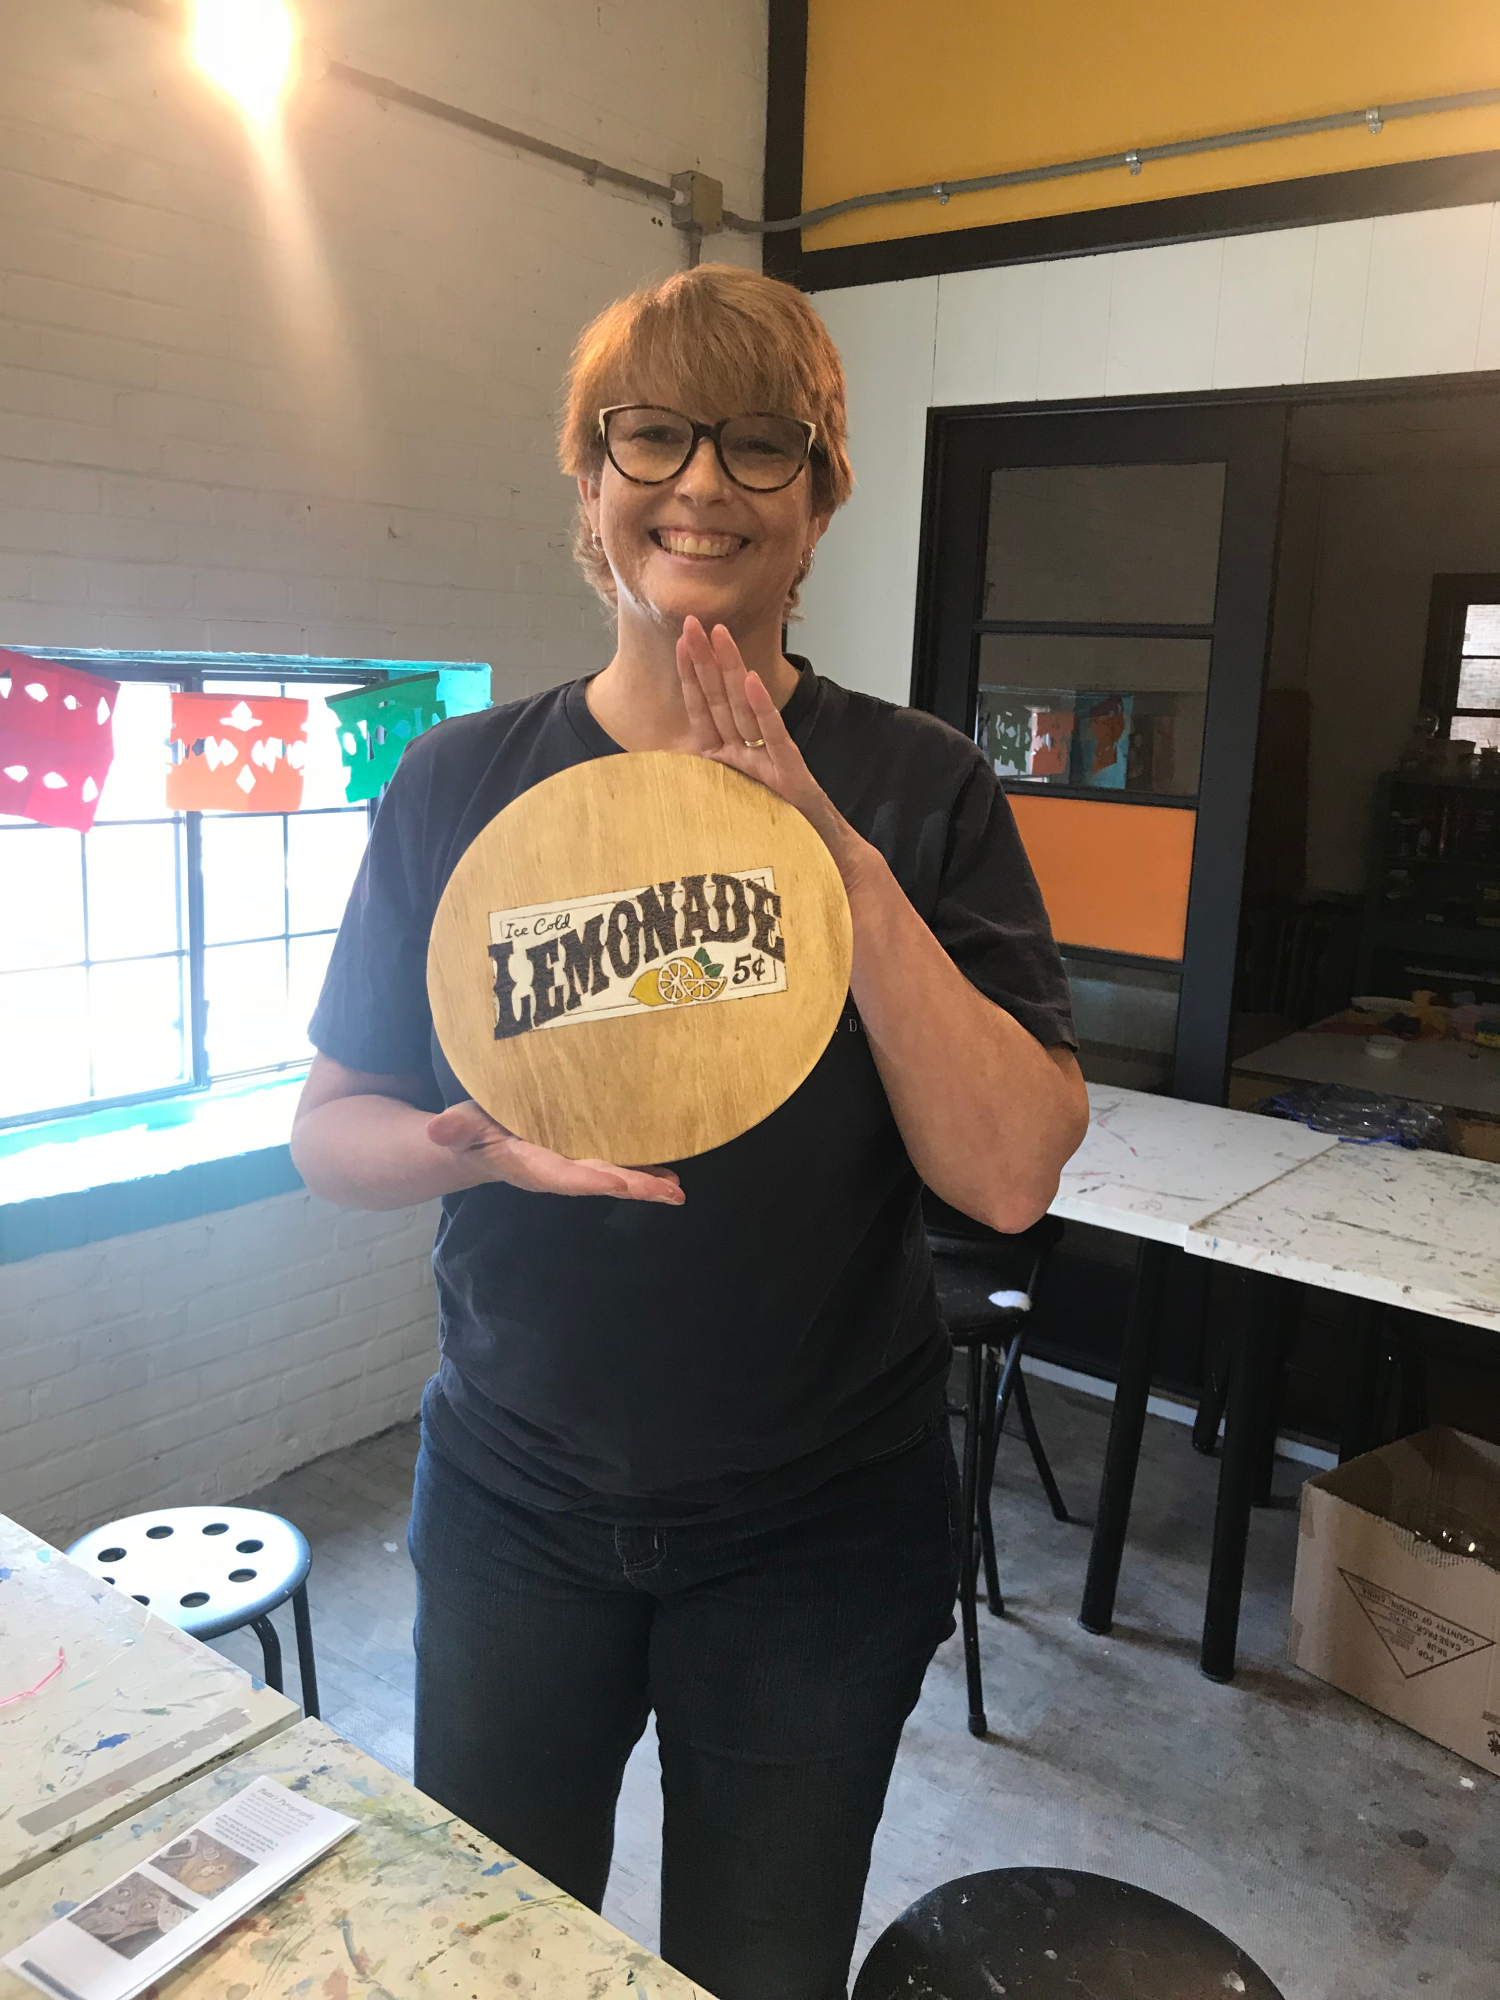 |
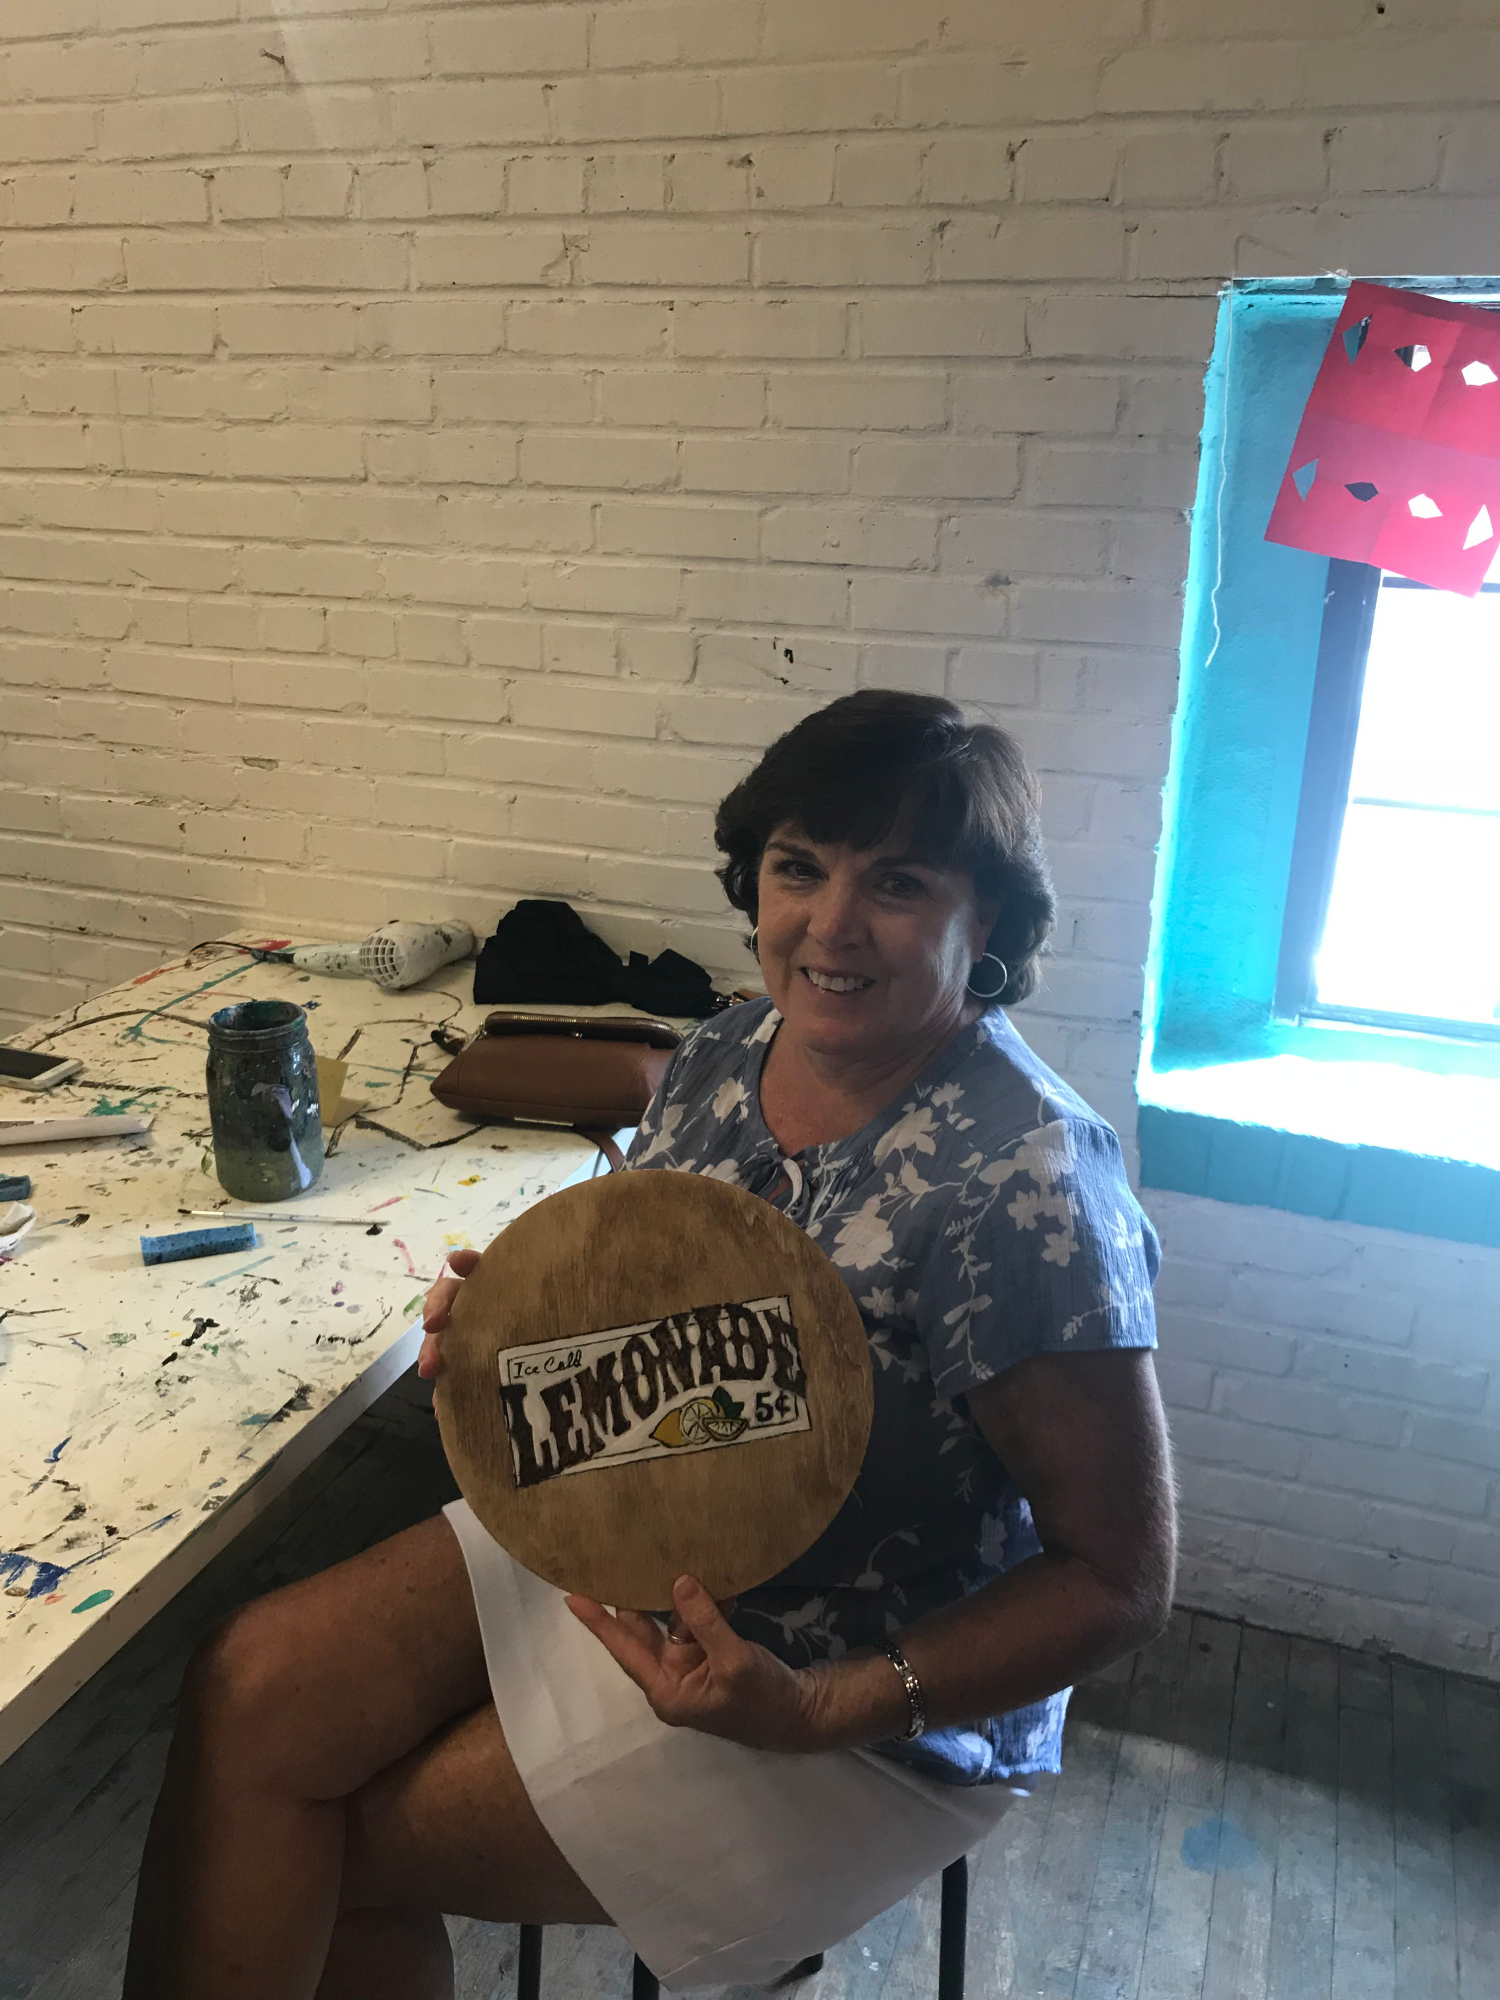 |
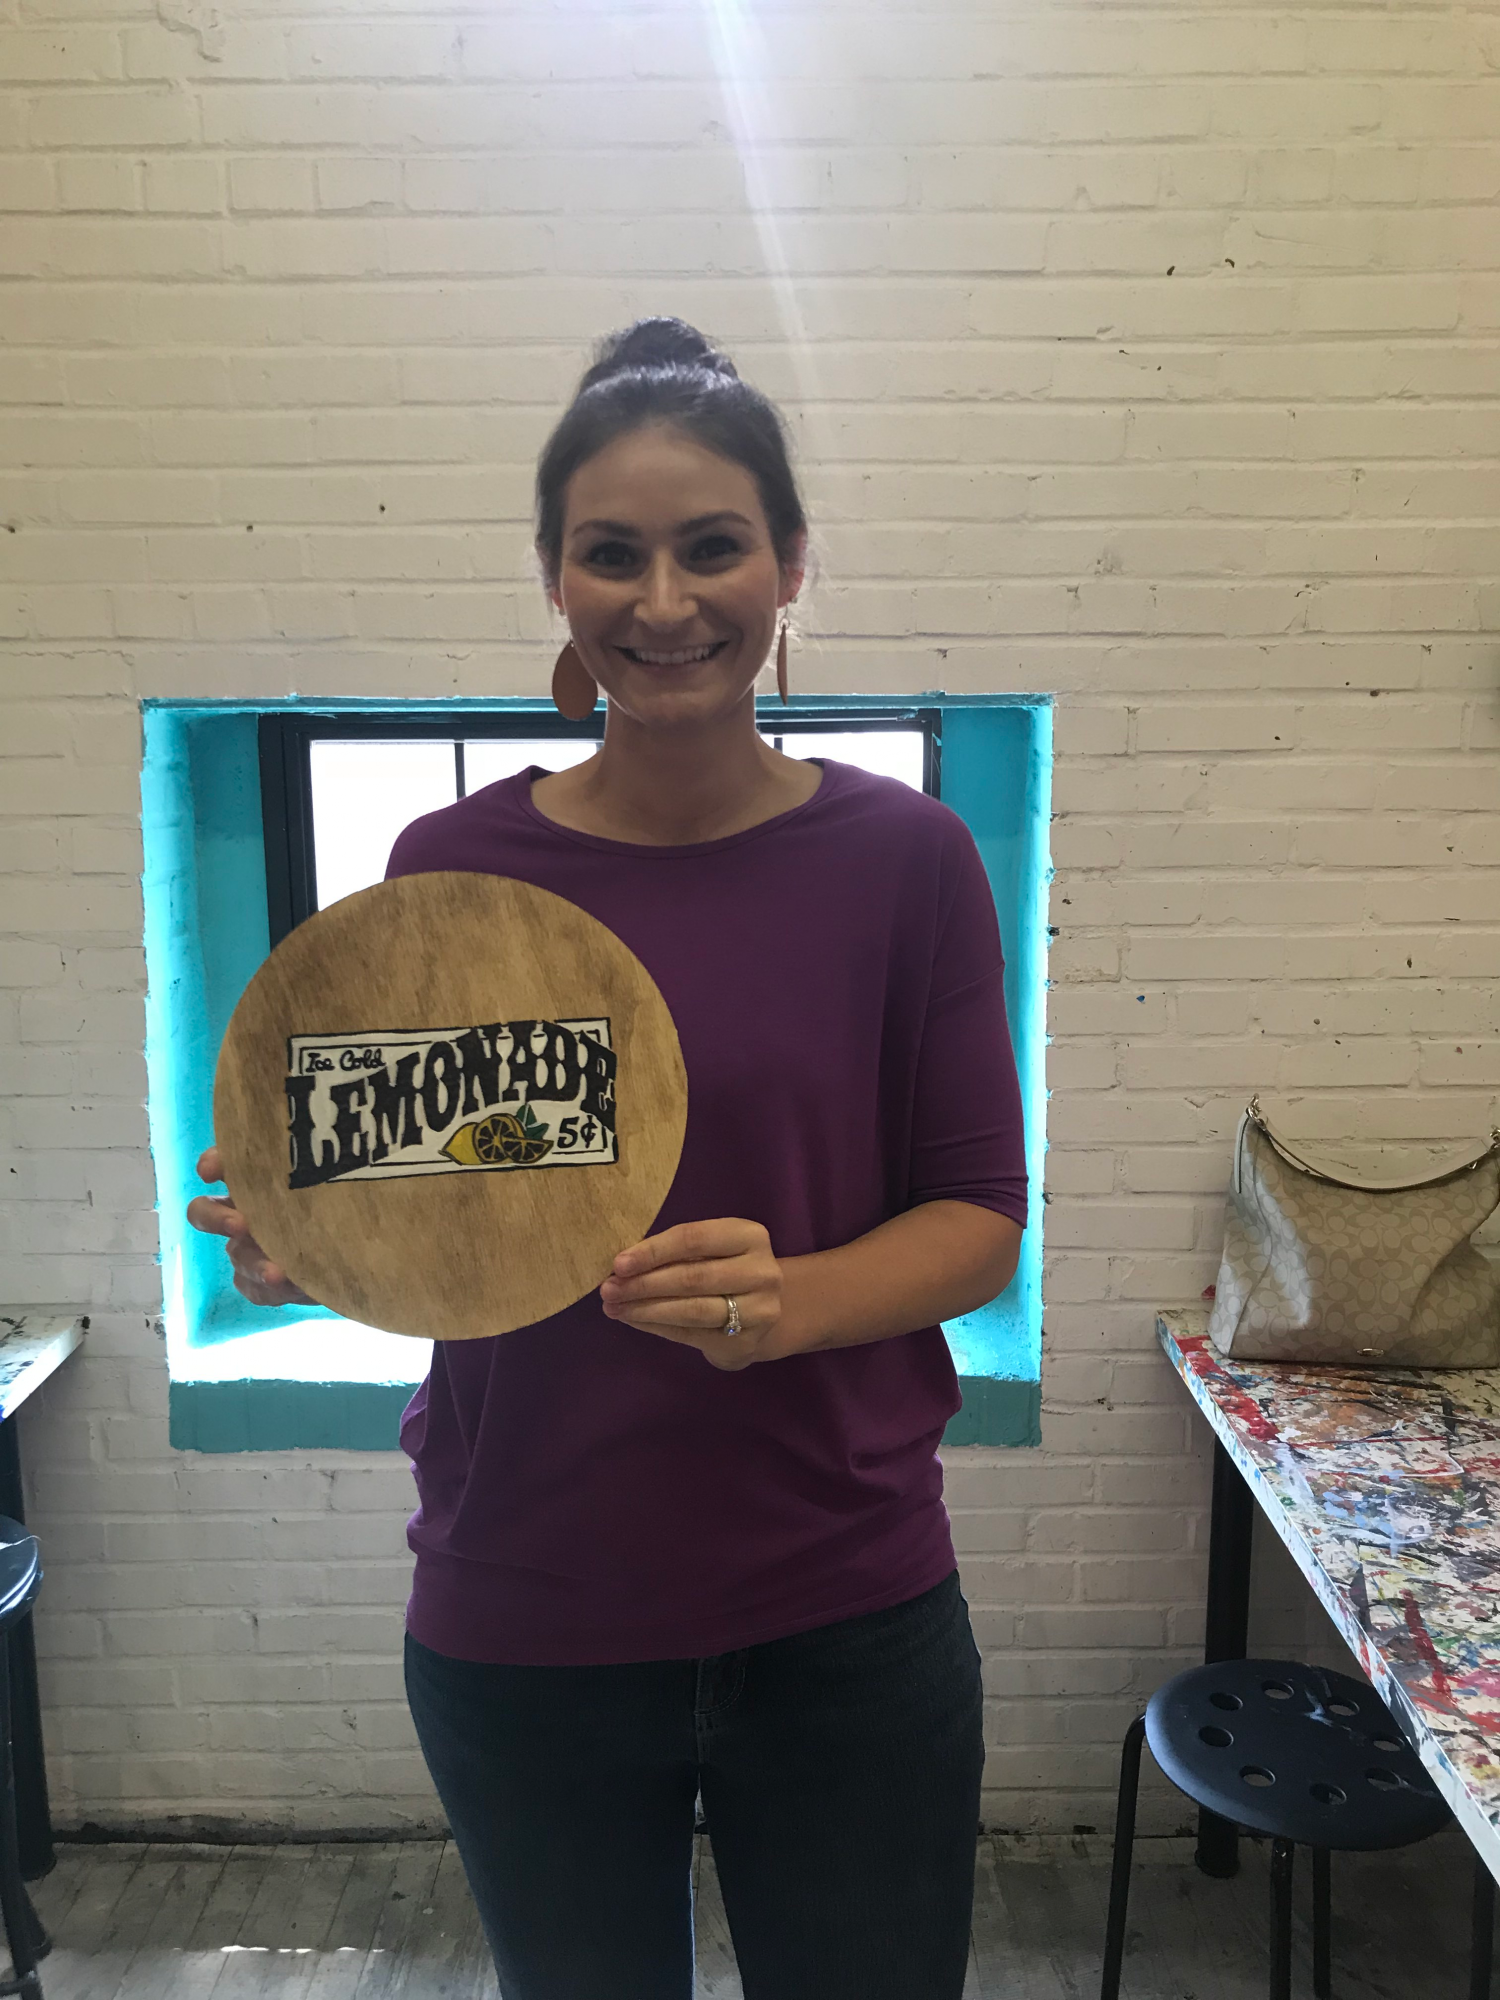 |
 |
 |
 |
Andrea understands that pyrography isn’t a medium that is well known in the field of arts. In fact, she did not imagine herself hosting any workshop about it at all – being contented with creating beautiful pyrogrphy art work and selling them. That changed when we started commissioning her to create tutorials for us using our wood burning pens. In one of the tutorials, she was teaching some children how to create wood burnings for their loved ones. Watching their excitement in the process got her curious about creating classes for adults. She wanted to expose as many people to this art form as she could. Thinking of ways to get pyrography out there, she came across her local art studio. Although Stache Studio provides customers with amazing pottery and painting classes, she realized they didn’t have any on woodburning. In fact, there just aren’t many places around where one could learn Pyrography.
 |
 |
 |
“Leave a permanent impression with pyrography”
Andrea Pate
 |
 |
 |
Jessica, owner of Stache Studios, loved Andrea’s idea and immediately went to work to get things rolling while the artist provided the tools she got from TRUArt. After the resounding success of her first workshop, the artist was thrilled to see the excitement others were going through learning something she was passionate about. She feels very fortunate to have the opportunity to teach people pyrography and plans to continue sharing her expertise with more classes. As of this writing, she’s been busy creating seasonal designs for her workshop that customers can display every month of the year in their homes. It definitely doesn’t look like she plans to slow down one bit seeing that workshops are powerful tools to get the needed exposure to the art as people are starting to become familiar with it and with what she does.

To those who have yet to touch a pyrography pen or to those who think they don’t have the creativity for it, here’s what Andrea has to say about it:
“DO not to give up. If it’s something you’re not good at, that’s all the more reason to keep going. It will get easier and you’ll learn what works for you along the way. If it’s something you are passionate about then never give up.
It’s amazing what you can learn and how you can improve in such a short time frame. I look back at where I started and to where I’m at today and there is such a huge difference. I’m excited to see how much I will continue to grow and improve over the course of this year.”
We at TRUArt couldn’t have said it better, Andrea. We’re so glad and honored to be a part of your achievements in the wonderful world of pyrography. Thank you!
What you will need:
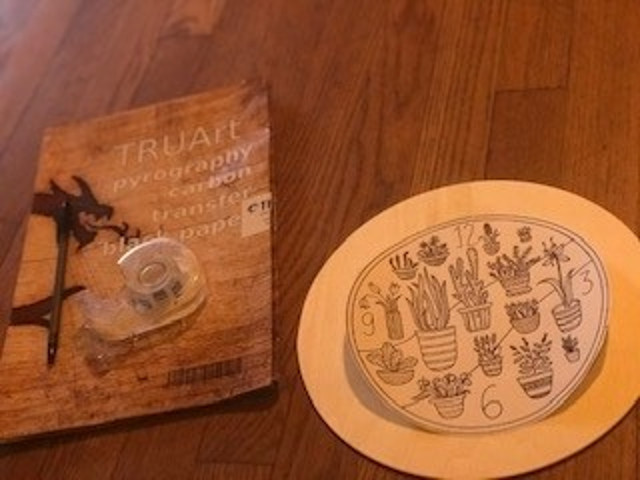
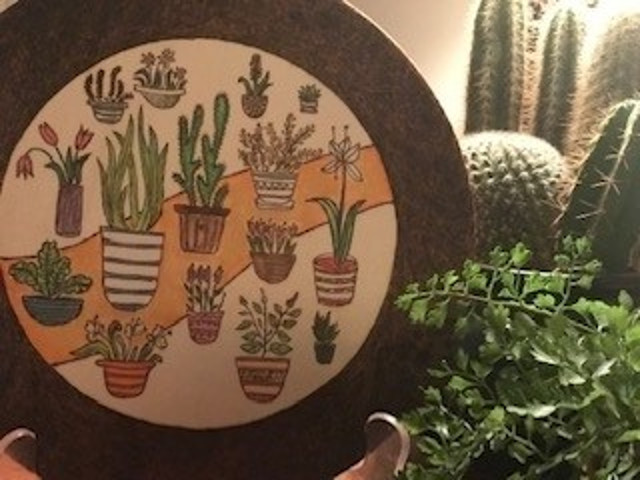
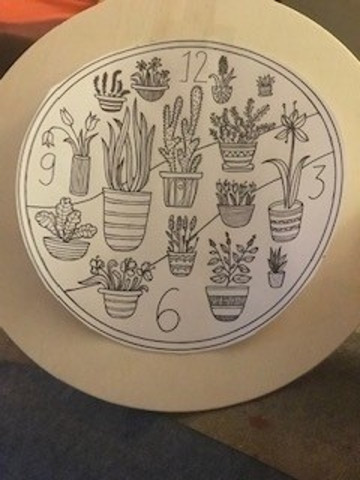
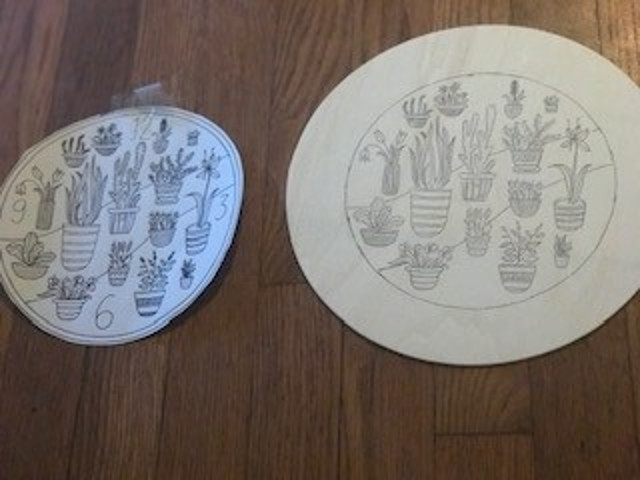
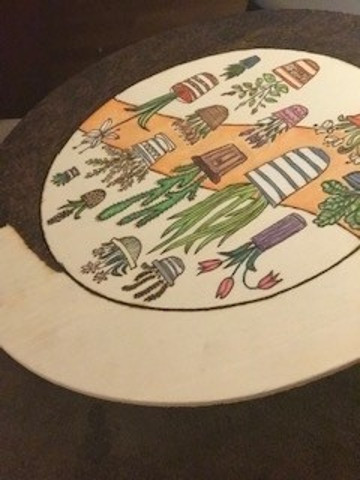
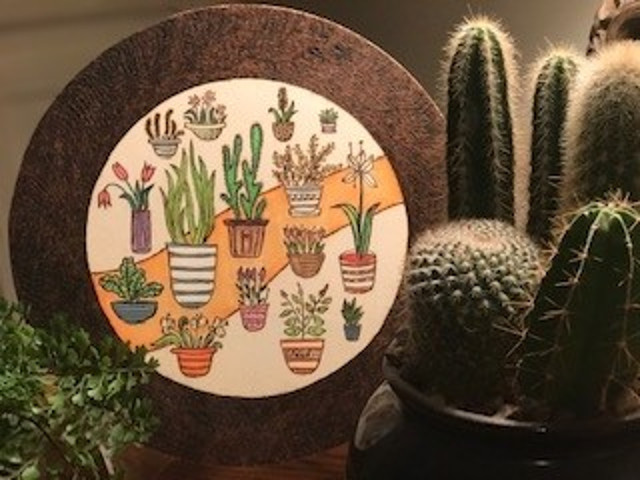
Sometimes, in pyrography, trying to find the right image to burn can be extremely tricky. When you are an artist, copyright laws can make it challenging to find a great image to burn. Fortunately, now TRUArt has FREE printable stencils available. Once I came across these stencils, I couldn’t wait to get started.
There are several unique designs available to download but, ultimately, I decided on this cactus stencil. This stencil is available under the clock category. I loved the pattern so much that I modified the stencil to make it my own and decided not to trace the numbers.
 |
 |
 |
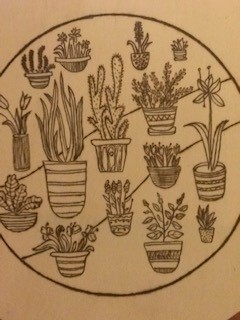 |
I found this stencil to be a quick and easy burn. This is a great project to do with your family. My children had fun picking out the colors of the various pots and helped me find the right shade of green for each plant. We spent the day going over different stencils and both my children found something that appealed to each of them.
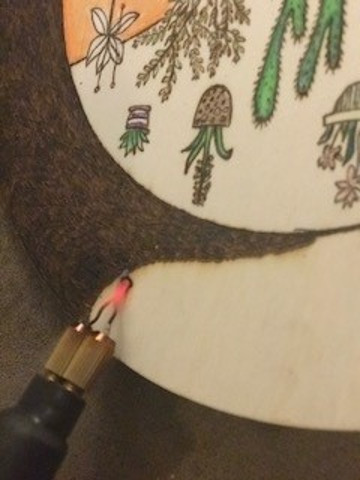
Once the image was burned and colored, I decided to give the background a nice, thick solid burn. This technique gave my burning some depth and made my image pop.
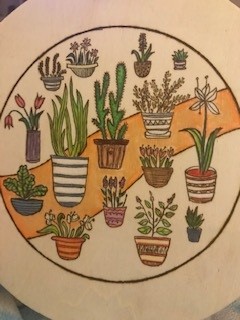
I was extremely happy with the ending result. This was a fantastic family project that is exciting for children to do. These prints are also a useful tool to help you practice your pyrography skills. My children loved working with these stencils and they are both excited about working on our next burning together.
See you next time,
Andrea Pate
Pate’s Pyrography
Materials:
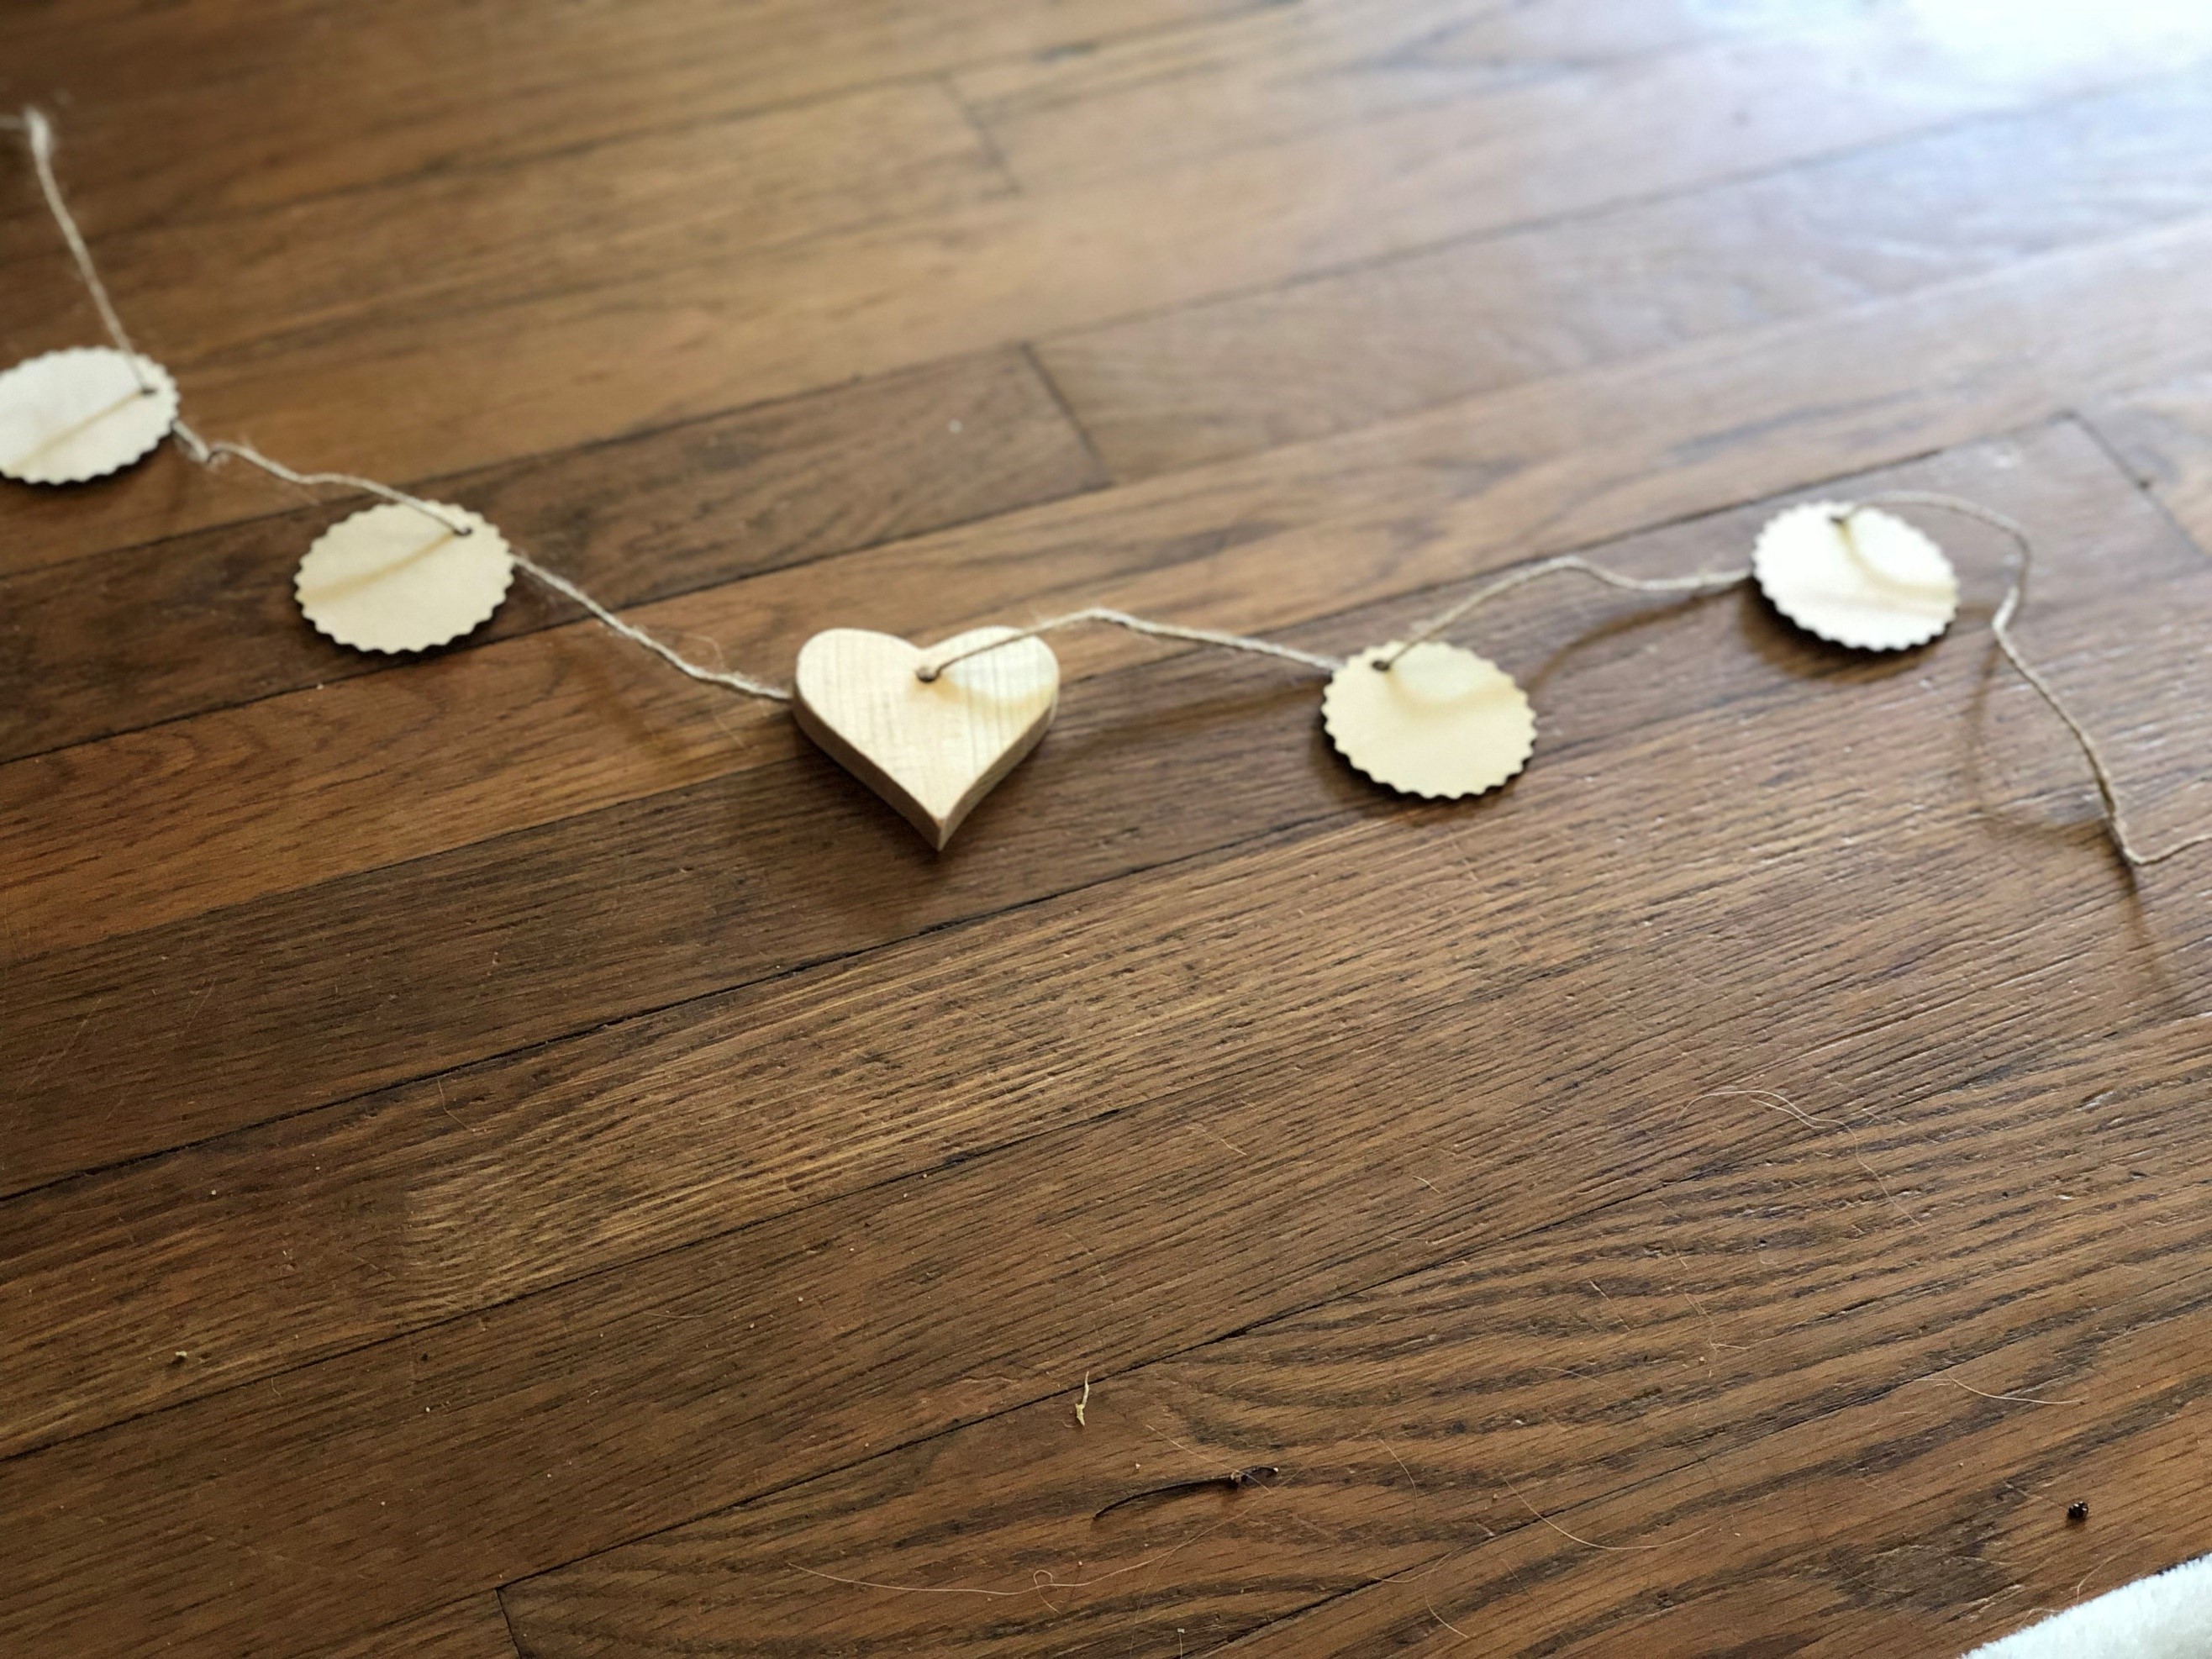
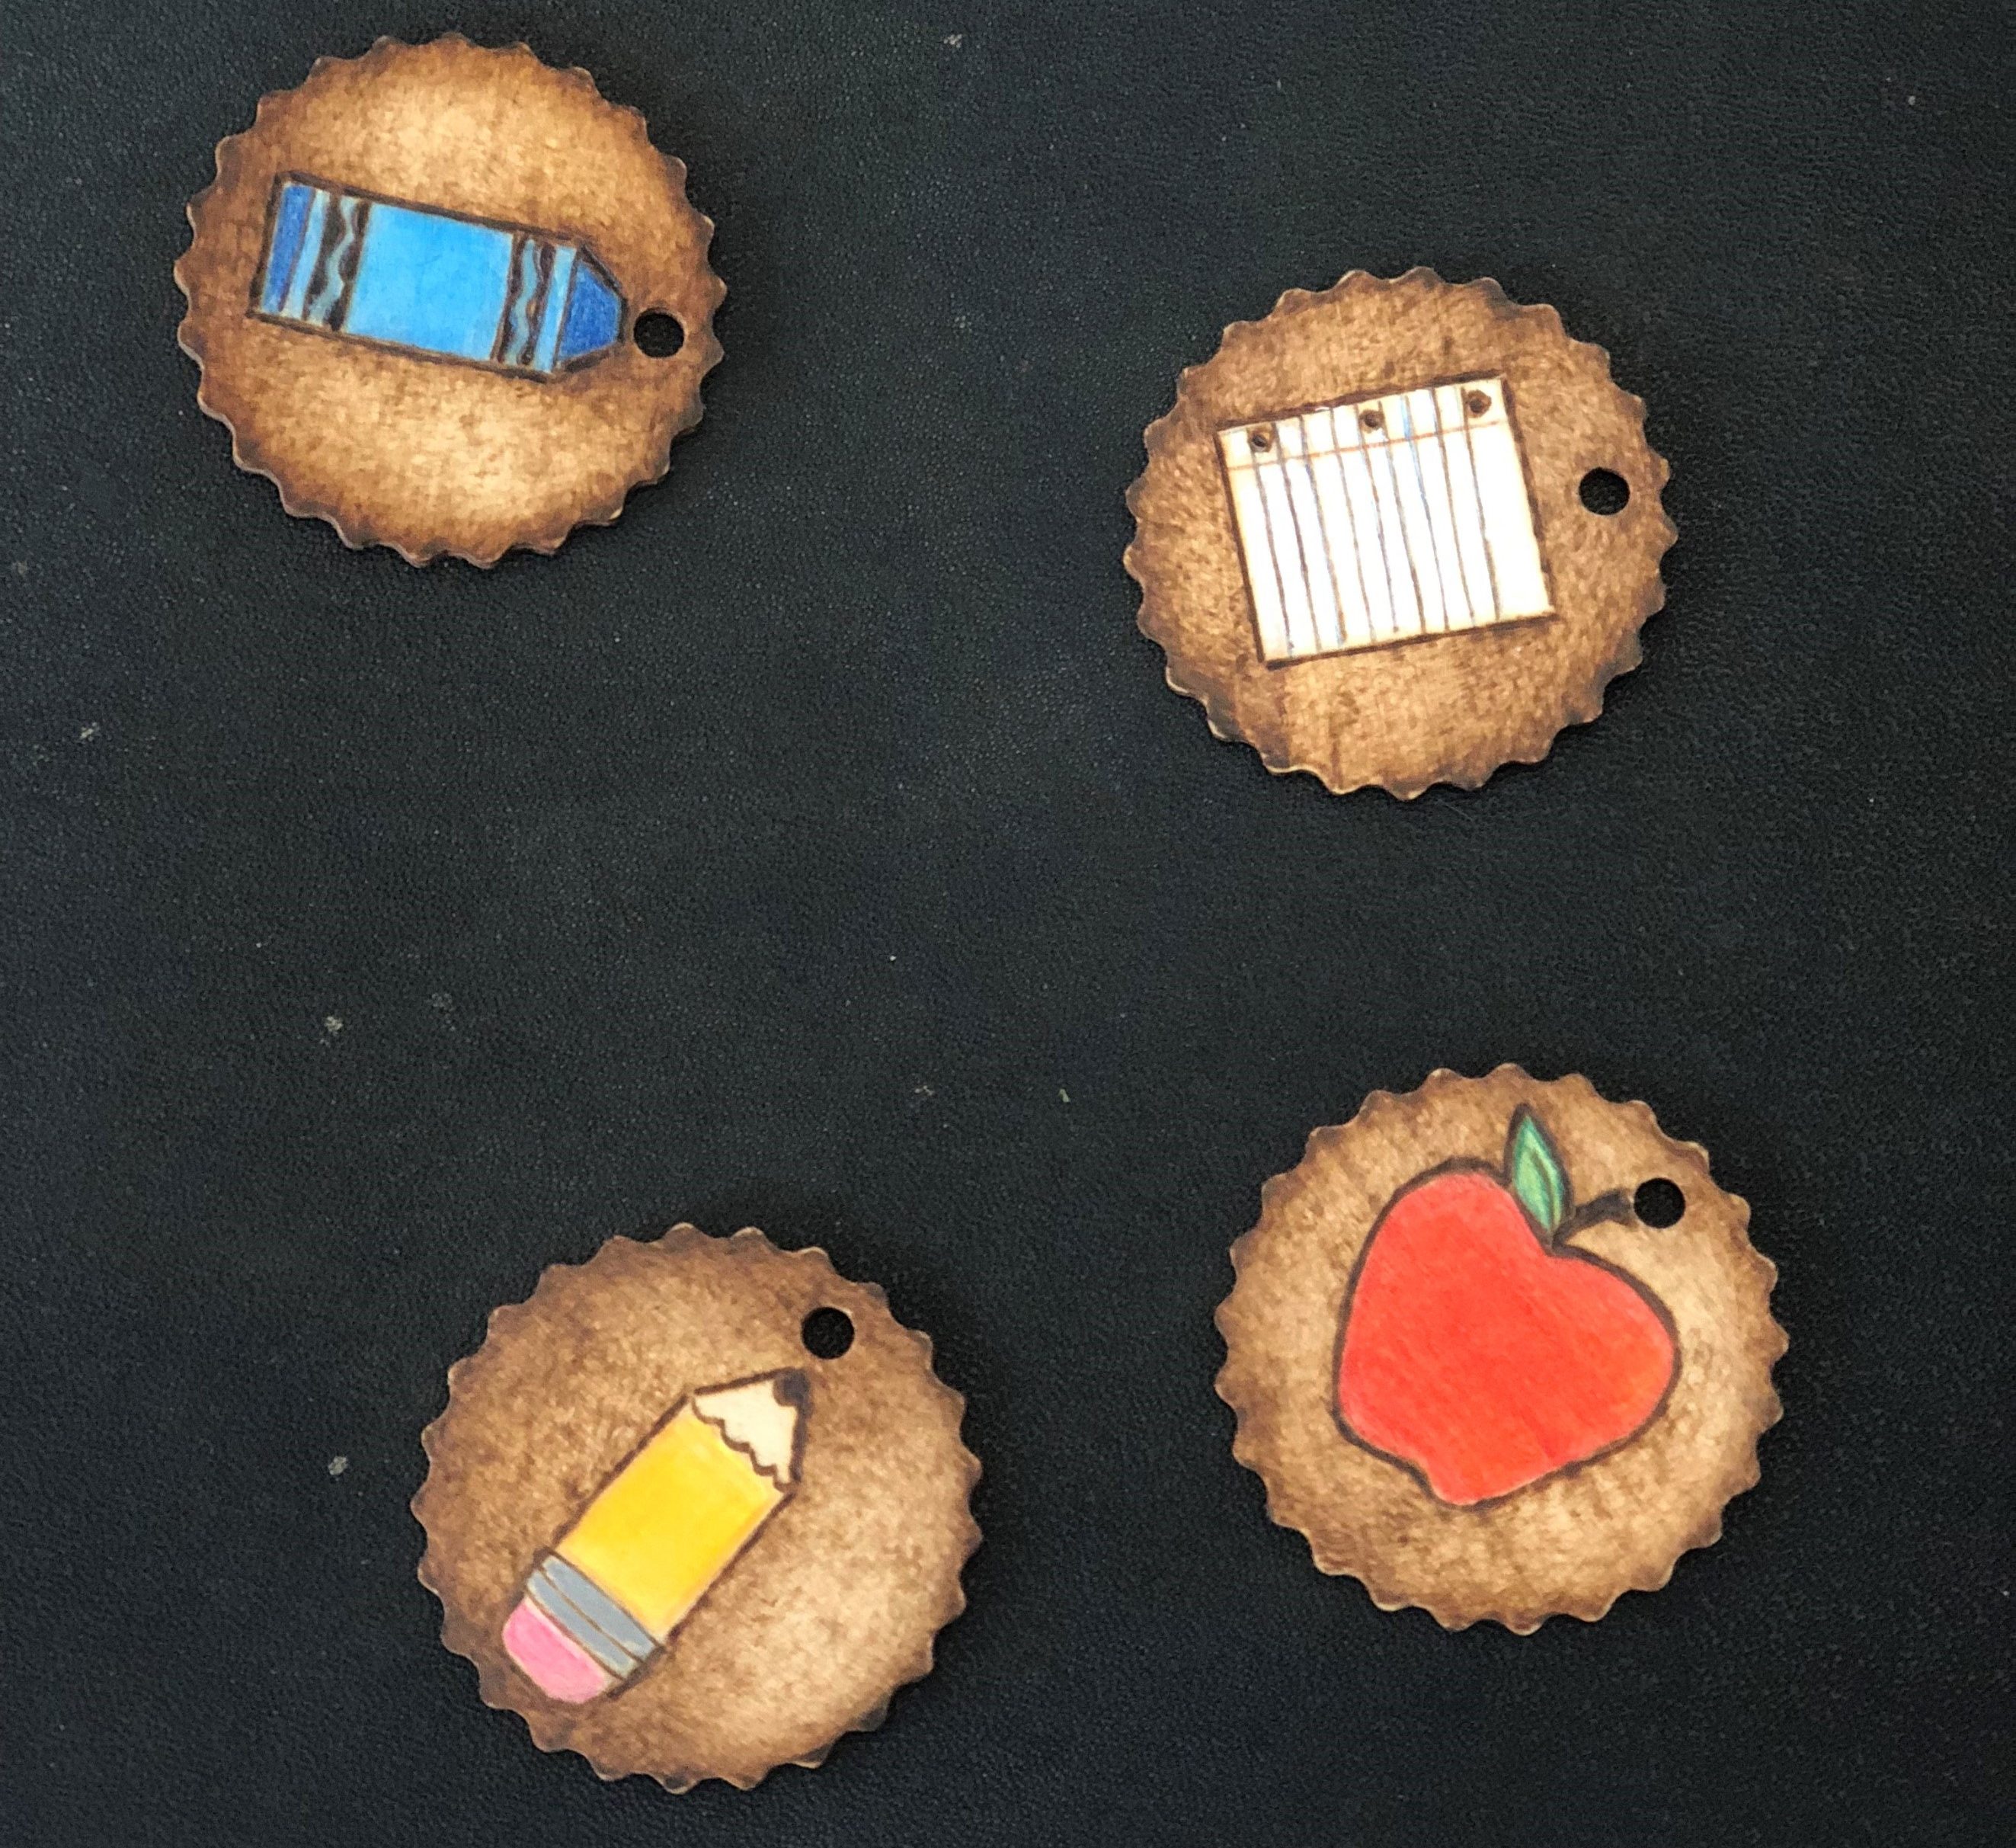
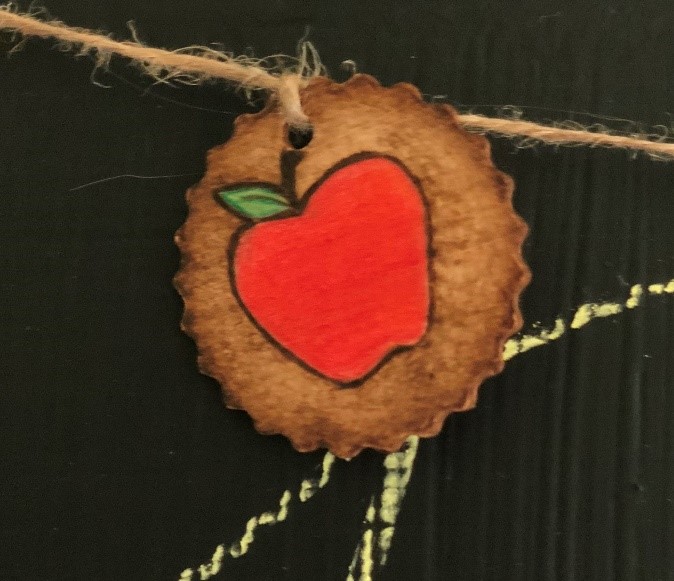
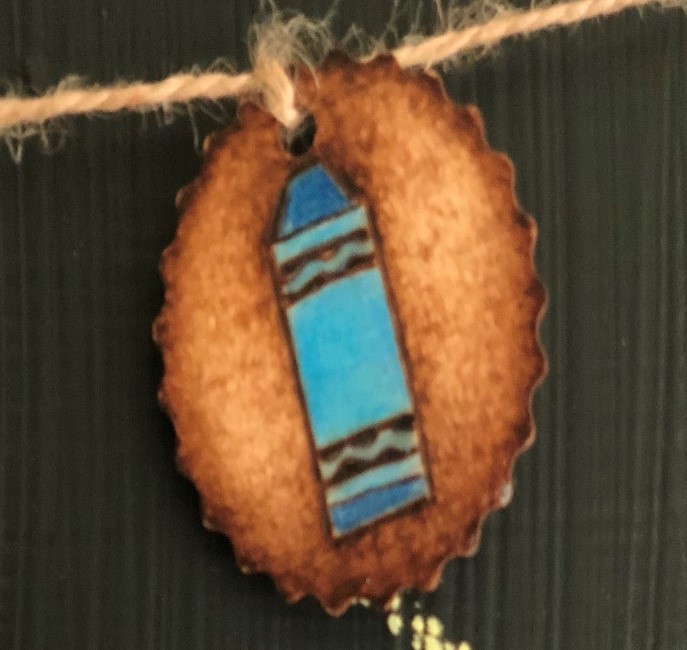
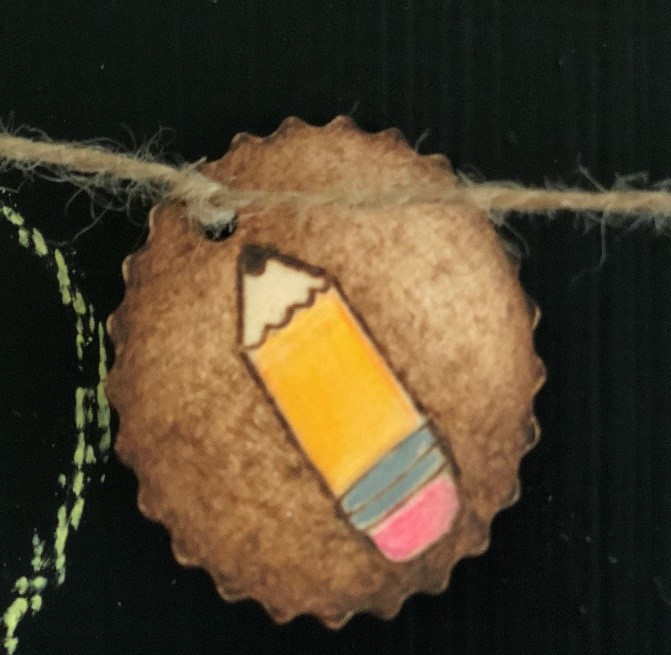
This is a fun and quick project to make for any teacher. Get your kids involved and let them help burn and/or create the designs that are used for this banner.
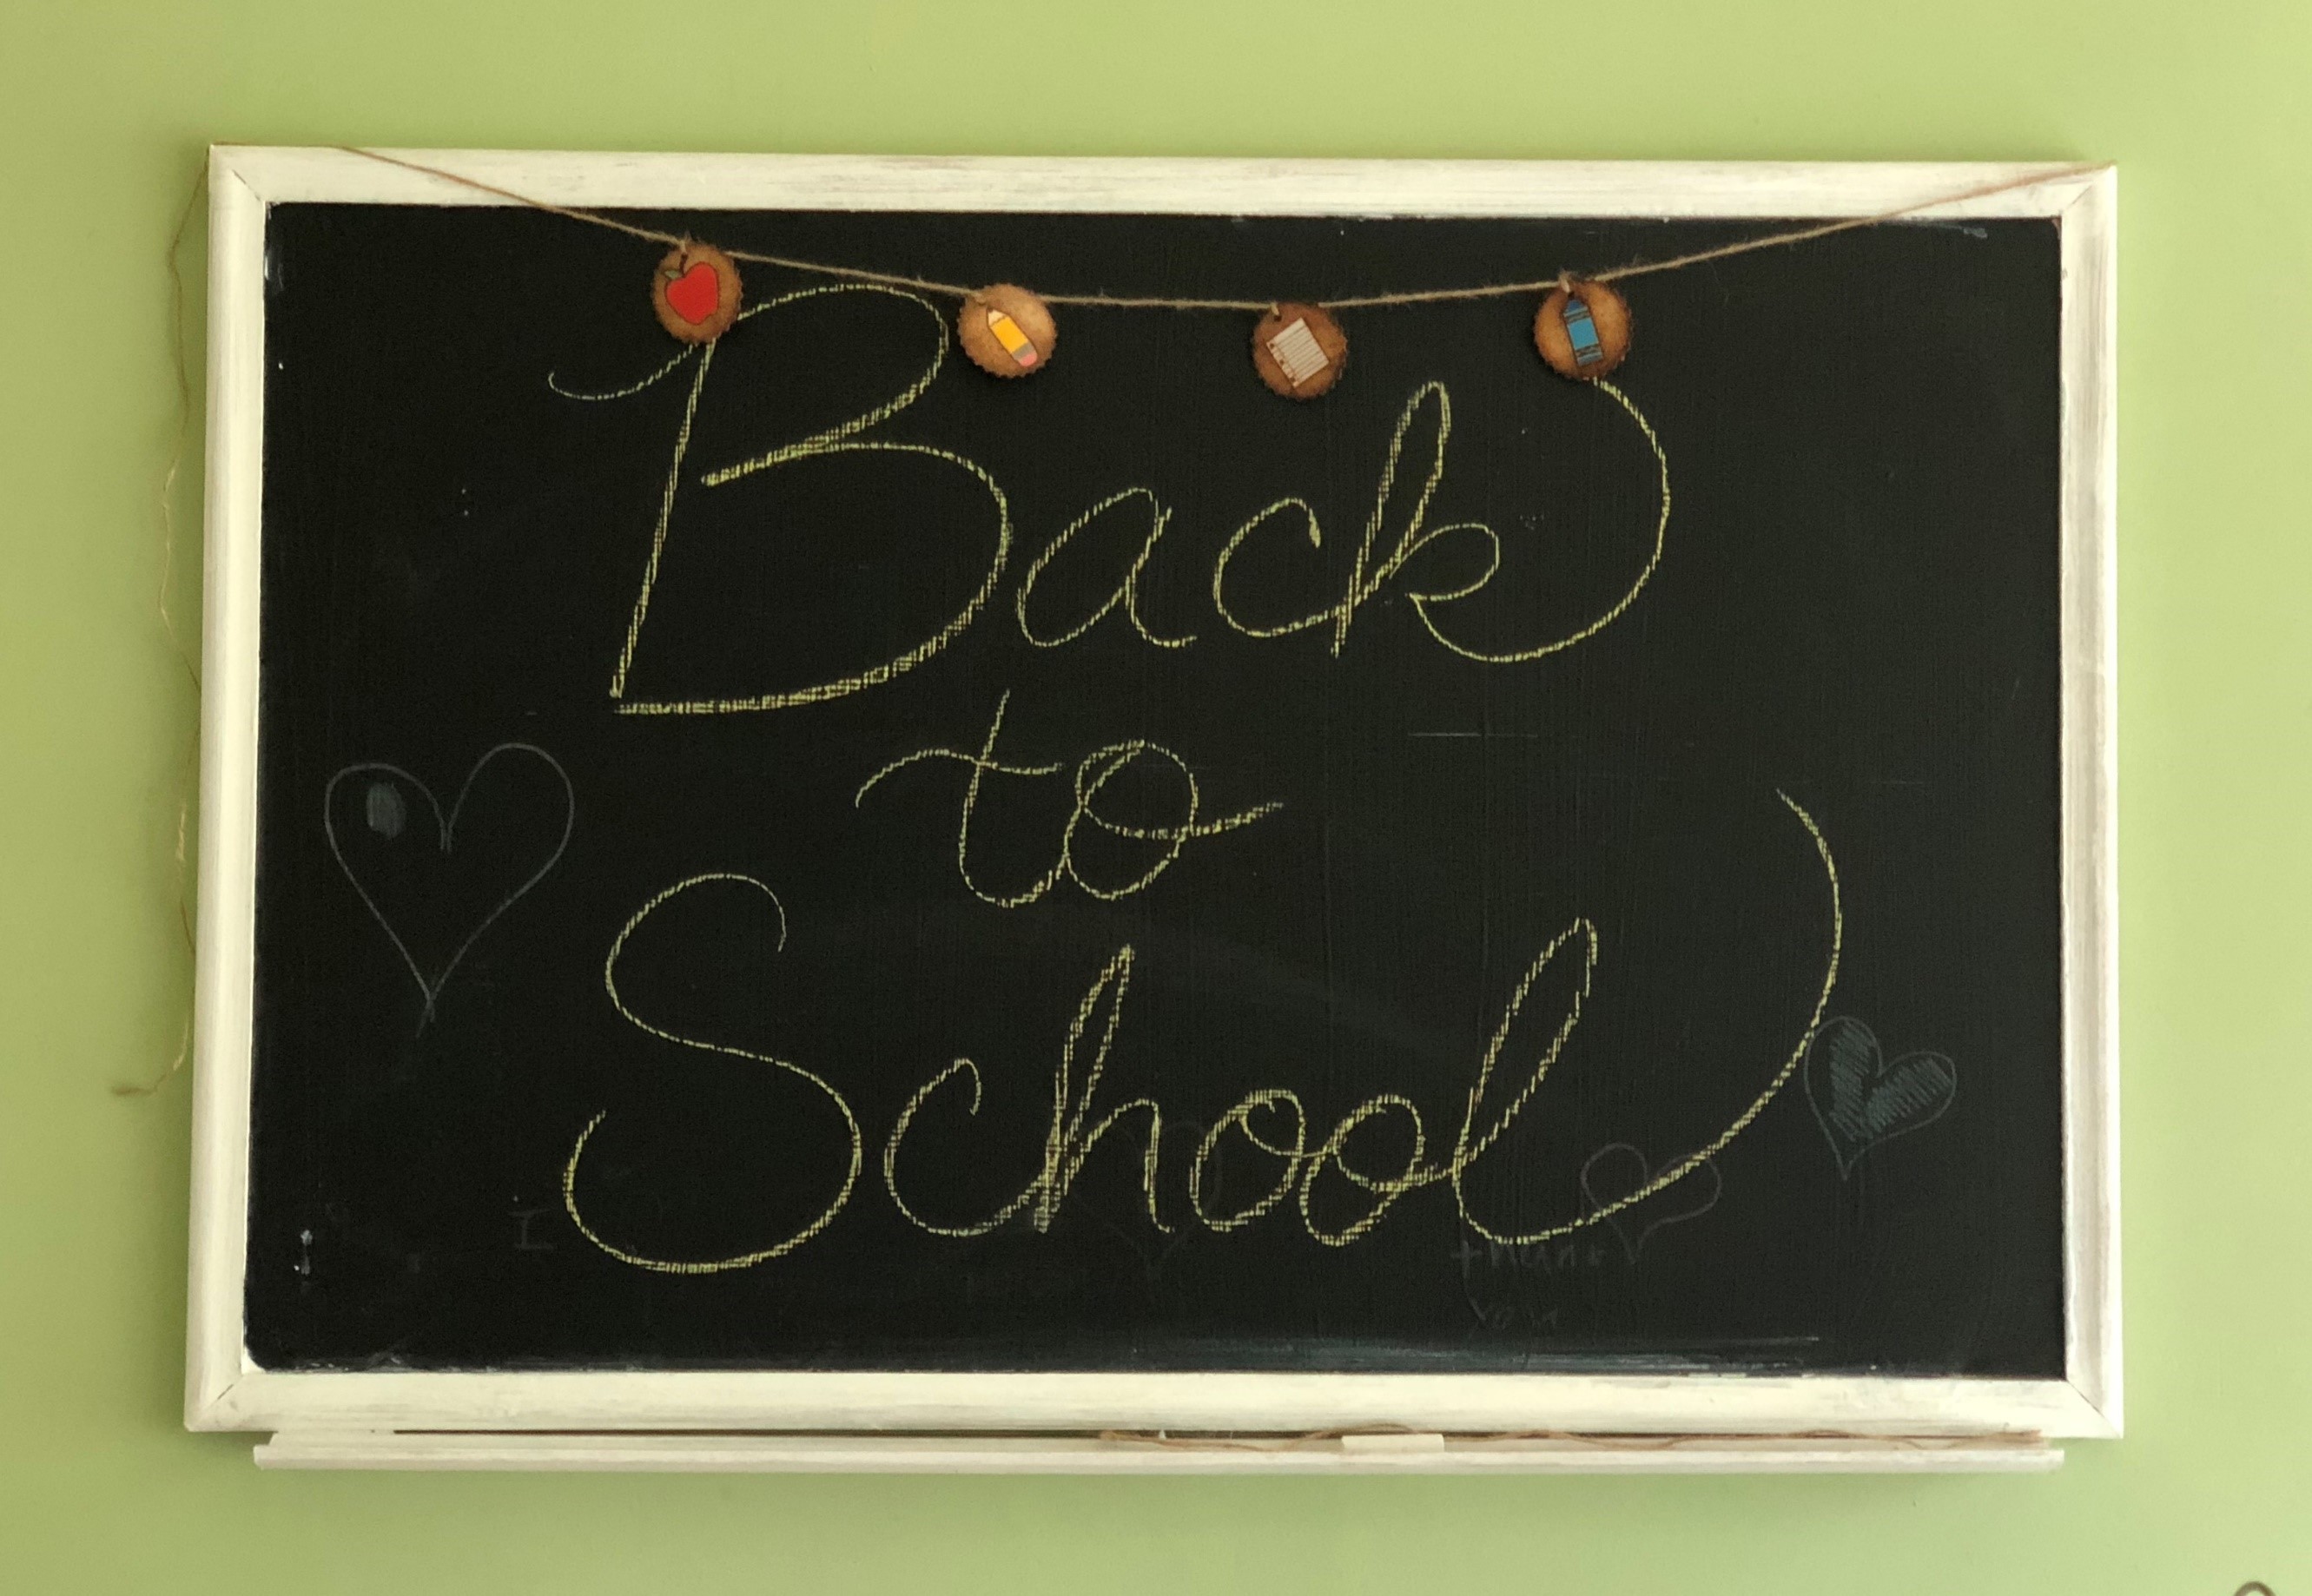
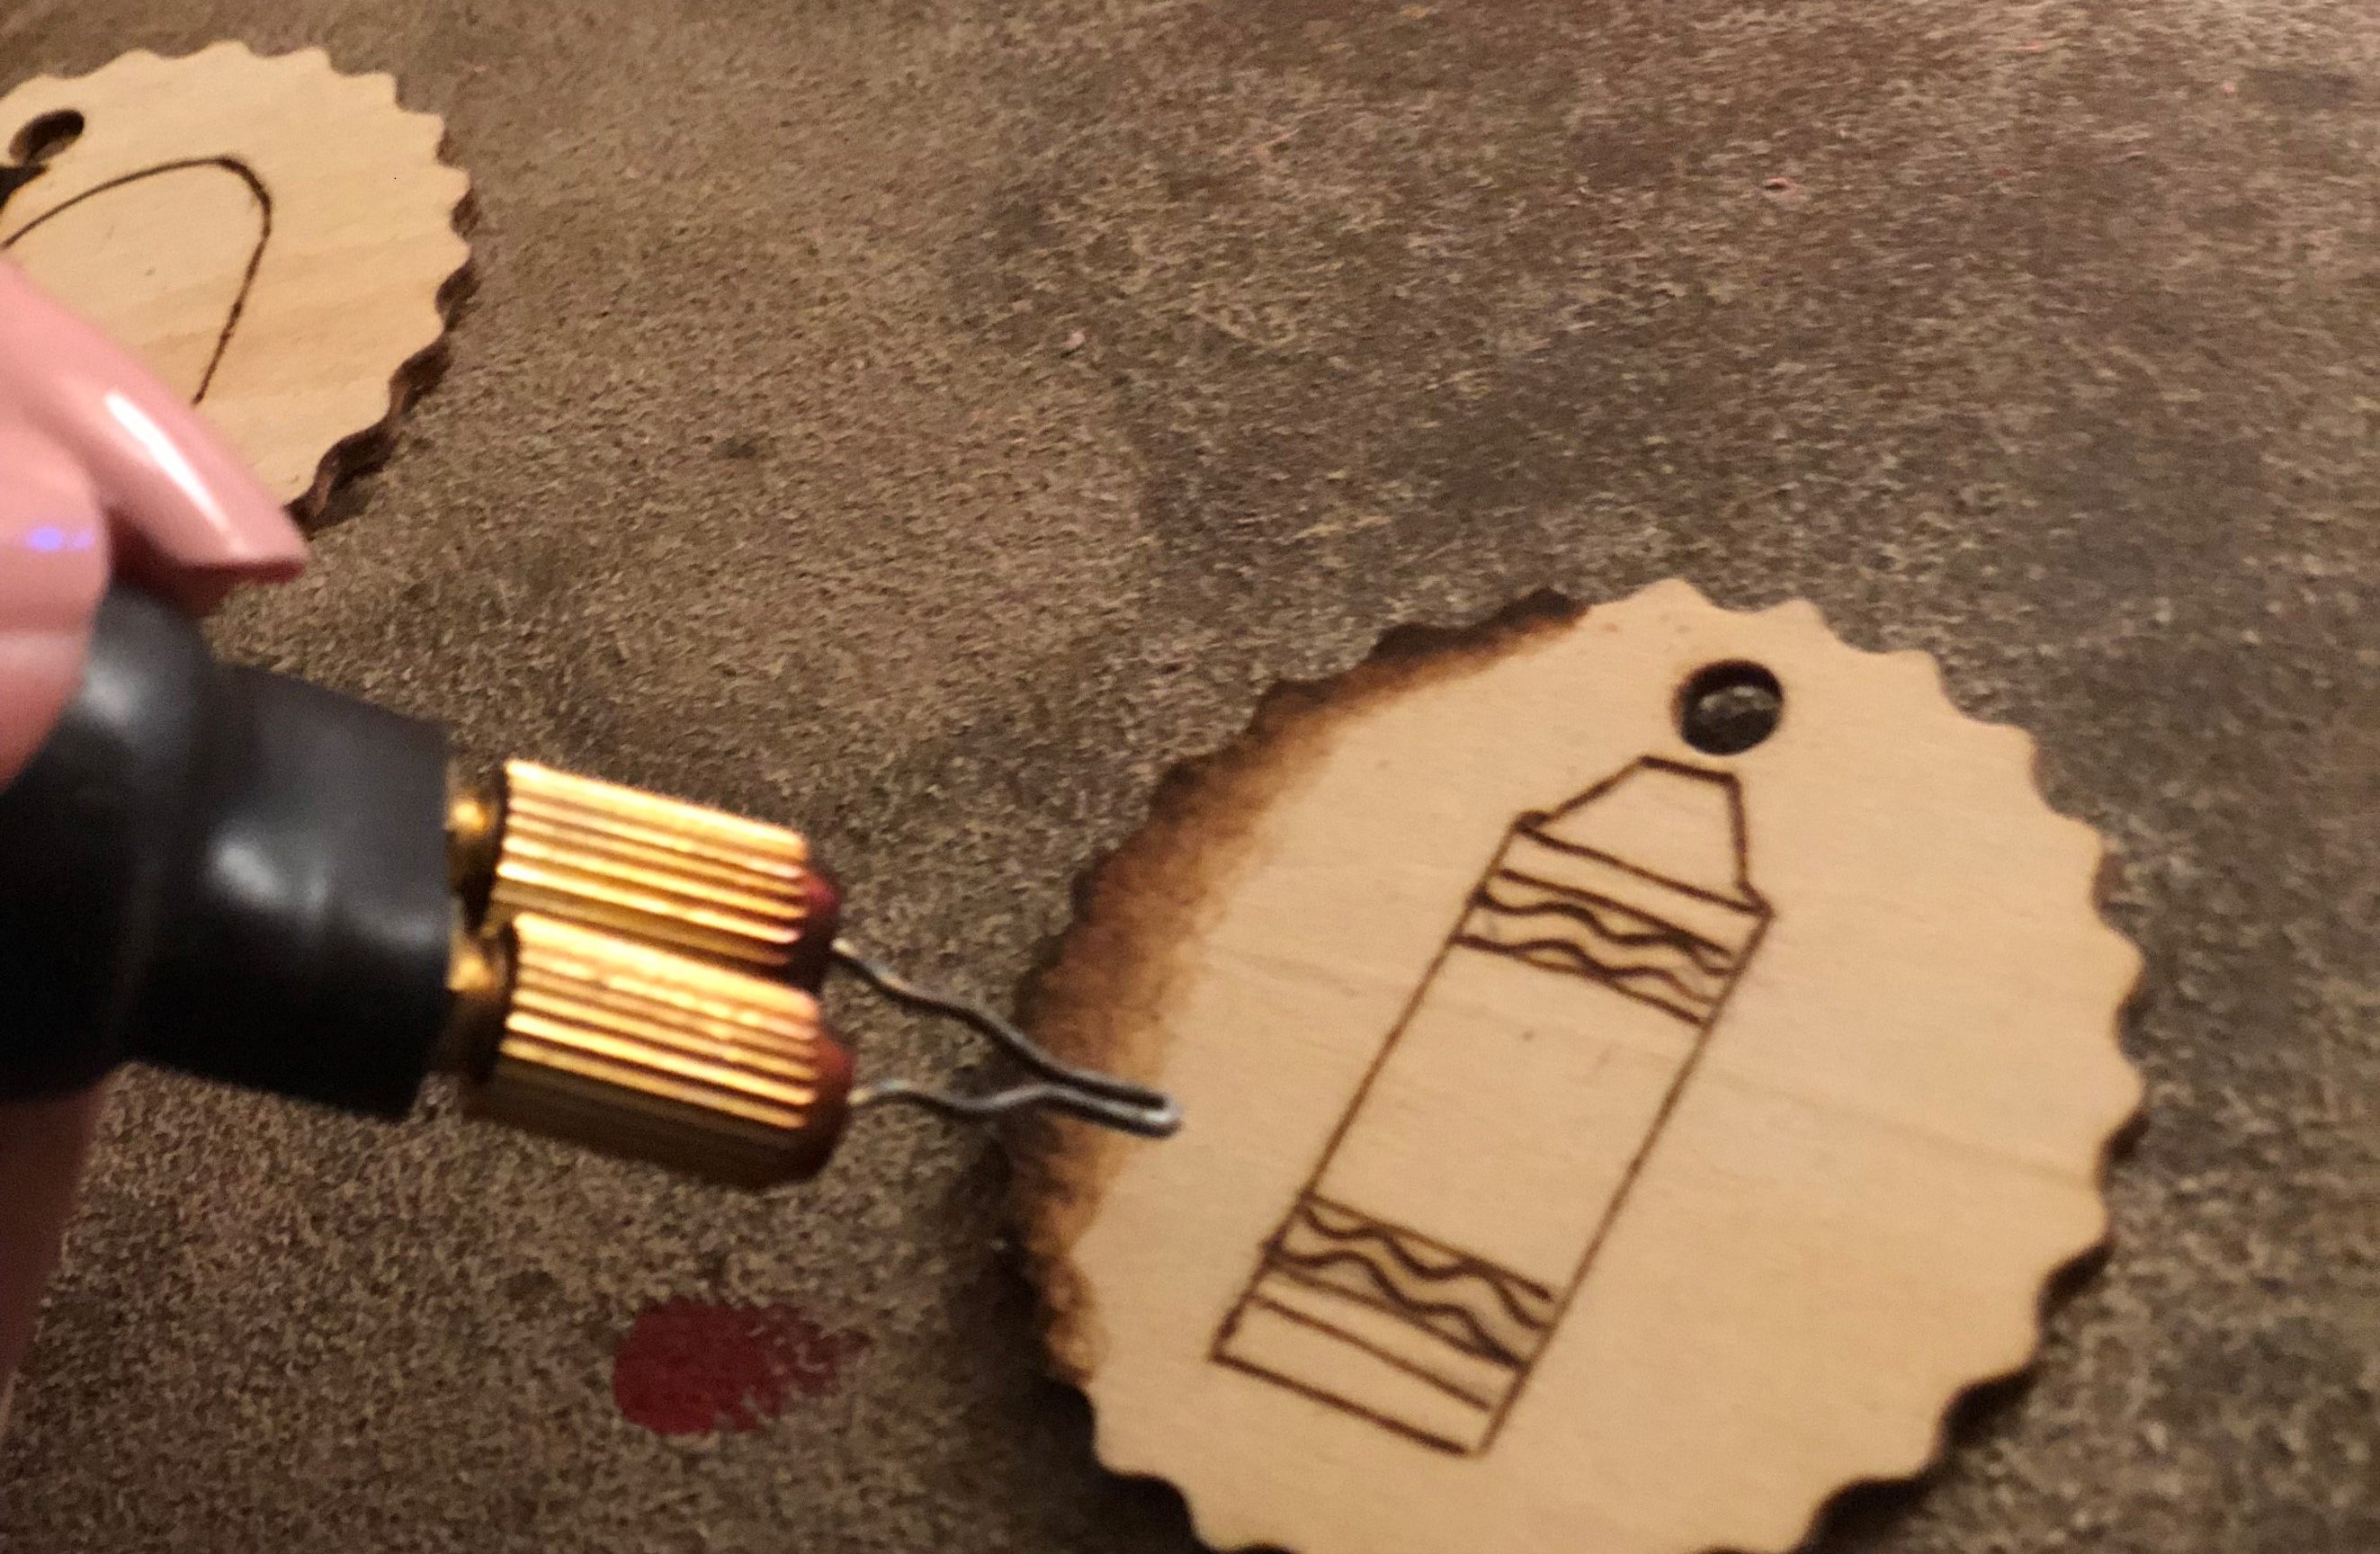
To start, draw or trace some items that are commonly associated with school (for tracing tips, check out my previous post Wood burning Tutorial). Keep the drawings simple. Make sure you only use one drawing per work piece. Outline your image with your pyrography pen.
To make your image pop, I recommend burning the background. You can make the background a solid dark burn or you can do some light shading (for shading tips, check out my tutorial Shading Technique).
Once your burn is complete, add some color to your wood.
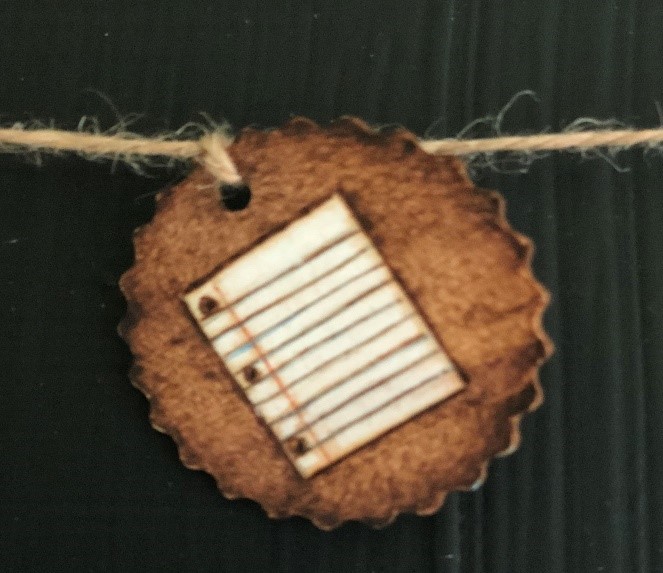
String your wooden circles on some twine. Once you pull one circle through, knot it at the top of the hole to keep the wooden piece from shifting.
 |
 |
 |
 |
Give this to your child’s teacher as a sweet “Back to School” gift. If the banner is not for you, as another option, you could use these wooden circles as an ornament or they could even be used for decoration on a wreath. Practice with different designs and see what works best for you and your kids.
If you have any questions whatsoever, please leave them on the comments below and I’ll get to them as soon as possible.
See you next time!
Andrea Pate
Pate’s Pyrography
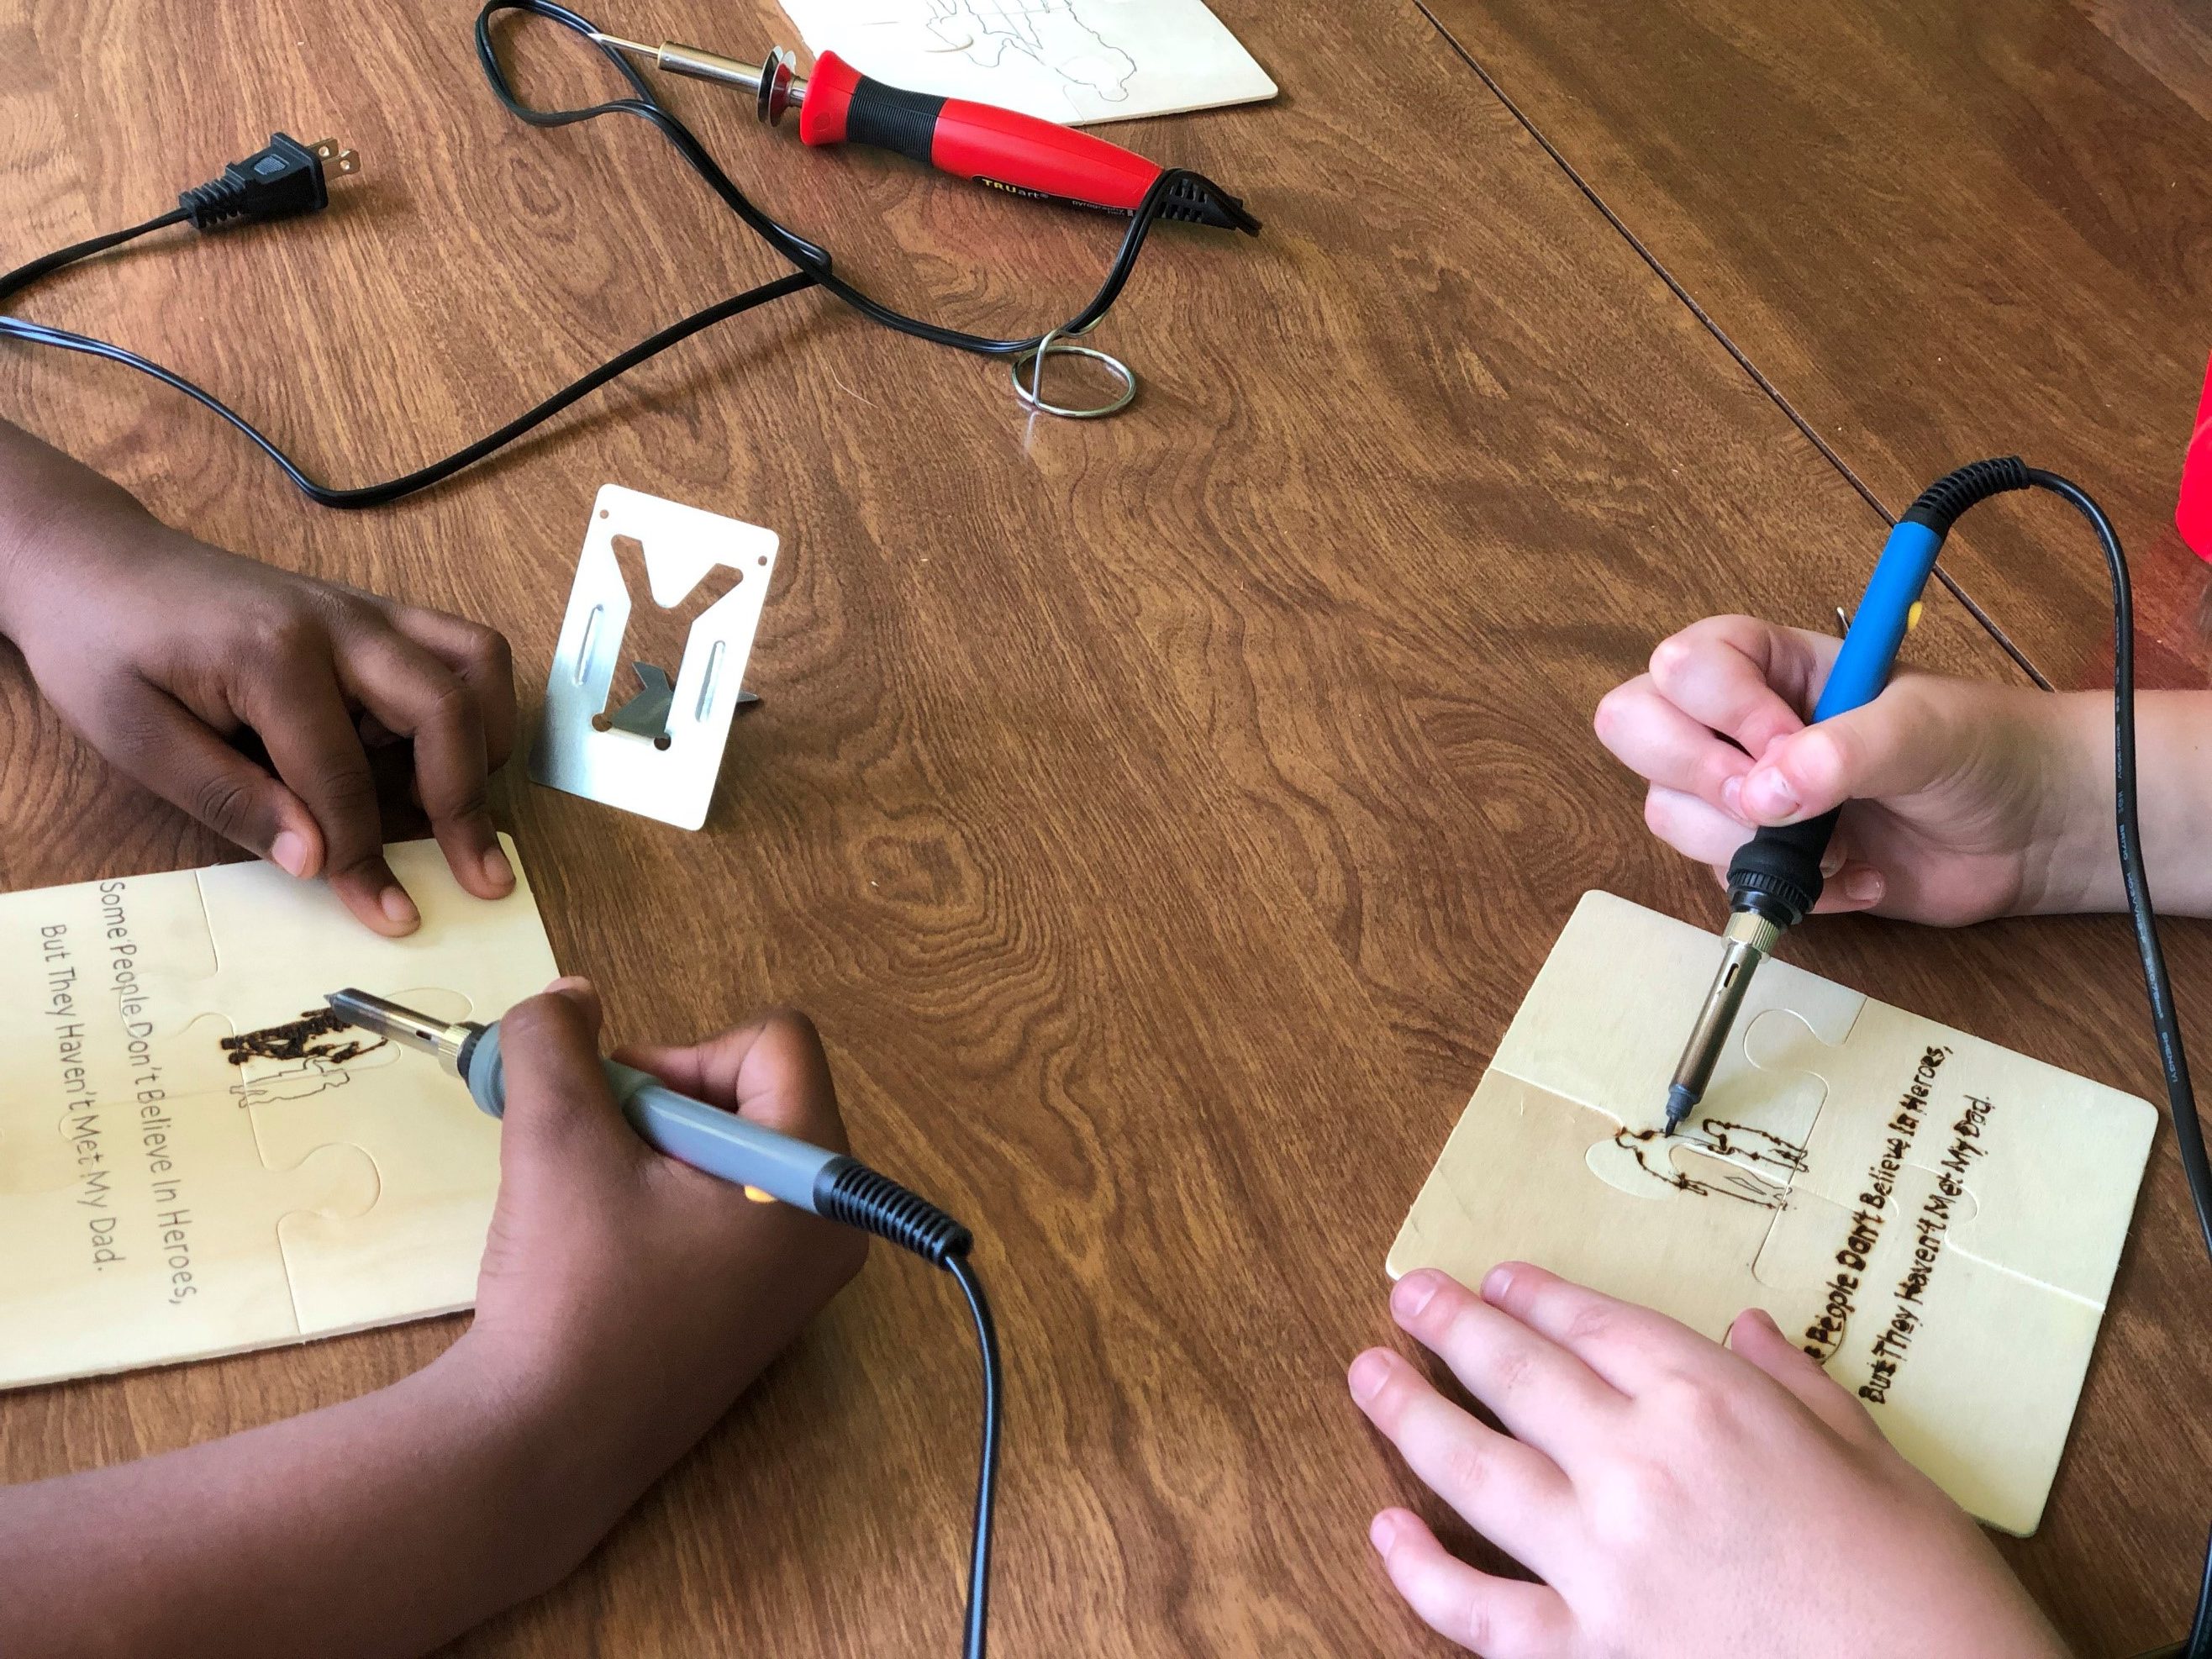
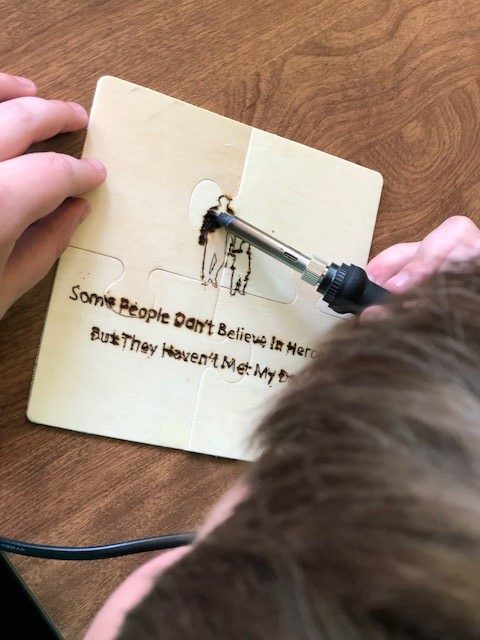
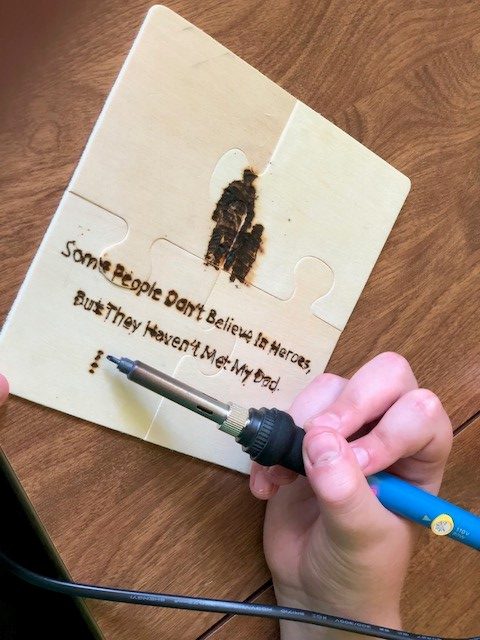
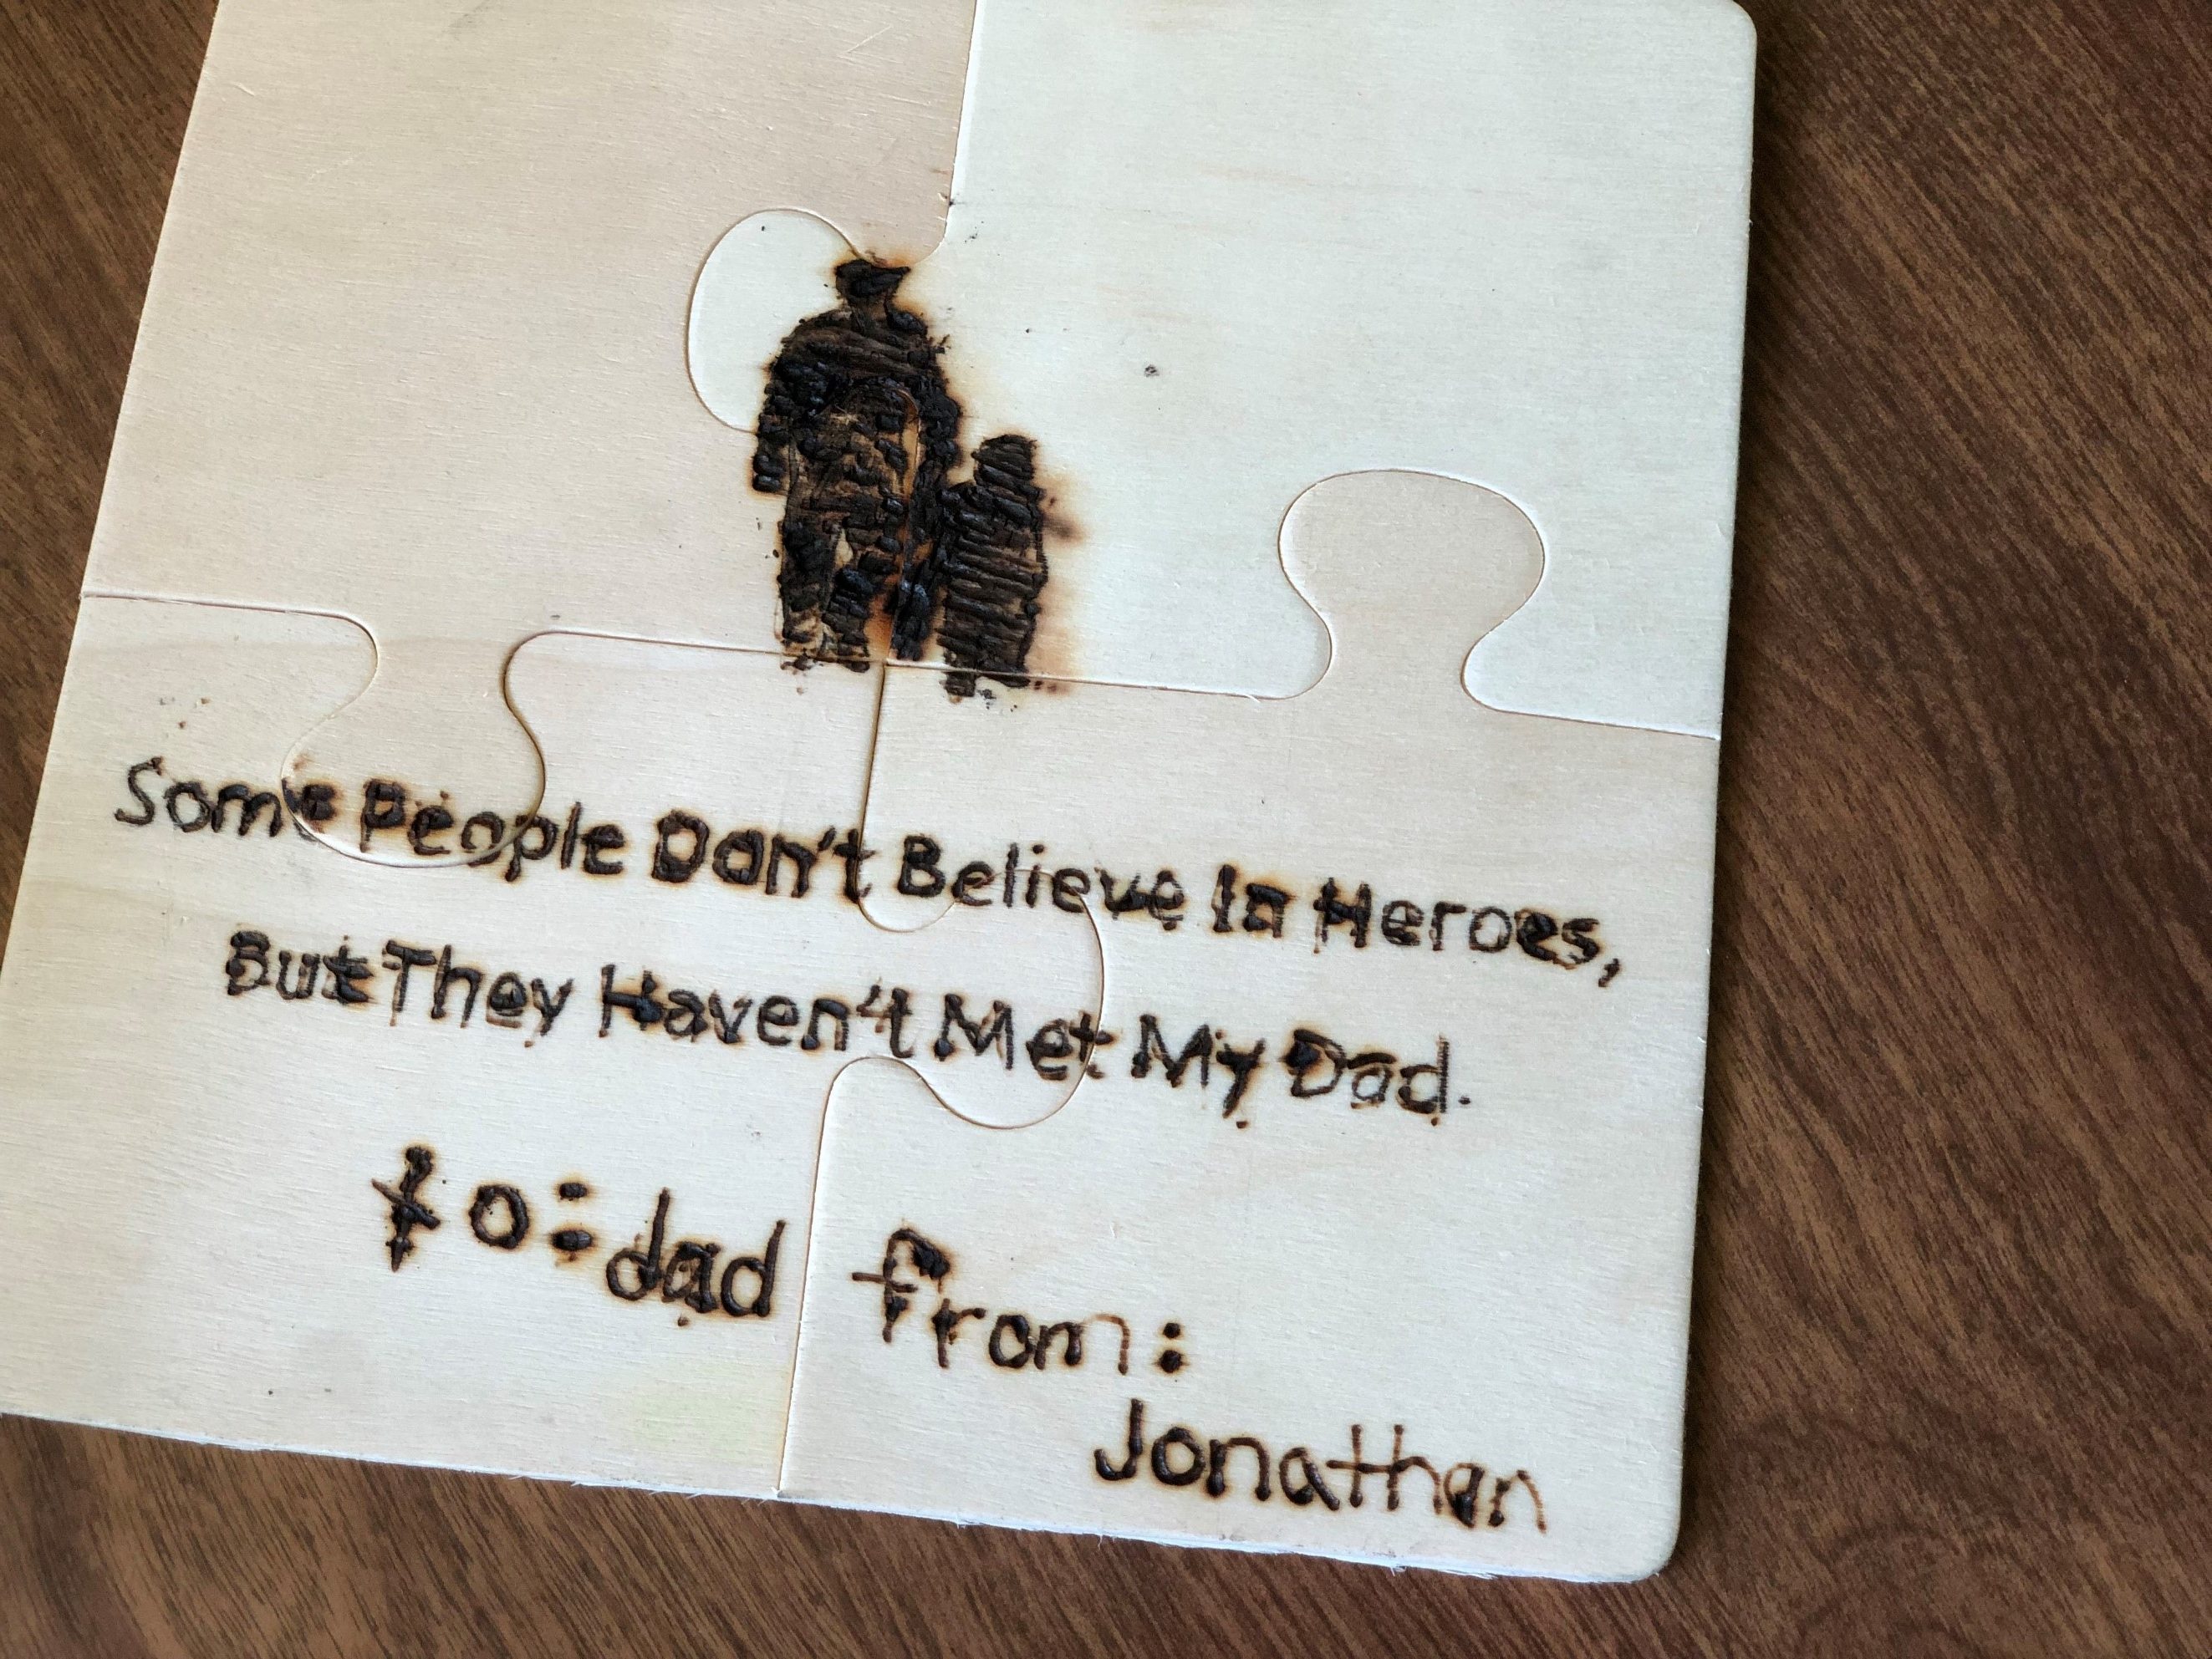
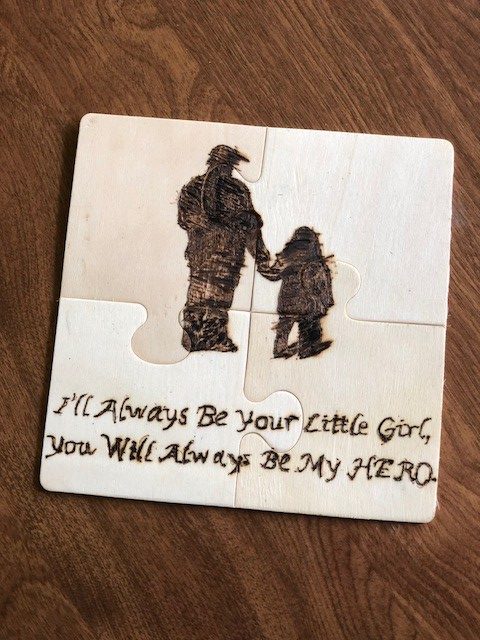
A great way to bond the whole family is to work together on a single woodburning project. Yes, pyrography can be for the little ones too!
What you will need:
IMPORTANT Child Safety Tips:
Never let a child use a pyrography pen unattended. An adult must always be present to supervise since pyrography pens get hot – VERY HOT. Be sure your child holds the pen by the rubber handle and never touch near the tip of the pen. If you or your child is not actively burning with your pen, keep it propped up on the stand that was provided with your TRUArt pyrography kit. It holds your hot pen securely and you don’t have to worry about it accidentally touching anything else. Always make sure your pen is turned OFF and unplugged when it is not in use. Allow some time for your pen to cool off completely before handling and storing it. Remember, these pens are HOT. This is not a toy and must be used with caution under adult supervision.

 |
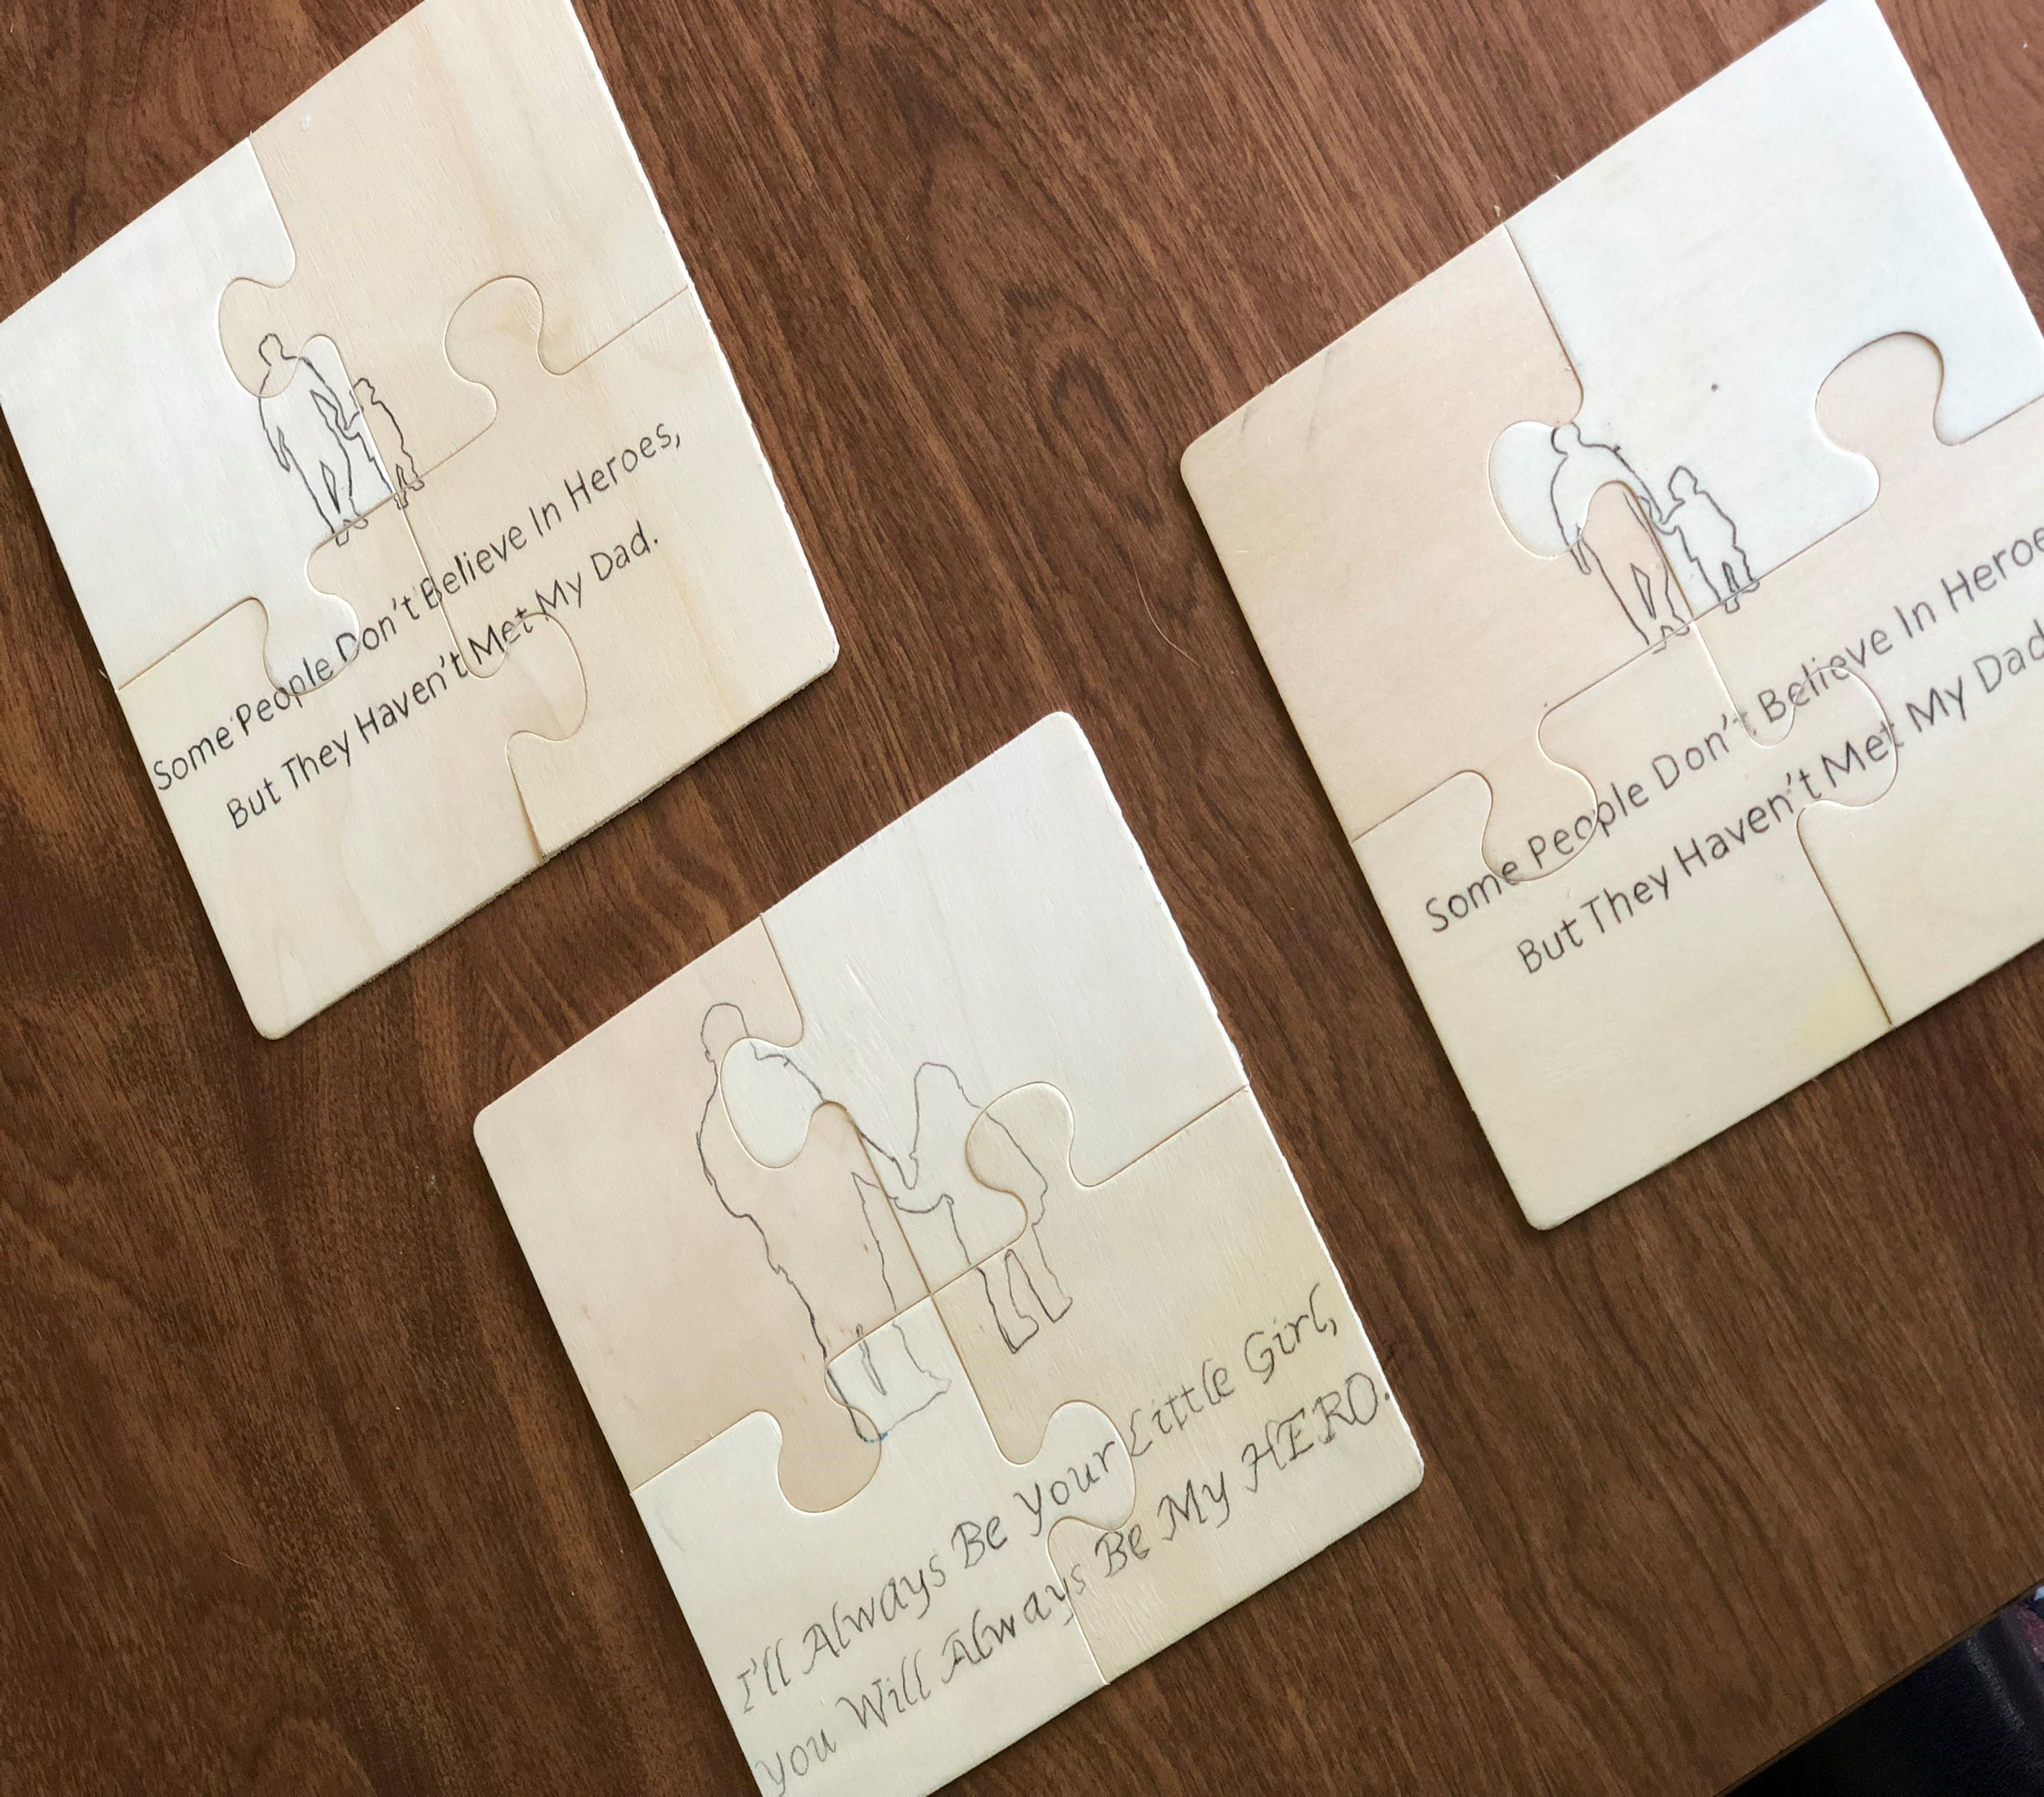 |
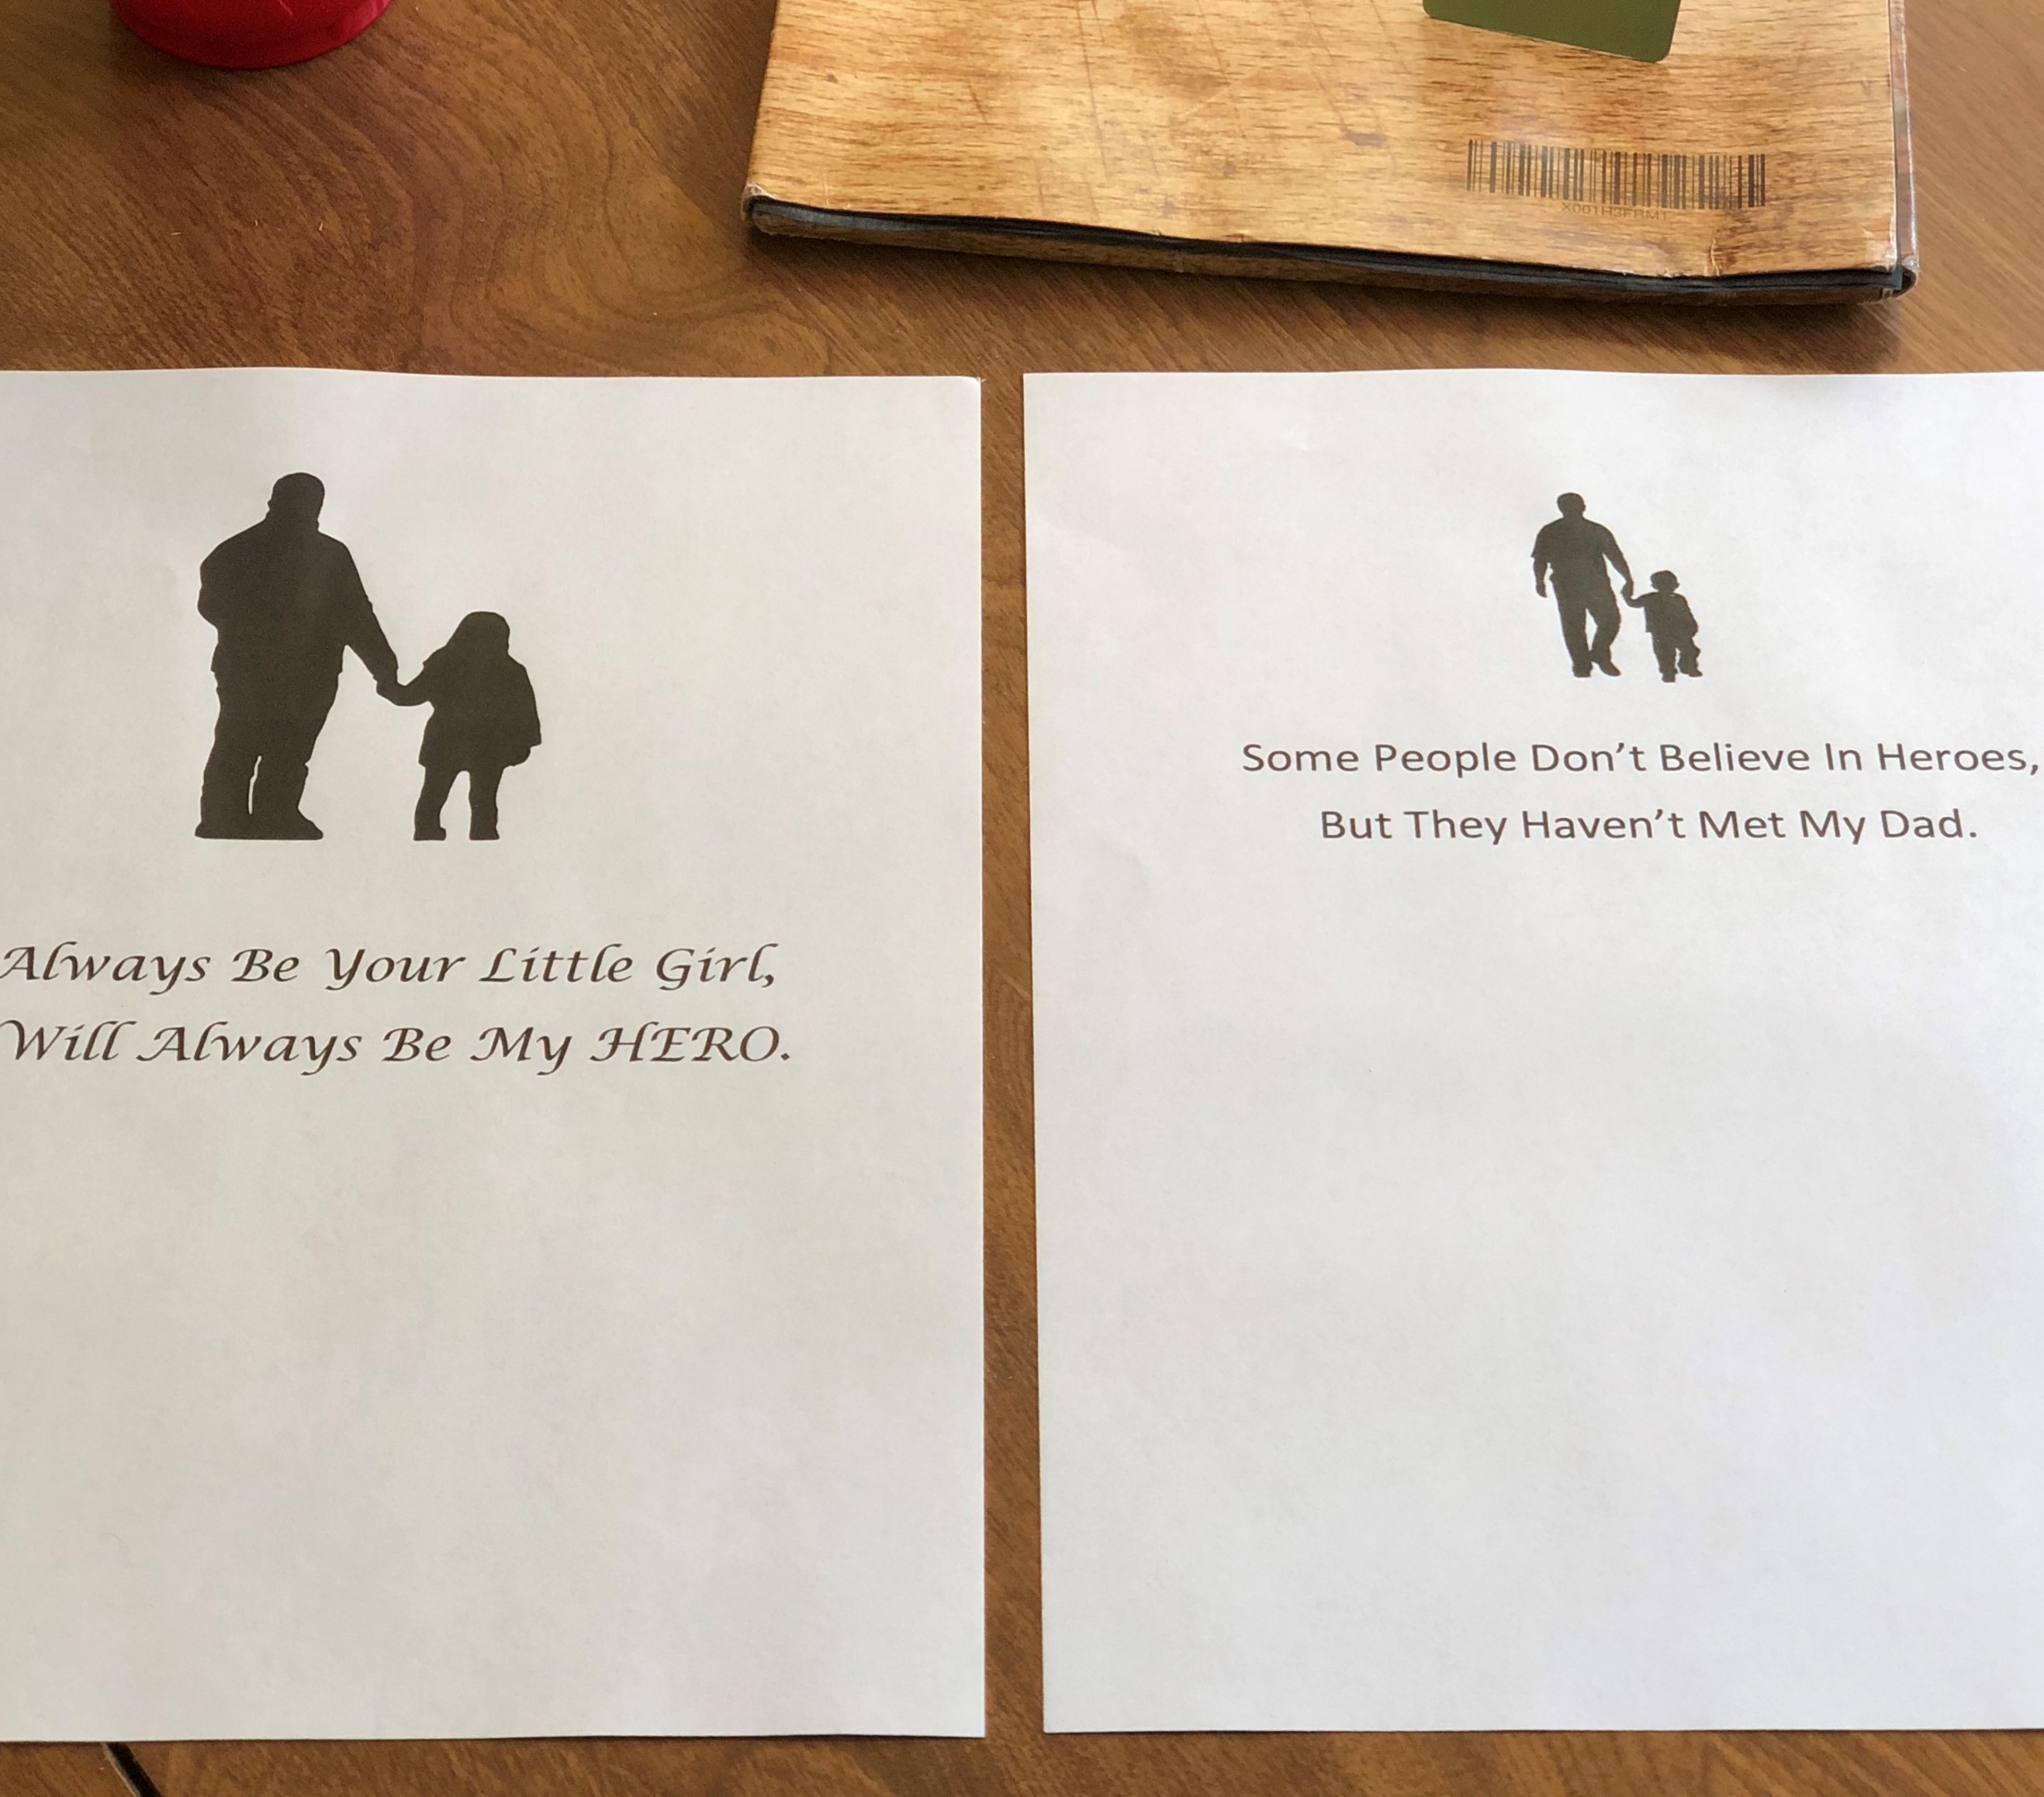
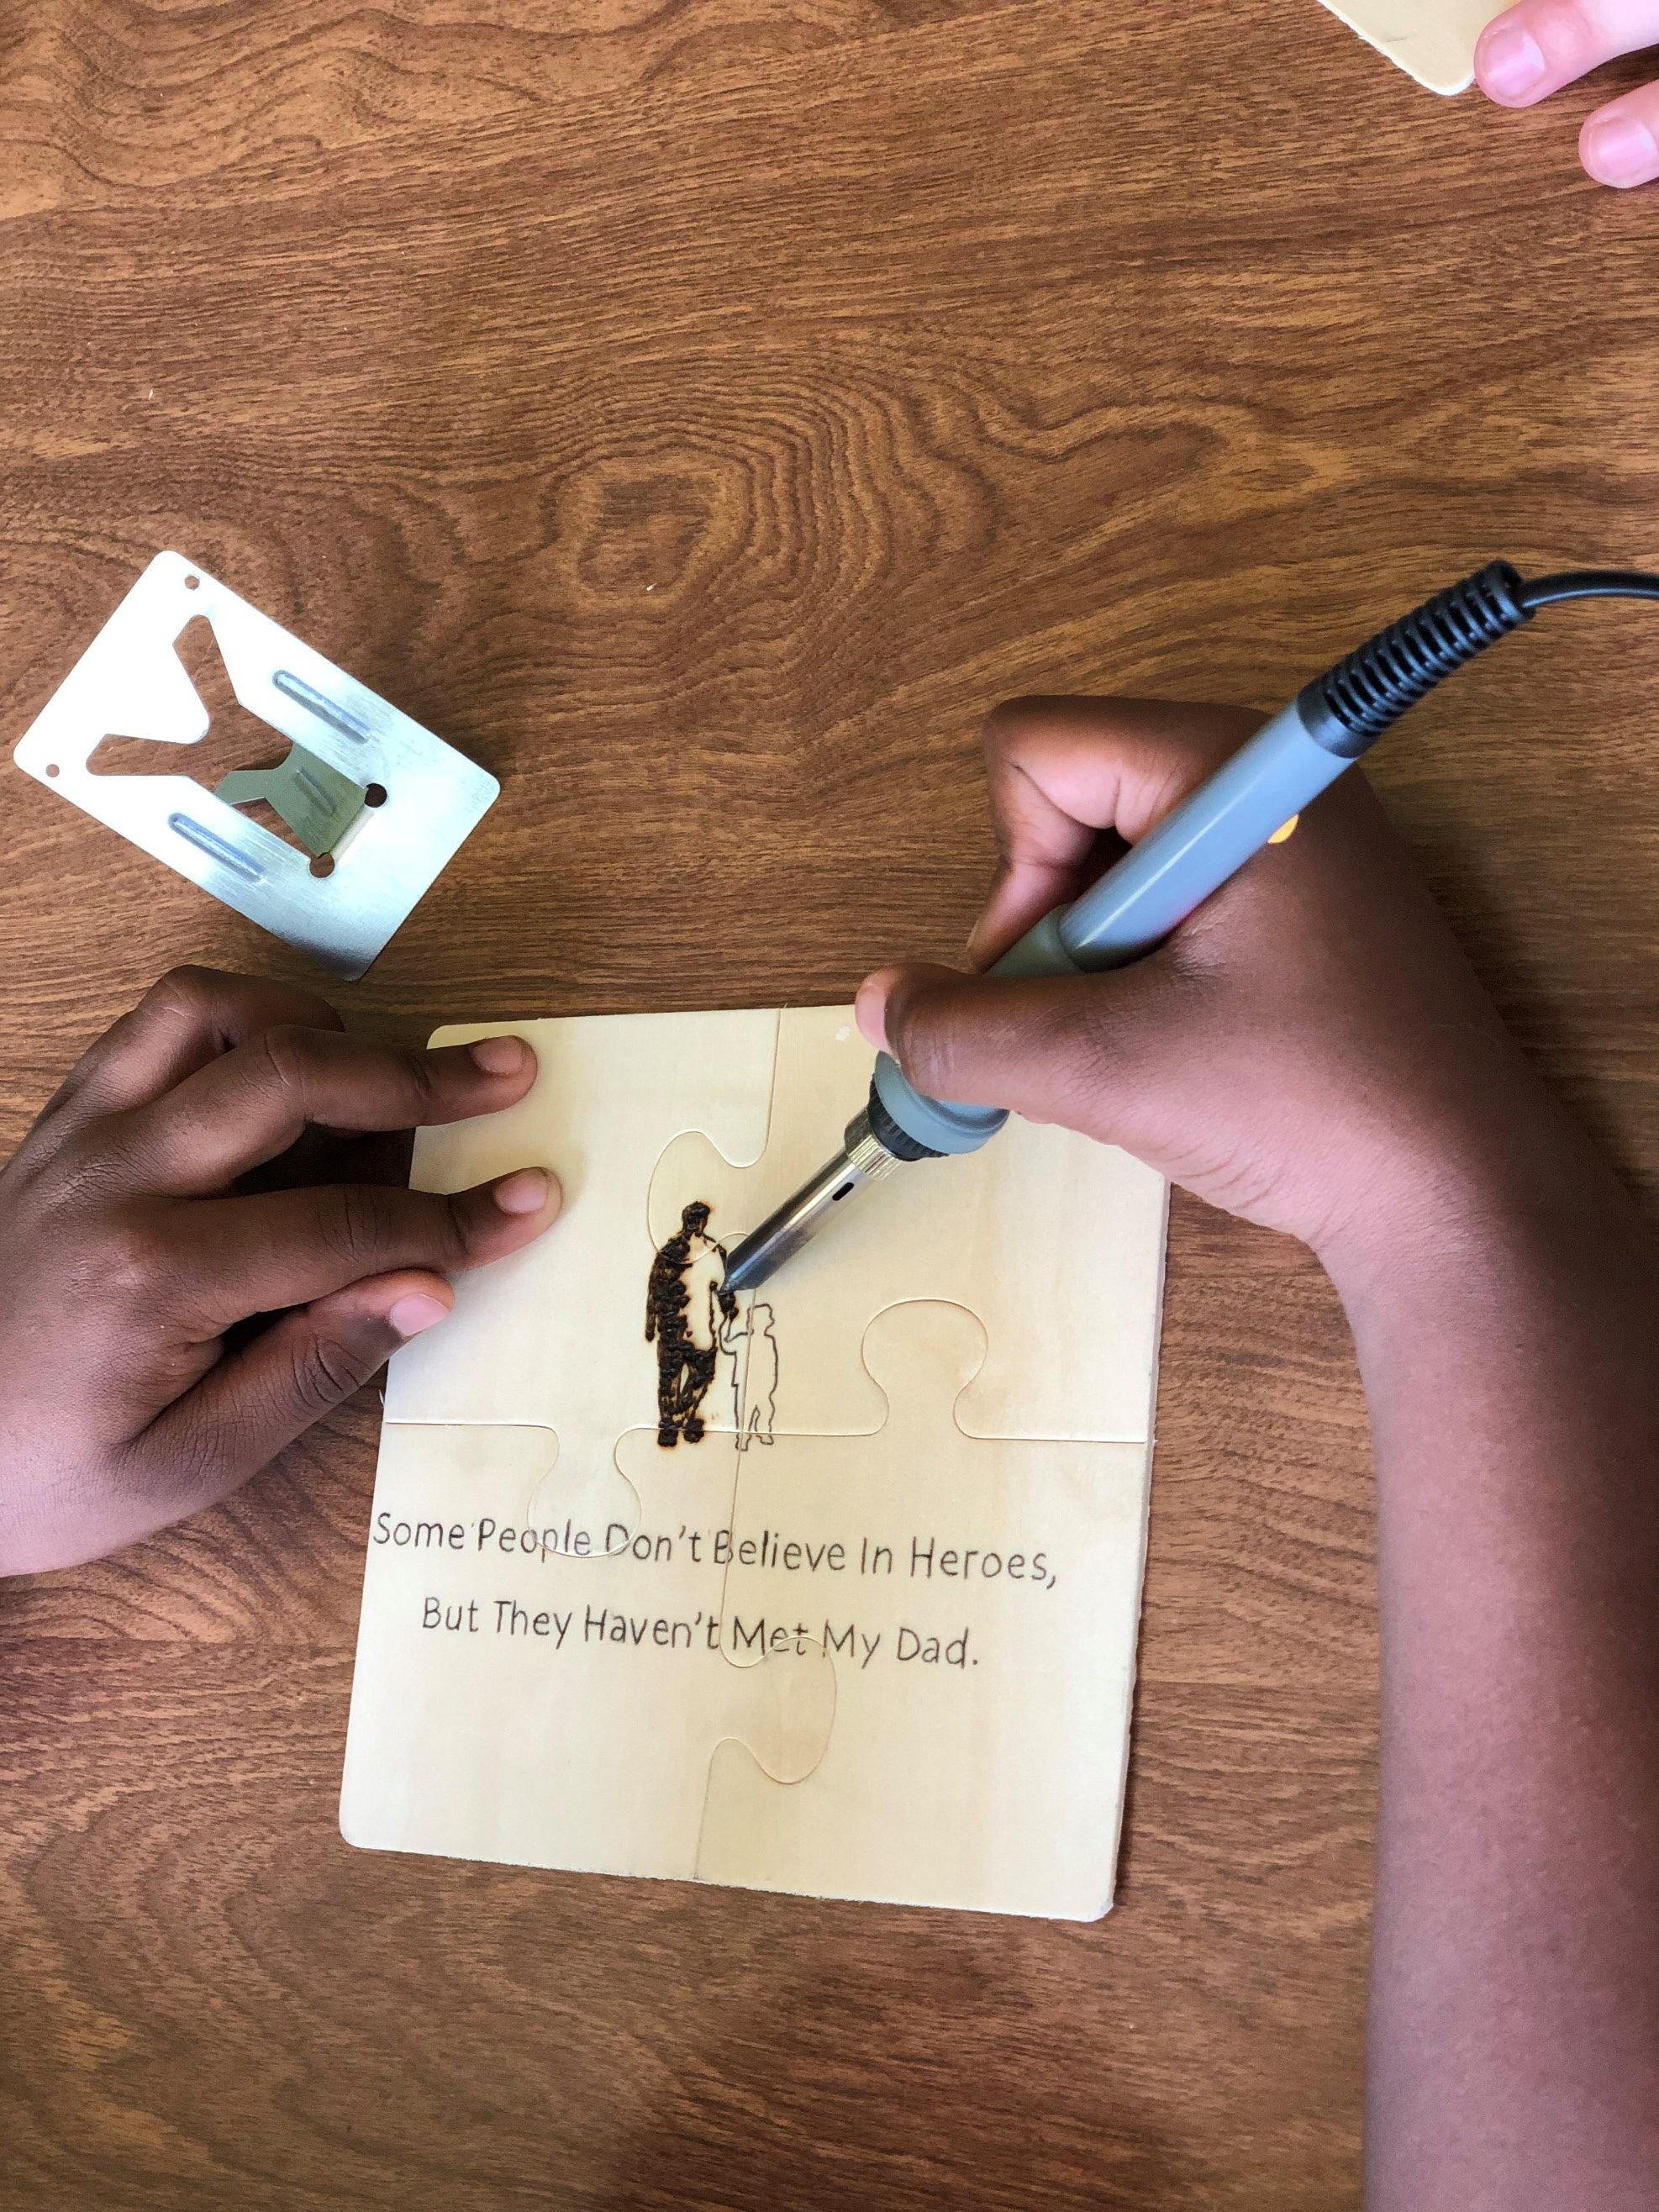
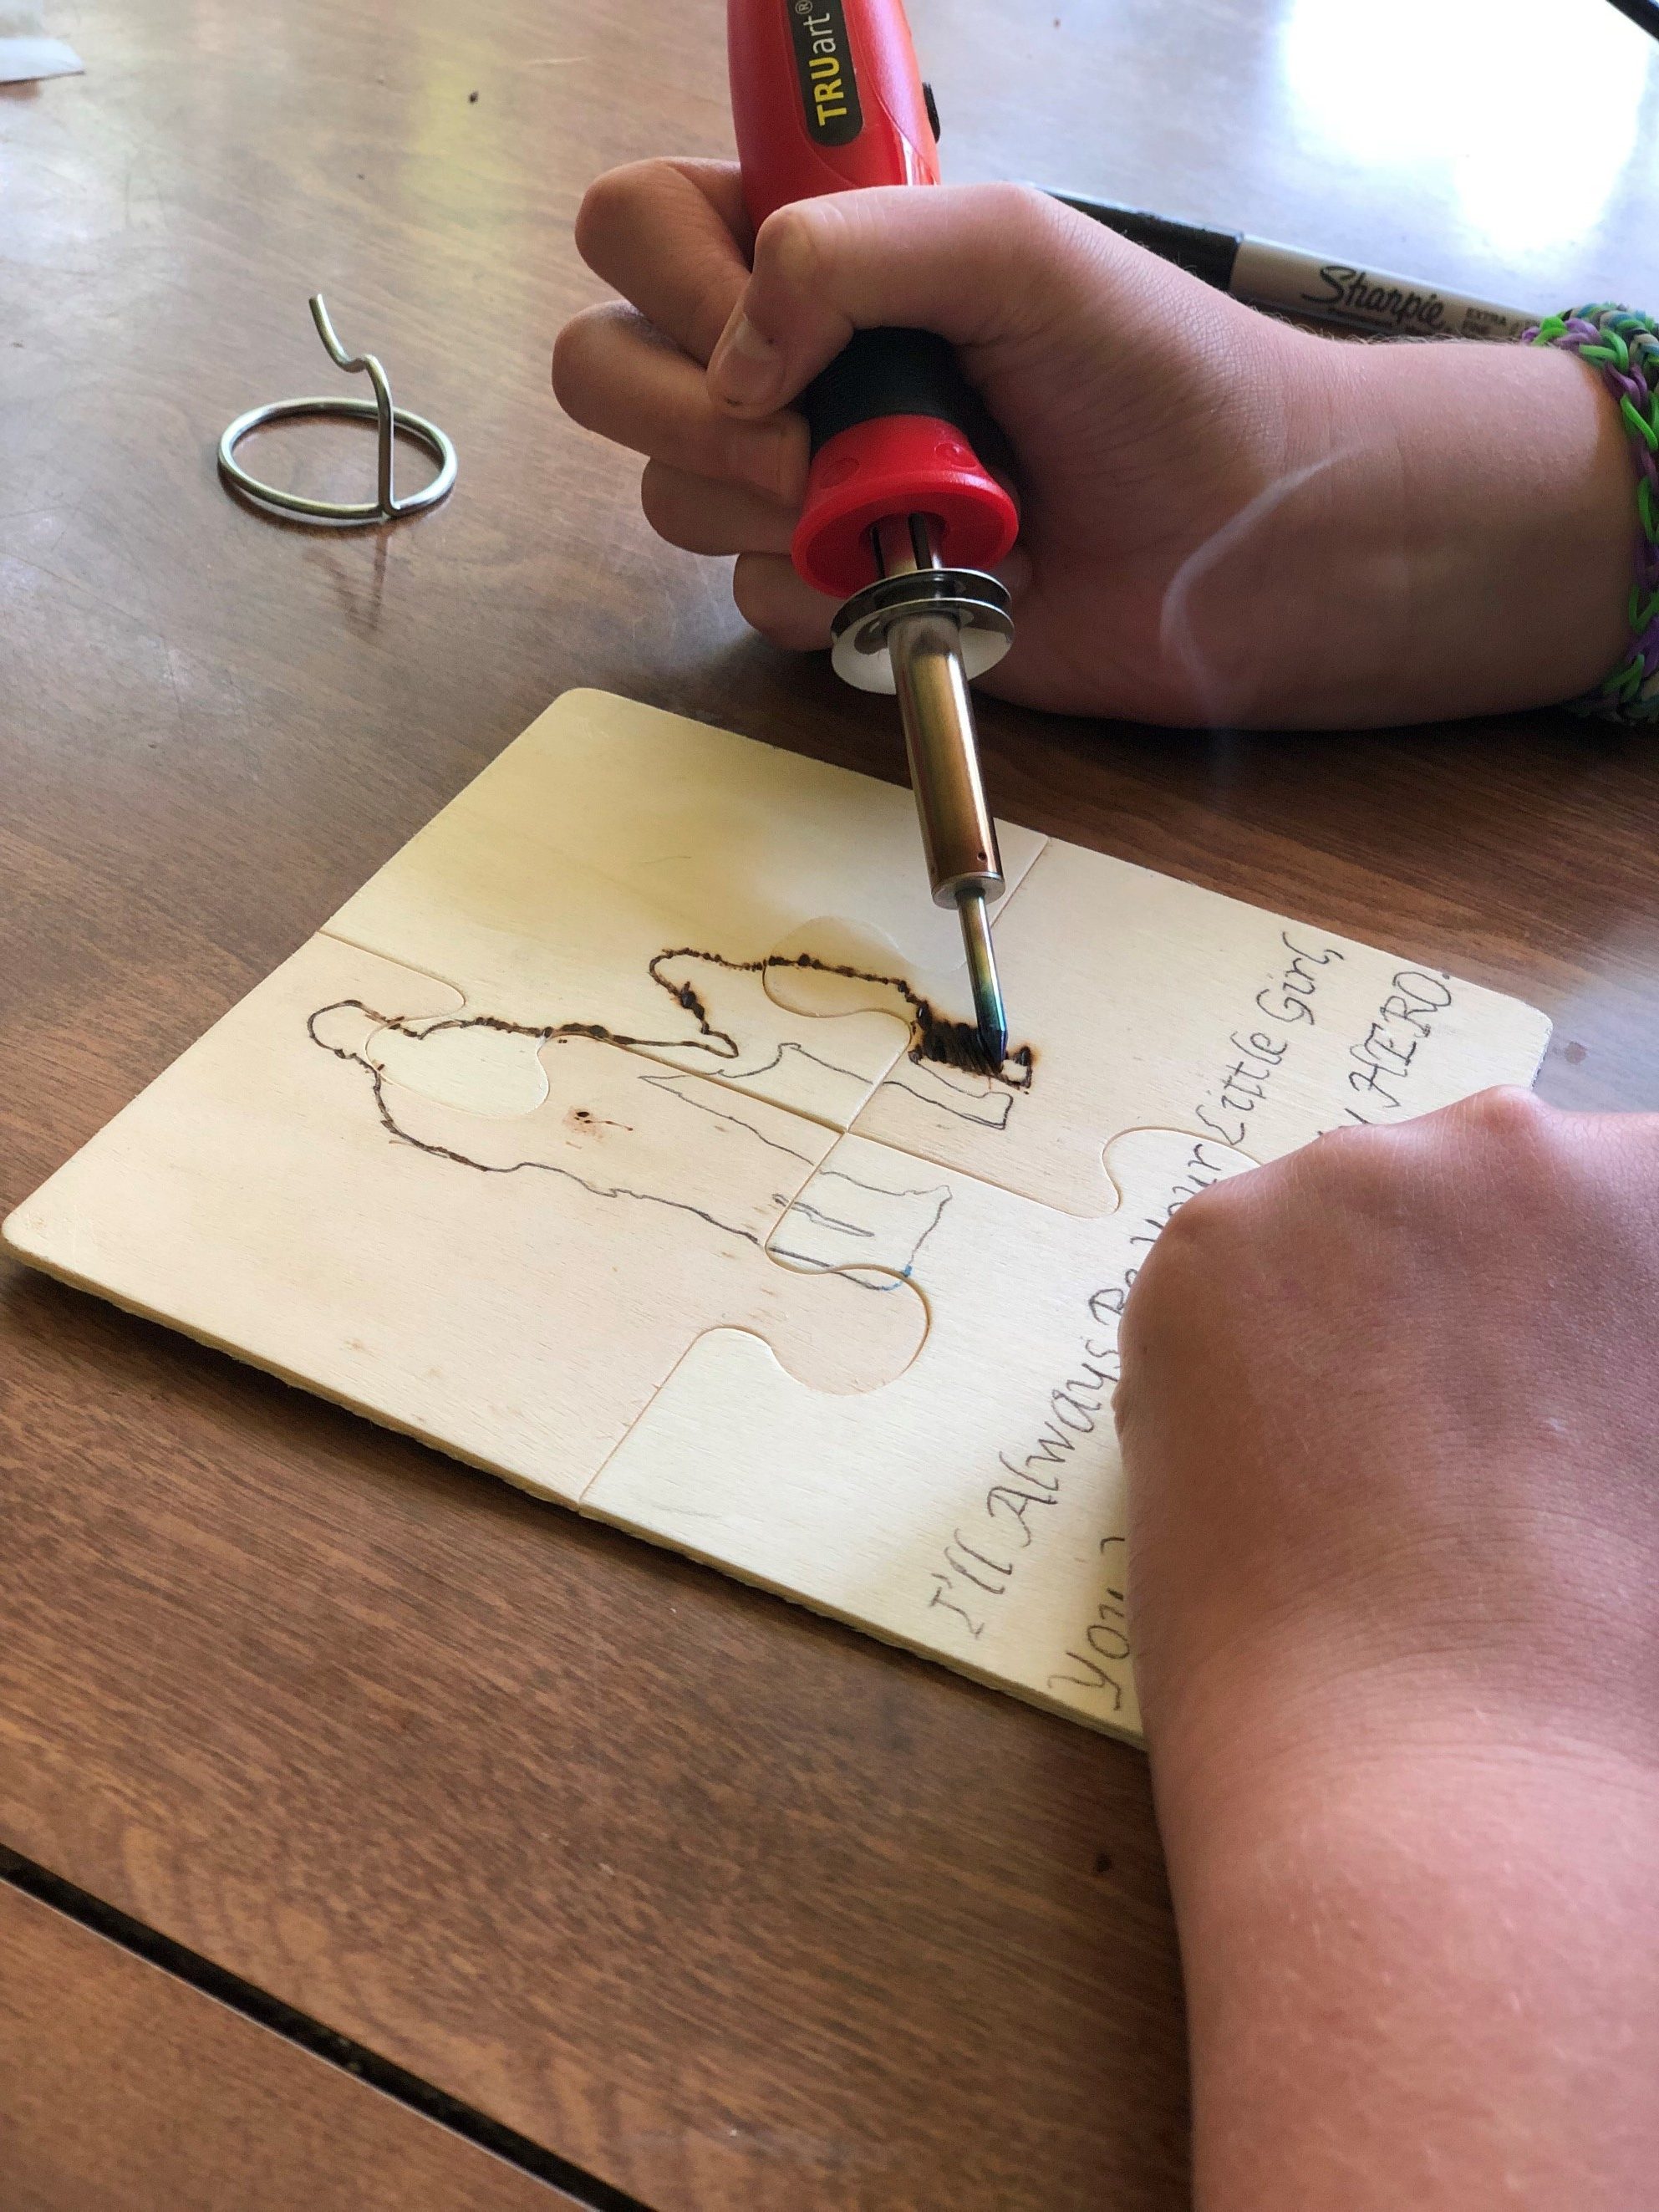
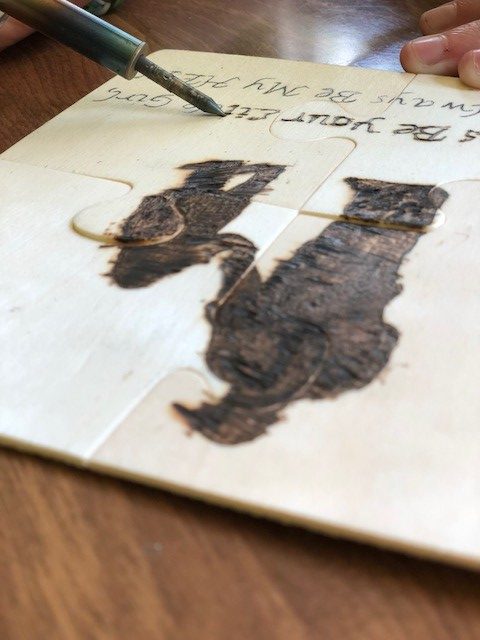
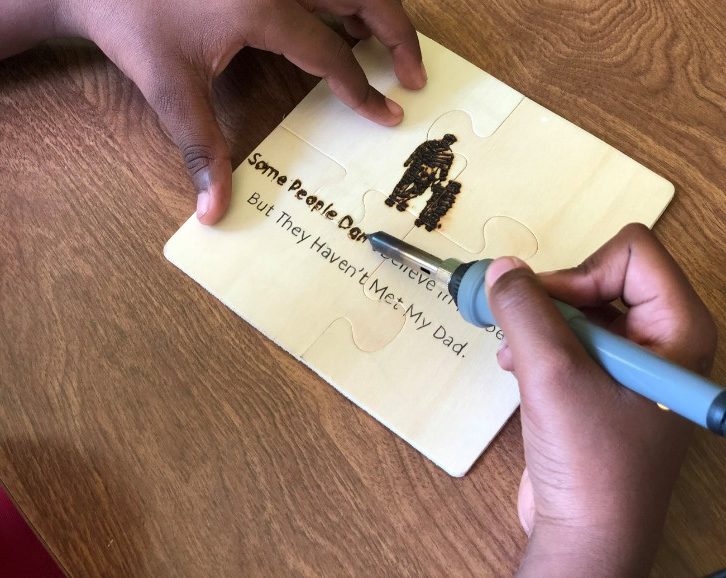
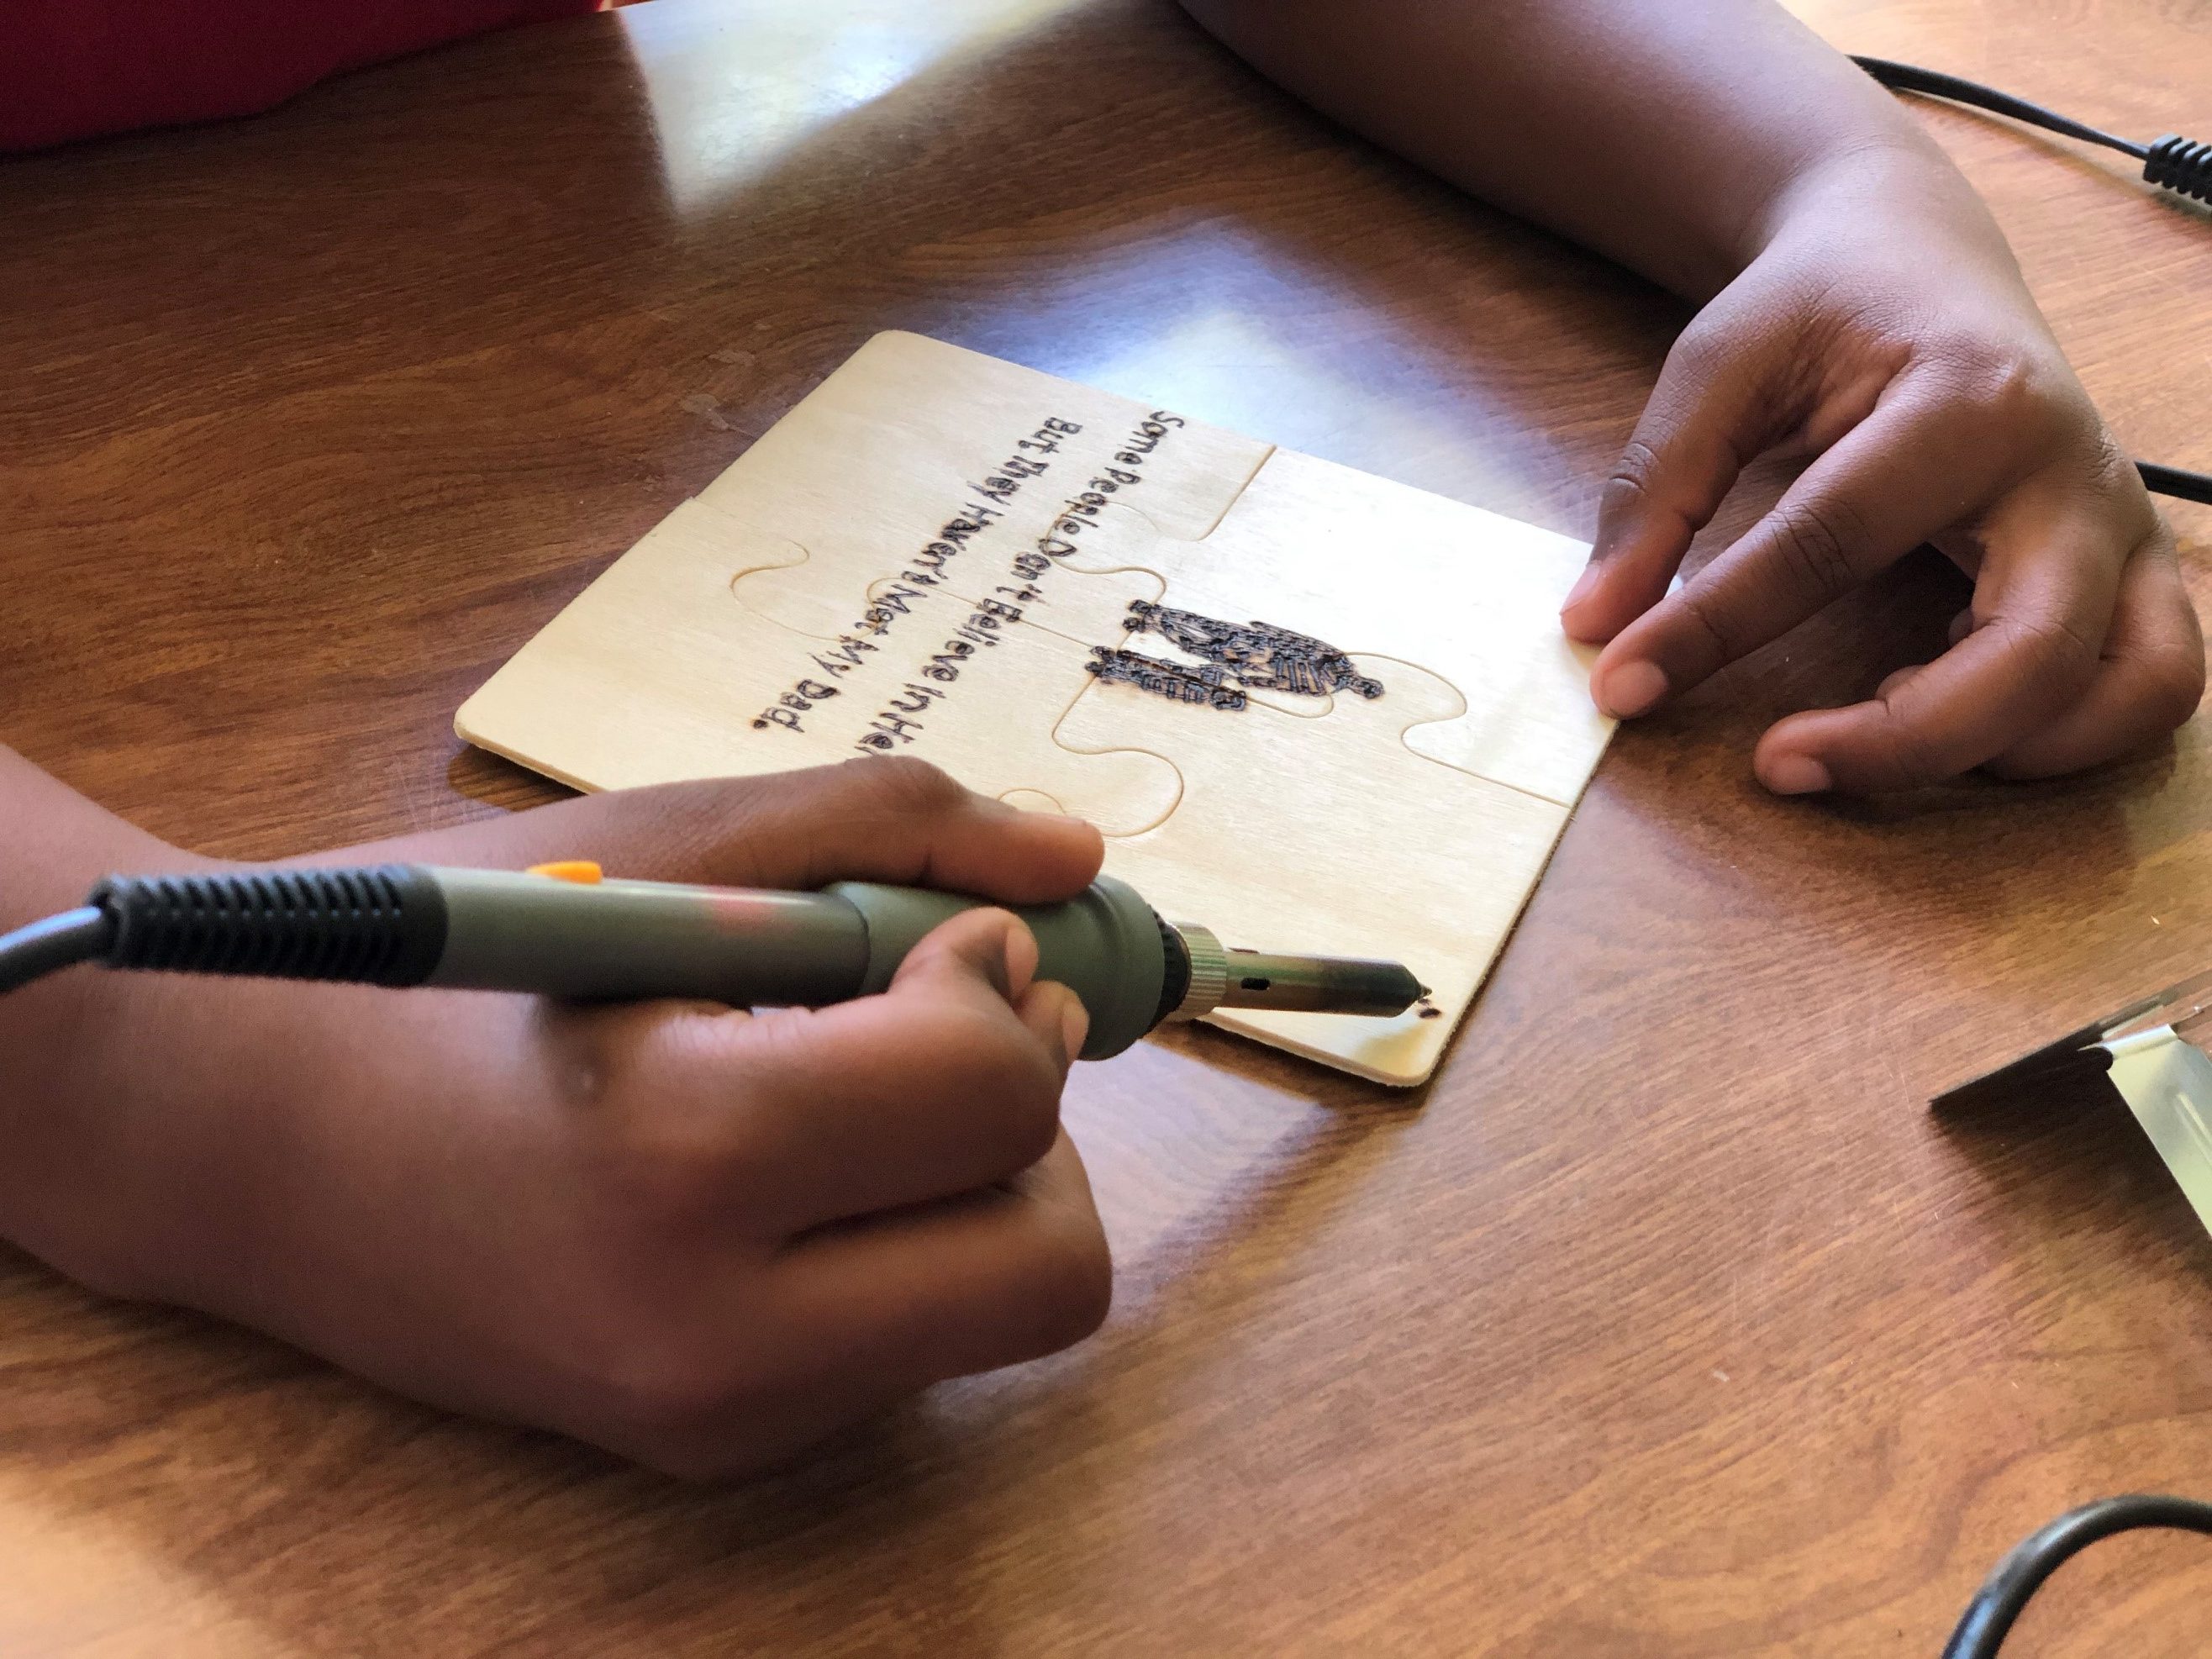
One thing I find exciting about pyrography is that anyone can do it! Children in general love to draw and enjoy creating something special for the ones they love so I wanted to find a project that would be fun and easy for any age to try. With the help of my three little artist volunteers, we scoured the internet for quotes or phrases that sounded like something they would want to tell their father. Once we had the phrases picked out, I typed up the words on a Word document. I let the young artists pick the font that they thought looked best for their artwork. Larger fonts work best as does thicker lettering. I then looked for some simple clip art to add to the document – nothing too difficult for our young artists to handle.
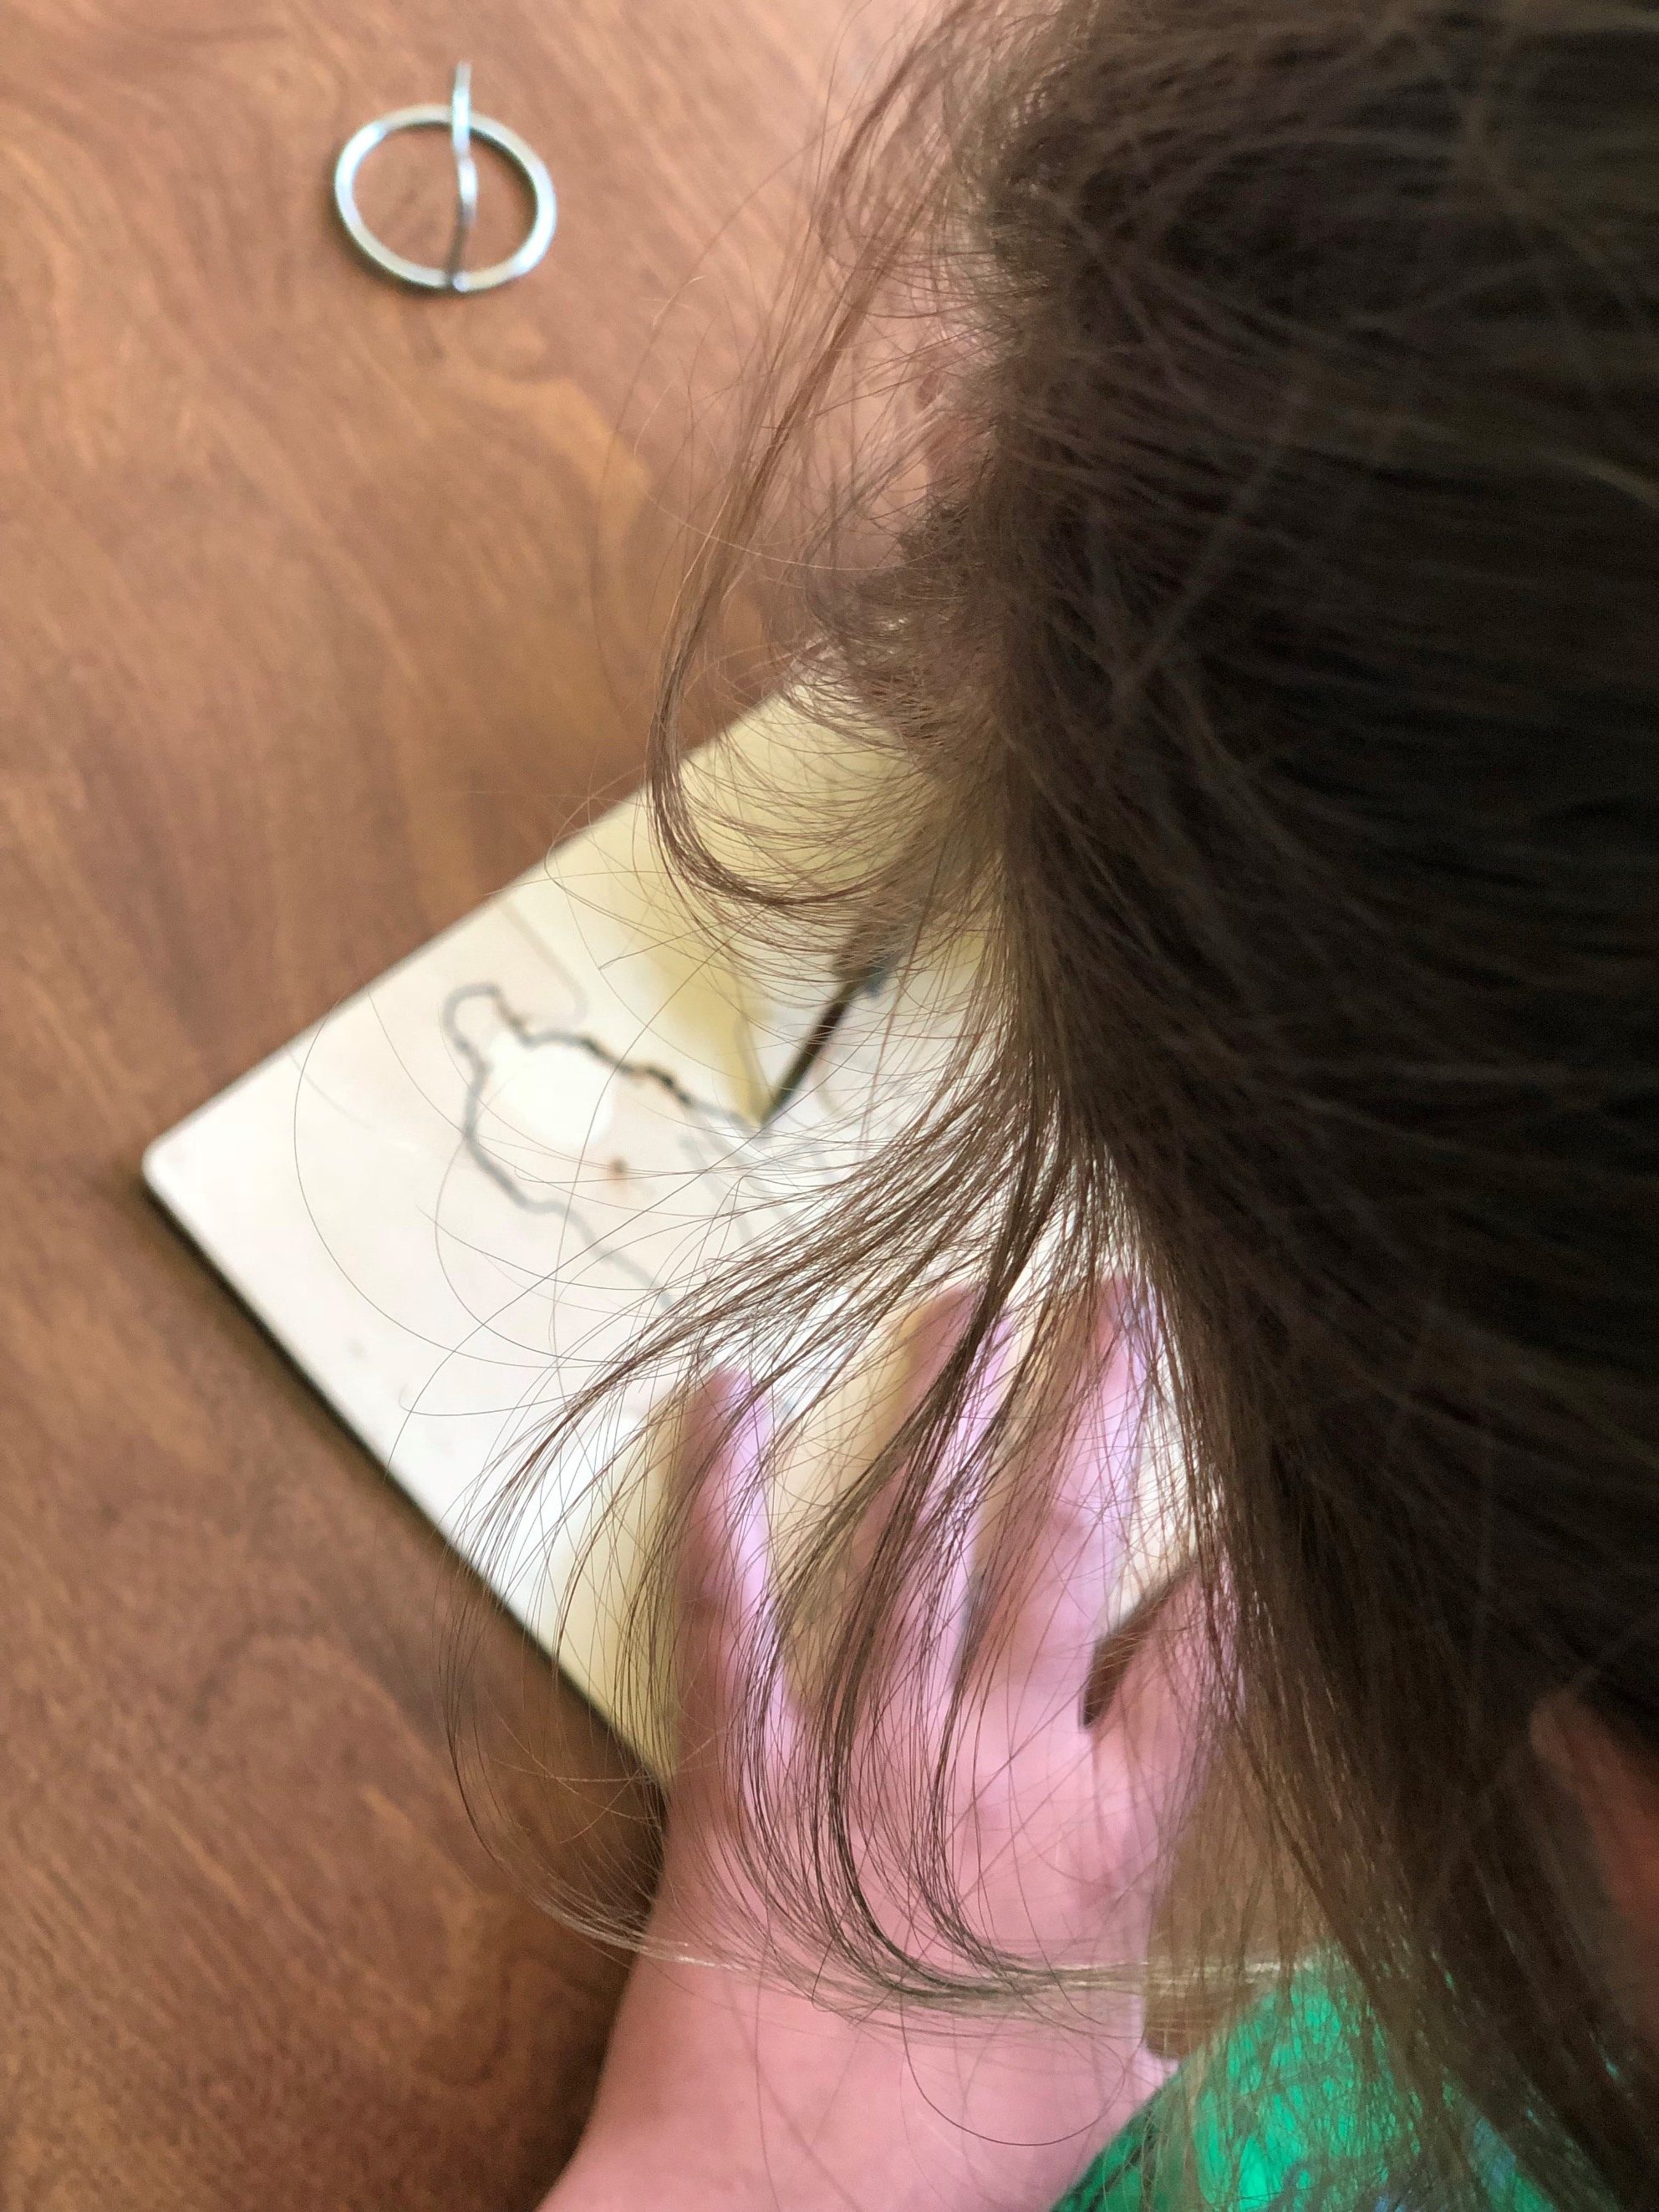
Once you have everything picked out the way you want, scale everything down to the size you need to fit the wood. Print your image out and then either you or your child can trace the image onto the wood. If you’re not sure on how to do this, check out my previous post Woodburning Tutorial. Once the image is traced, remove the carbon paper and tape. Start burning.
 |
 |
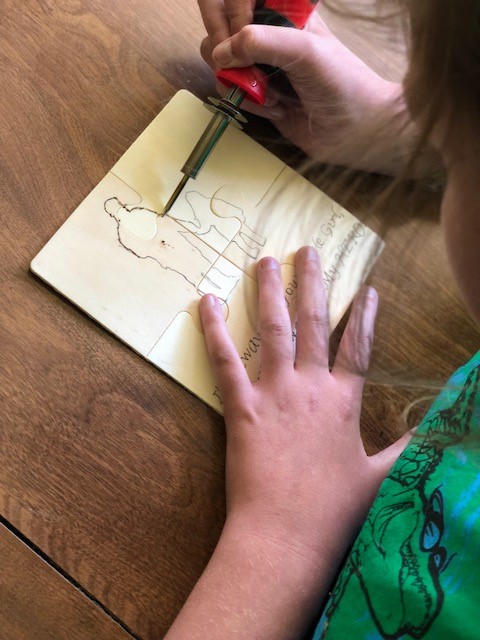
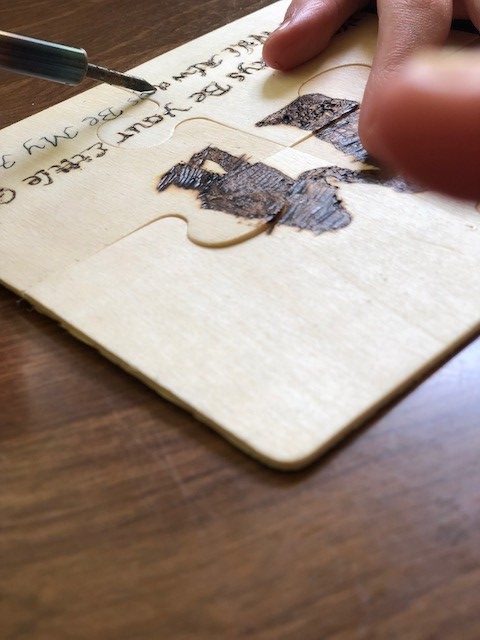
When burning, children tend to press down hard with the pen. This can cause hand cramping as well as burn splotches on the wood. If this happens, don’t worry. Remember, they are just children. Let them have fun enjoying the process and reassure them that it happens to everyone every now and then. If burn splotches do happen, this usually means the temperature is too high and needs to be adjusted. Be sure that an adult adjusts the temperature of the pen, never a child.
 |
 |
Sometimes, the grains in the wood may prevent a smooth burn for the young artist. The grains may cause some stray, crooked lines. It takes practice to learn the right pressure and heat to use while burning. Embrace the flaws. Remind the young artist to have patience. They are learning and it will get easier with time. Observe their excitement as they burn into the wood. After all, this is about having fun while learning a new art form. Occasionally, you may see some smoke come up when the pen touches the wood. This is normal. This usually happens if the pen is too hot or when it is pressed hard into the wood. Be sure that the child does not keep the pen pressed onto the wood for a length of time. With these pens, you are burning the wood so a hole can be burned through if you’re not careful.
 |
 |
As the adult, you may need to assist the child with holding the pen. It is thicker than regular pen and the child may be scared at first. That’s ok too. Safety is the main priority. Most children are nervous the first time they use a pyrography pen. Once they start burning, they usually become comfortable with the pen rather quickly and end up loving the process. Guide them, help them and supervise them. Allow them to have fun creating something unique and special.
 |
 |
 |
 |
When the burning is complete, you can give them a pen to write their name down or personalize a message.
 |
 |
Practice wood burning with your children often. You’ll be amazed at how quickly they adjust to using the pens. Be patient and know that mistakes will be made, it’s just part of the process. Always follow the safety tips and have fun.
Got any questions? Just leave them in the comments below and I’ll get to it as soon as possible.
Enjoy!
Andrea Pate
Pate’s Pyrography